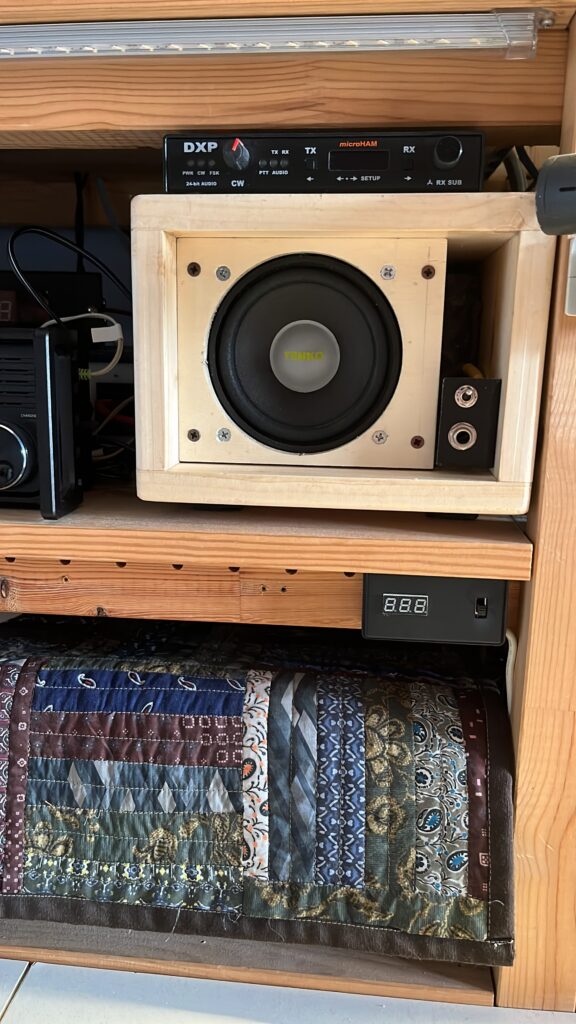
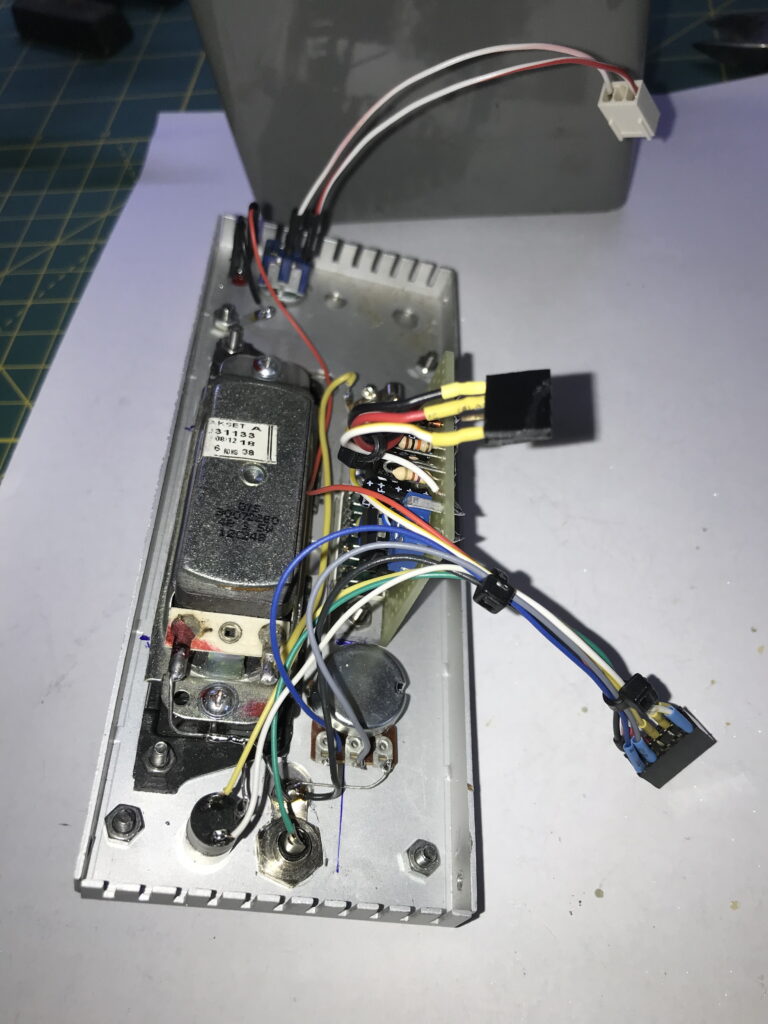
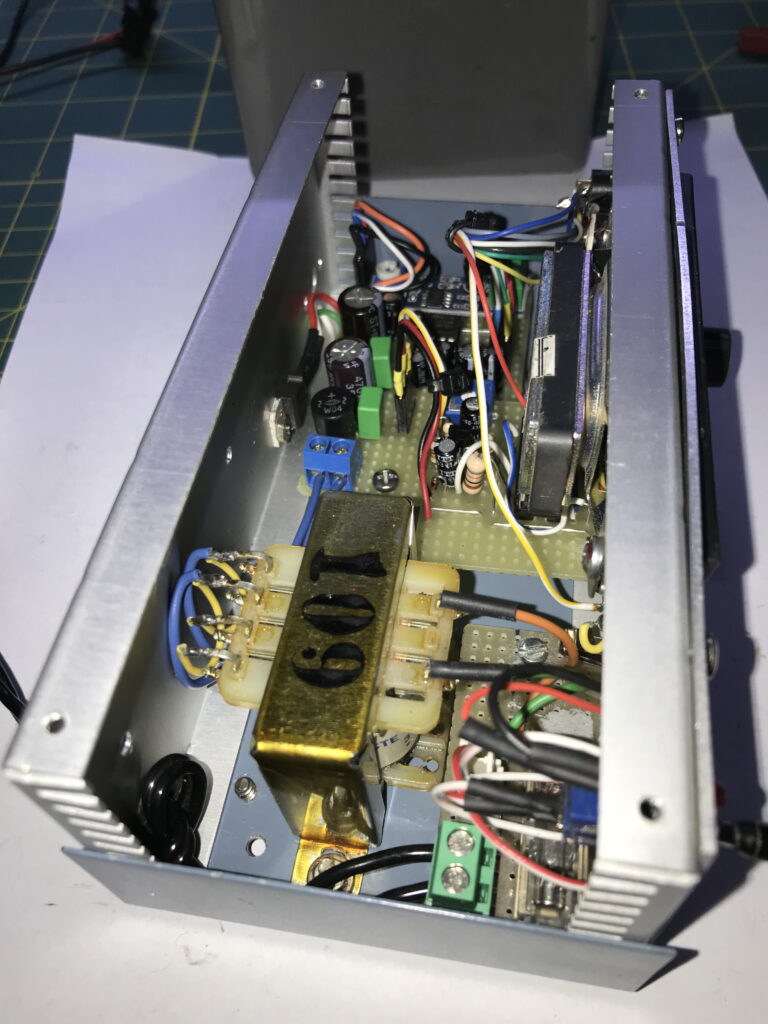
Da tempo volevo cimentarmi nella costruzione di una cassa di linea in legno Tempo fa ho trovato in un mercatino un’altoparlante da 4 pollici a poco prezzo ed ho deciso di provare a “progettare” e realizzare la mia cassa acustica di linea, praticamente un gioco spendendo poco … la tavola da 18 mm trovata dal solito brico in offerta a 6,50 euro ed essendo attrezzato per lavorare il legno ho iniziato a divertirmi
I had wanted to build a wooden case line speaker for a long time. Recently t an hamfest I found a NOS 4 inches speaker (defined as a woofer) for few bucks so I decided to start my project. In addition I found a wooden board 18 mm thick at bargain price so the cheap game could begin…so let’s try
Non avendo alcuna esperienza in materia di progettazione di diffusori acustici , mi sono affidando ad Intenet ed mediando fra le mille possibilità trovate sono arrivato ad un dimensionamento che incontrasse le mie esigenze. Francamente non mi aspettavo risultati soddisfacenti…e invece
As I have no skill in acoustic design I surfed the Internet and merging the lot of solutions I met I found the sizing I need. Of course I didn’t expect any satisying result … but I was proven wrong
Costruzione / Building
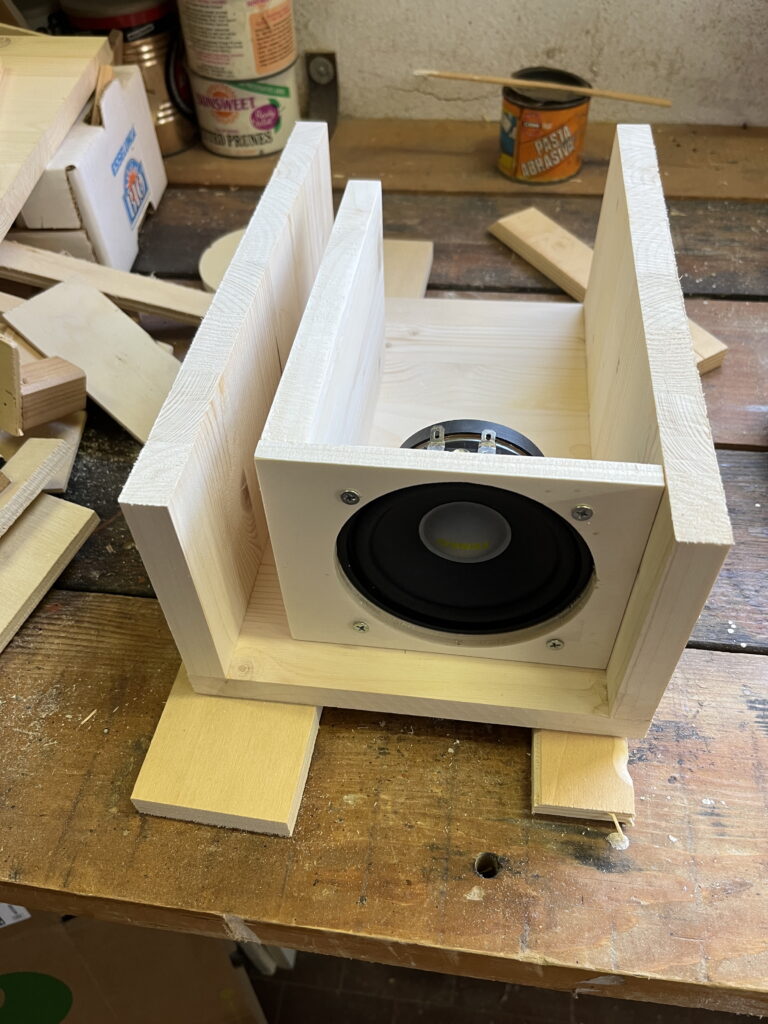
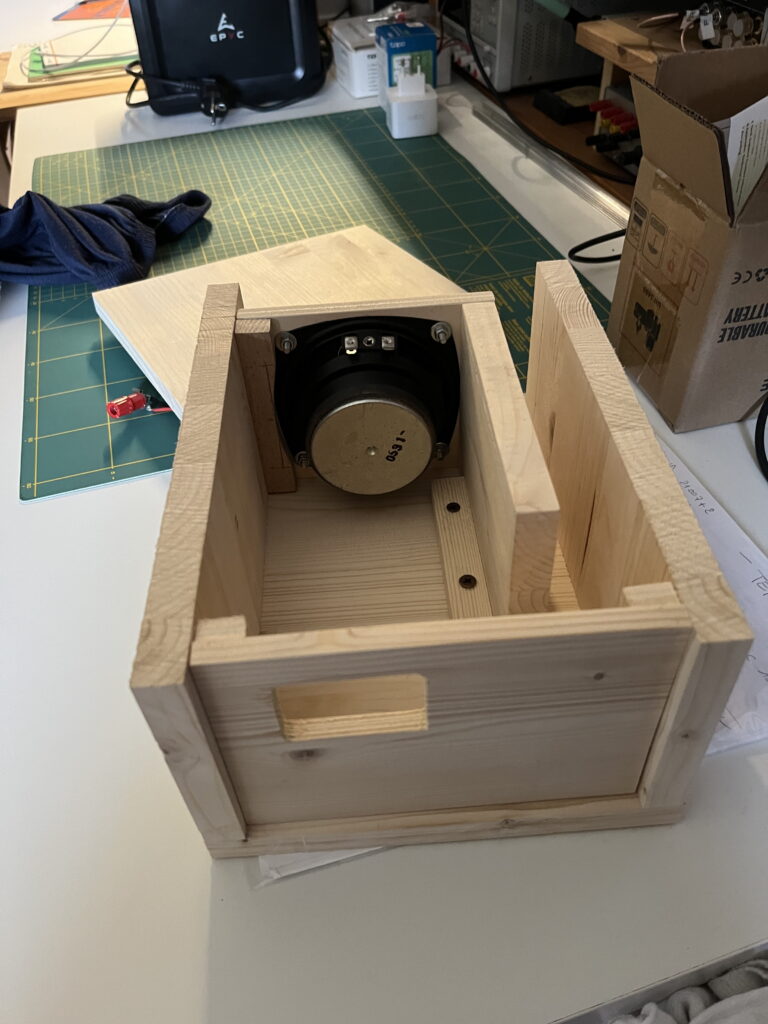
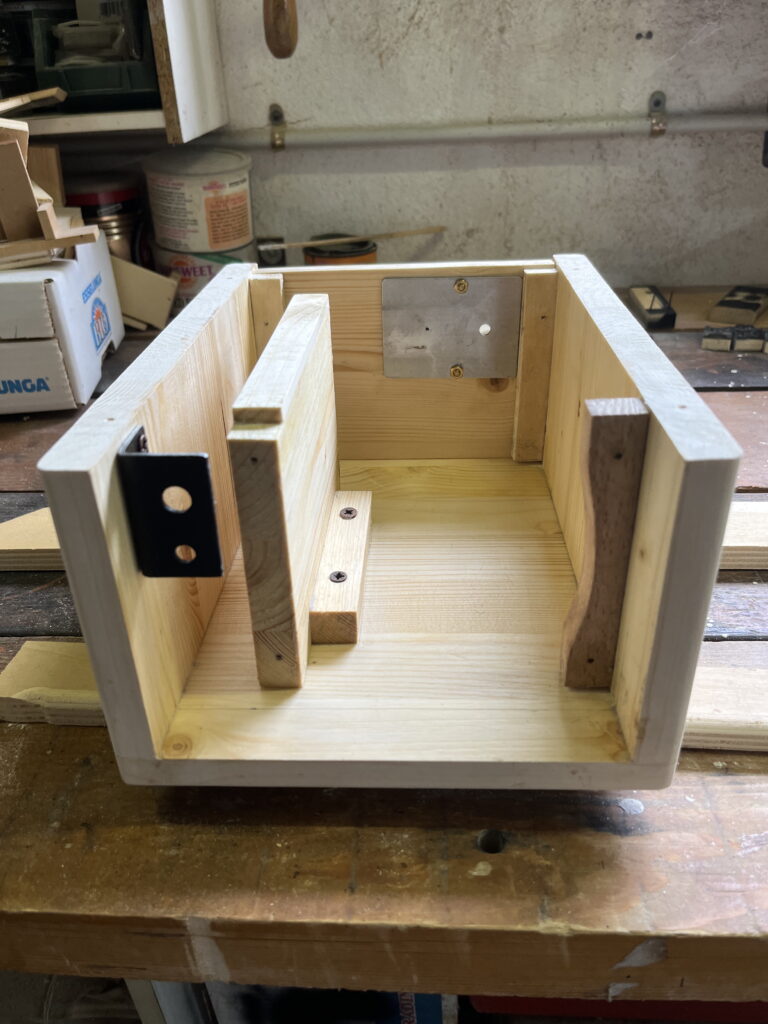
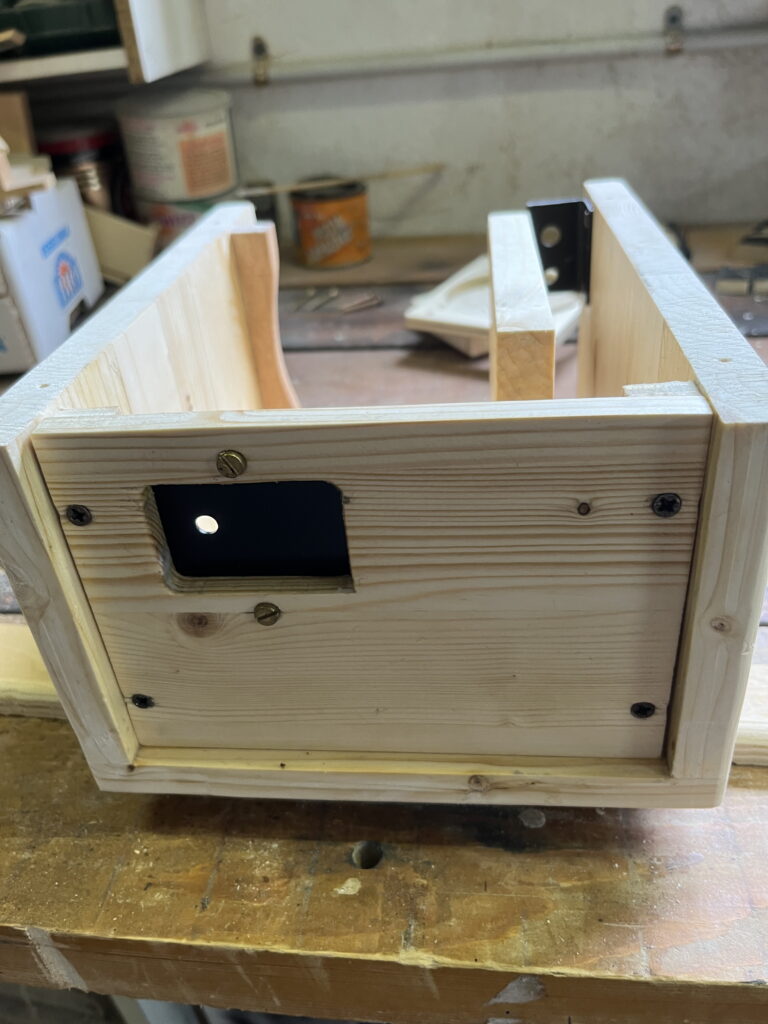
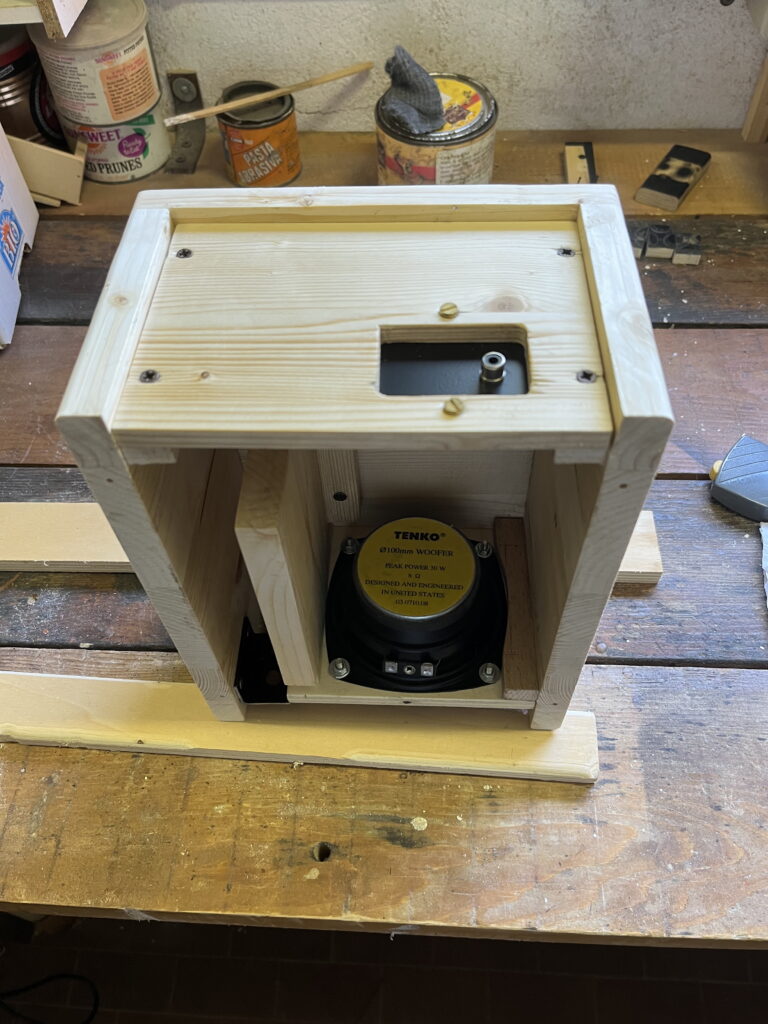
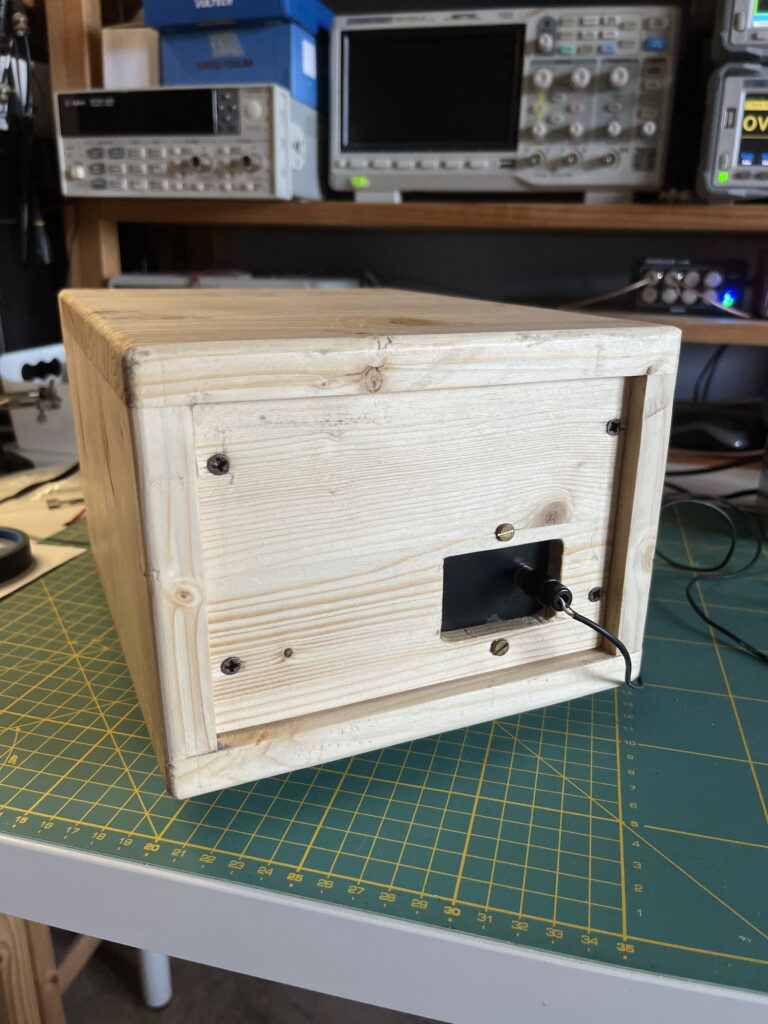
Per la costruzione ho utilizzato una tavola lamellare spessa 18 mm e del compensato da 10 mm. Nelle foto che seguono vedrete come ho assemblato le parti (ovviamente è solo una indicazione, nulla vieta di usare altre soluzioni)
To build the case I used wooden board 18 mm thick and some plywood 10 mm thick (scraps from previous projects). Here below you’ll find how I assembled the case (of course you can do it in the way you prefer)
Sul frontale ho previsto un deviatore ed un jack da 6,3 mm per la cuffia. Mediante il deviatore è possibile inviare l’audio all’altoparlante o alla cuffia (purtroppo non disponevo di un jack stereo da 6,3 mm con la commutazione da spinotto inserito). Ho aggiunto un circuito (traendo spunto da un prodotto commerciale) che garantisce un carico sull’uscita audio della radio qualora il jack cuffia non sia inserito e si cummuta su cuffia. Sono presenti anche resistenze su tip e ring del jack che hanno lo scopo di proteggere l’audio qualora si inserisca un jack mono (che metterebbe a massa il ring del jack. Questo è lo schema del circuito
On the case front I provided a 2 position switch and a 1/4 female jack for headphone. The 2 position switch lets you to send audio to speaker or to headphone (unfortunately I hadn’t a stereo jack with switching contacts operated by the jack plug). I added also a little circuit that grants rig output charge in case you switch to headphone but no headphone is in. Resistors protect from grounding ring in case you insert a mono jack plug. Here is the diagram
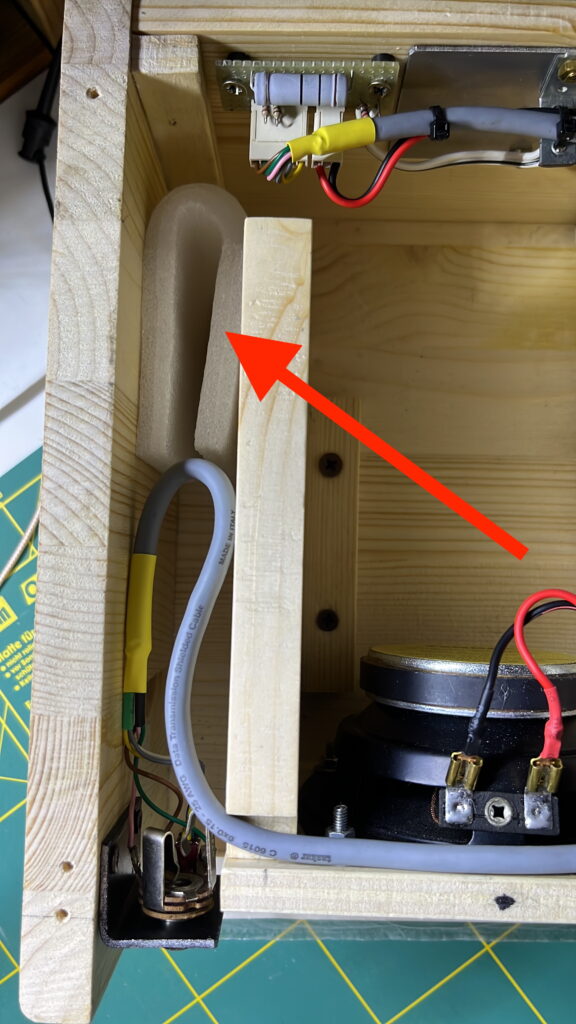
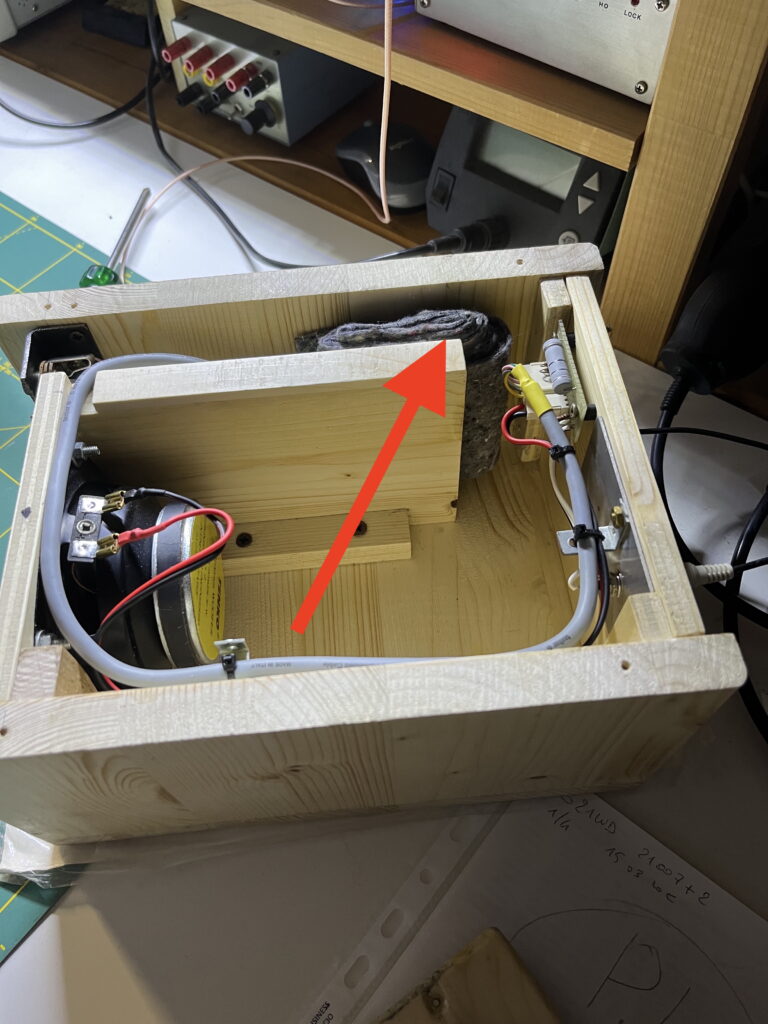
Ecco come si presenta la mia realizzazione completa del cablaggio / Here is how it looks my case with the cablinginstalled
Ed eccola completata mancante del pannello frontale in stoffa e prima dell’ultima carteggiata e della successiva lucidatura a cera / And finally line speaker is completed, it misses the front fabric cover and the latest sanding and wax finishing
Questi sono i disegni con indicate le dimensioni che ho usato io, nulla vieta di adattarle alle proprie esigenze / Here are drawings and dimensions I used to build my case. They’re for reference and not mandatory, you can adapt them to match your needs
Una volta costruita è necessaria una messa a punto finalizzata ad ottimizzare la risposta in frequenza. Io facendo solo CW mi sono focalizzato sul segmento 500-1000 Hz. Per questa operazione è stato fondamentale l’utilizzo di questo programma gratuito e multipiattaforma. In pratica ho posizionato il mio MacBook a 50 cm dalla cassa (chiusa col suo coperchio) in modo che attraverso il suo microfono ascolti i suoni in uscita dalla cassa ed ho collegato l’scita cuffia del MacBook all’altoparlante. Chiuso poi in religioso silenzio per non alterare la misura ho proceduto. Qui il programma che ho usato
Once built you need to optimize the frequency responce. As I operate only CW I payed attention to 500-1000 Hz segment. To tune my line speaker I used a free software that’s available for Win-Mac-Linux. To do measures I placed my MacBook at about 50 cm from the speaker (of course with the bottom cover mounted) so MacBook internal microphone listen to my line speaker sound. MacBook audio output was used to drive the line speaker. Then with no noise in the room (wife for example HI) you can start with measures. Here below the software I used:
La prima misura non è stata soddisfacente perchè c’era un “buco” intorno ai 700 Hz. Non disponendo delle necessarie conoscenze tecniche ho dovuto procedere per tentativi aggiungendo pezzi material fono assorbente. Ogni volta toglievo il coperchio inferiore, posizionavo il fonoassorbente, richiudevo la cassa ripetevo la misura (lasciando il MacBook fermo e mettendo la cassa sempre nella stessa posizione)
First measure result was depressing ! There was an “hole” at around 700 Hz. As I have no skill I tried some temptatives by adding some sound-absorbing blocks inside the case. For each temptative I uncovered the case, placed block in a certain position, close the case and perform measurement. In these steps the MacBook and the line speaker were left always in the same position (otherwise measures are different)
Al primo tentativo qualcosa è migliorato ma non ancora soddisfacente ed a poco è servito spostare il fonoassorbente lungo il canale
At first temptative something was improved, but still not statisfying me. Moving the block along the air duct didn’t pay
Successivamente ho trovato la soluzione che portava la risposta in frequenza come volevo io usando un tampone di ovatta e spostandolo lungo il canale fino a trovare la risposta desiderata
After several temptatives I used a wadding block and moving it along the air duct I found the frequency response I was looking for.
Questo è il risulato della misura / Here is the result
C’è un “buco” a 430 Hz ma non mi crea problemi e fino a 2,5 KHz l’andamento per me è più che accettabile / There’s still an “hole” at about 430 Hz but it doesn’t matter for me and response is good until about 2,5 KHz, more than acceptable for me
Ora è in uso corrente ed èla cassa che uso per l’uscita Main del mio 7610 / Now it’s my 7610 main receiver companion
July 1st 2026 – Added reference to “My shack integration” article
May 5th 2026 – “Telegram setup” paragraph: added clarification about running Node Red on a network computer different from the Mac hosting RumLog
May 2nd 2026 – First issue
RumLog (come la gran parte dei logger) permette di definire filtri in modo che sulla finestra del cluster vengano mostrati gli spot che abbiamo scelto di ricevere ad esempio perchè ci manca la conferma di quel country. Naturalmente solo il nostro logger può farlo perchè conosce il nostro log e per ciascuno spot in arrivo applica i filtri che abbiamo impostato e popola di conseguenza la nostra finestra del cluster evidenziando se per quel country o banda o modo abbiamo già la conferma.
Like many other loggers RumLog cluster feature offers the possibility to set several filters in order to show for example calls from a country we need. Of course only our logger can do this because it knows our log so at any incoming spot he queries the log and check if that spot matches a filter we set and acts accordingly and inform us if that country/band/mode we already have the confirmation.
Ovviamente è necessario essere davanti al monitor per vedere la finestra del cluster. Il mio desiderio era invece essere avvisato di uno spot interessante anche quando sono lontano dallo shack. Ho quindi cercato un modo per ricevere su Telegram un messaggio quando viene spottata una stazione di mio interesse (perchè non ho la conferma del country o della banda o del modo).
Obviously we must to be in front of the screen to see the cluster window. My goal was to be alerted even when I’d be far from the shack. For this reason I tried to find a way to get a Telegram message as soon as a spot coming from a country I need appears on the cluster
In questo articolo farò riferimento esclusivamente a RumLog, ma il principio di funzionamento credo sia adattabile (con le opportune modifiche) anche ad altri logger dal momento che RumLog (come fanno anche altri logger) propaga le informazioni del cluster in formato N1MM sulla LAN attraverso il protocollo UDP.
In this article I’ll strictly refer to RumLog, but I think the concept can be adapted (with appropriate modifications) also to other loggers because RumLog sends cluster info in N1MM format over Udp protocol (like several other loggers do)
Questo progetto è parte della mia integrazione di stazione. A questo indirizzo troverete la descrizione dettagliata / This project is part of my shack integration. At this URL you’ll find its concept and the detailed description
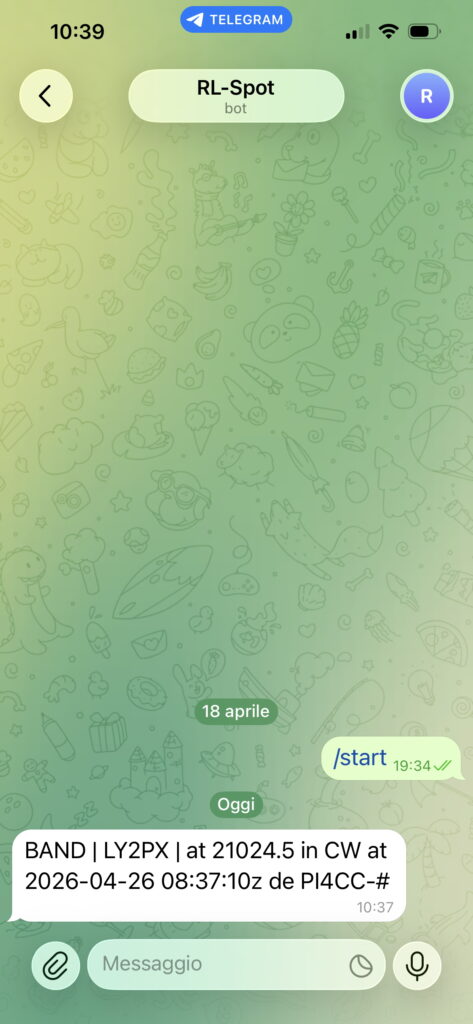
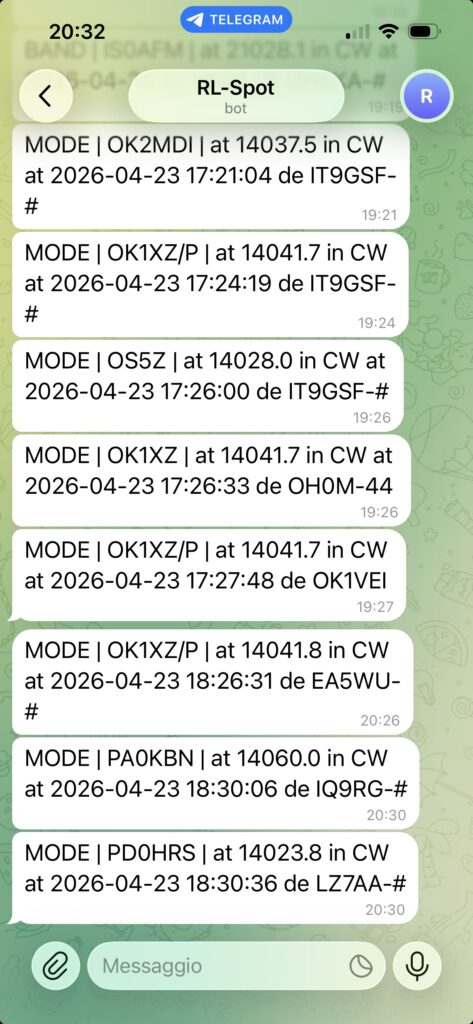
Messaggio ricevuto su Telegram/ Telegram incoming message
Il cluster di RumLog / RumLog cluster
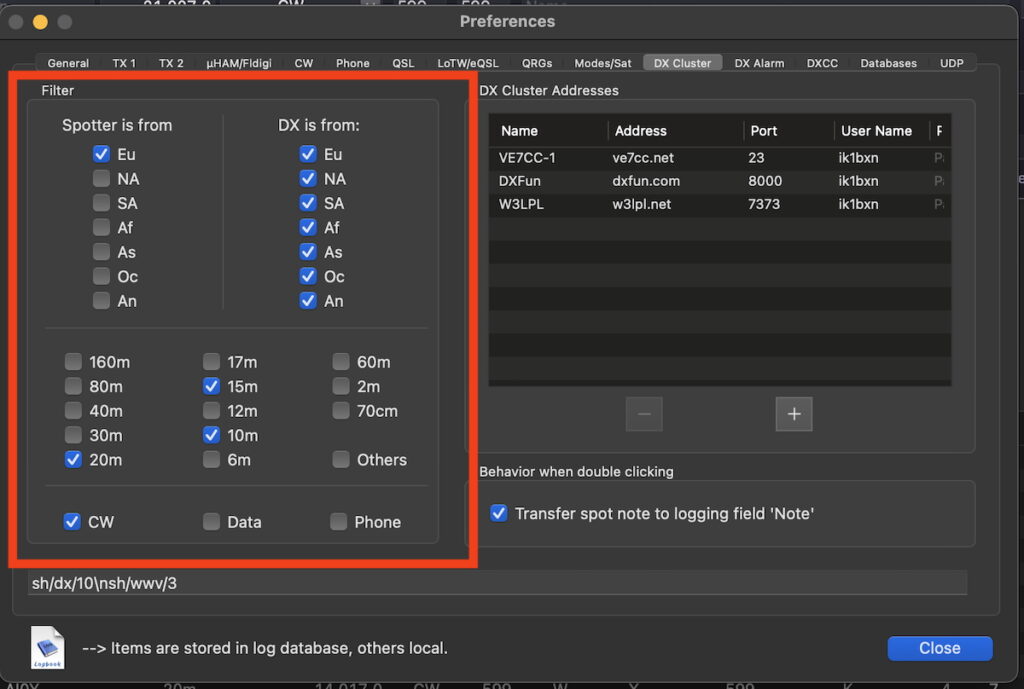
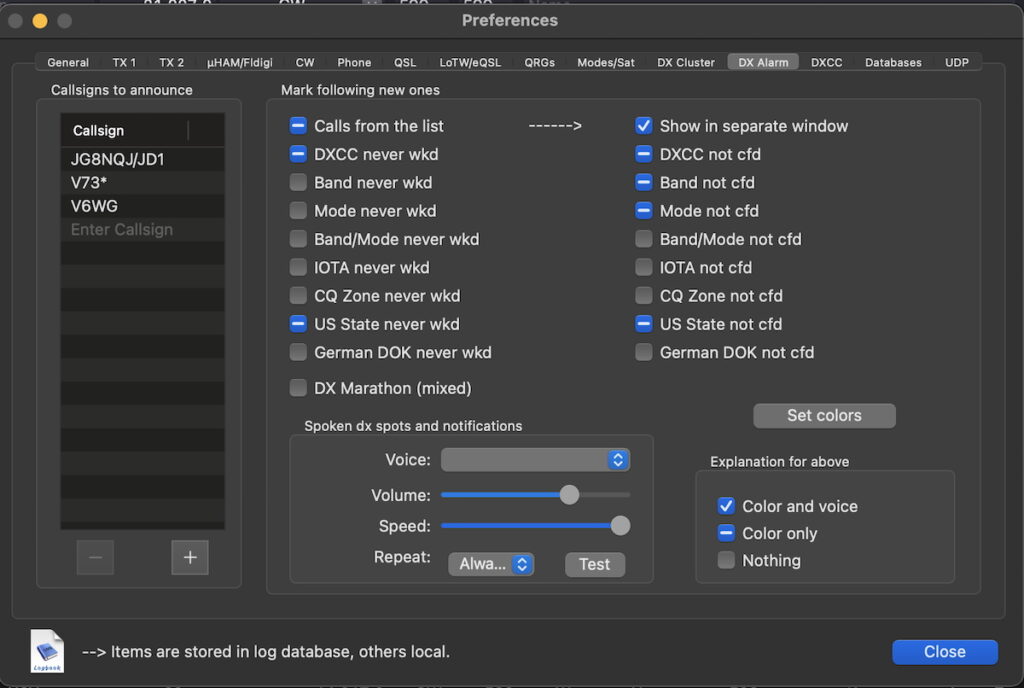
RumLog ha una finestra di configurazione del Cluster nella quale possiamo selezionare quali spot ci interessa visualizzare nella finestra del cluster. I filtri qui selezionati verranno utilizzati per costruire il pacchetto UDP che RumLog invierà sulla nostra LAN.
In RumLog there’s a Cluster configuration panel where we can set spots we’re interested in. Filter here set will define the spot set RumLog will send over Udp, into other words spots not matching these filter will not be sent over the LAN
RumLog inoltre offre ulteriori possibilità di configurazione degli allarmi che però impattano solo sulla finestra locale del cluster
Furthermore RumLog let you to set additional filtering criteria but they only affect the local RumLog cluster window
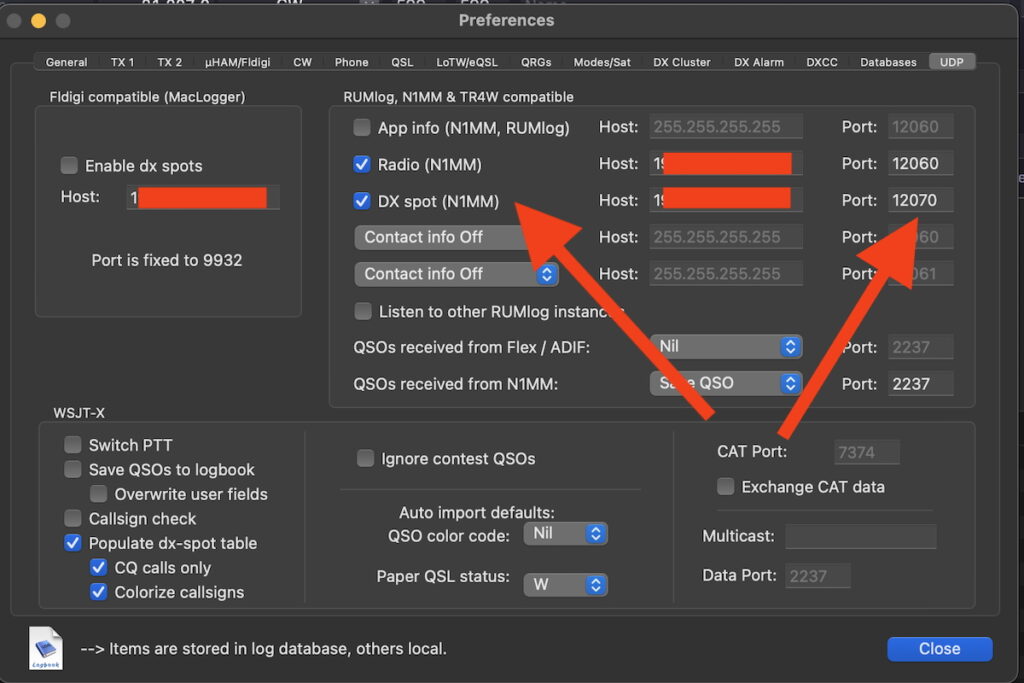
Una volta impostati i filtri è necessario attivare l’invio su UDP degli spot
Once the filter are set you’ve to activate Udp DX spot sending
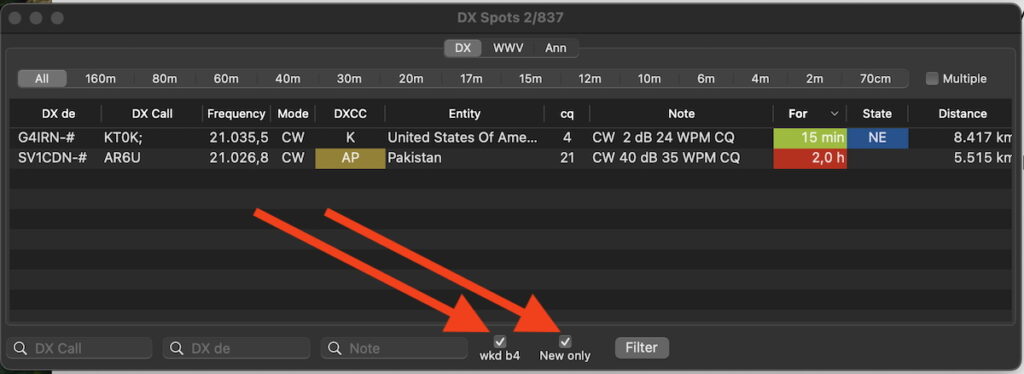
Oltre ai filtri sopra mostrati nella finestra del cluster di RumLog è possibile agire sui filtri, ad esempio nell’immagine qui sotto voglio visualizzare solo spot relativi a countries che mi mancano (“New only” marcata) ed escludo dalla visualizzazione i callsign che ho già a log (“wkd b4” ovvero “worked before” marcata). Tutto questo però riguarda le finestre di RumLog a video in quanto i dati inviati via UDP continueranno a mantenere la loro struttura indipendentemente da queste scelte.
Just to give a complete sight, in RumLog cluster window you can when “in session” decide to restrict spots list (in addition to filters set in Cluster configuration above discussed) to “New only” and/or “Worked before. Here below my daily setting. As above stated even these selections will not affect the “DX spot” sending via Udp
Il formato degli spot inviati da RumLog via UDP/ Structure of RumLog Udp spots sending via Udp
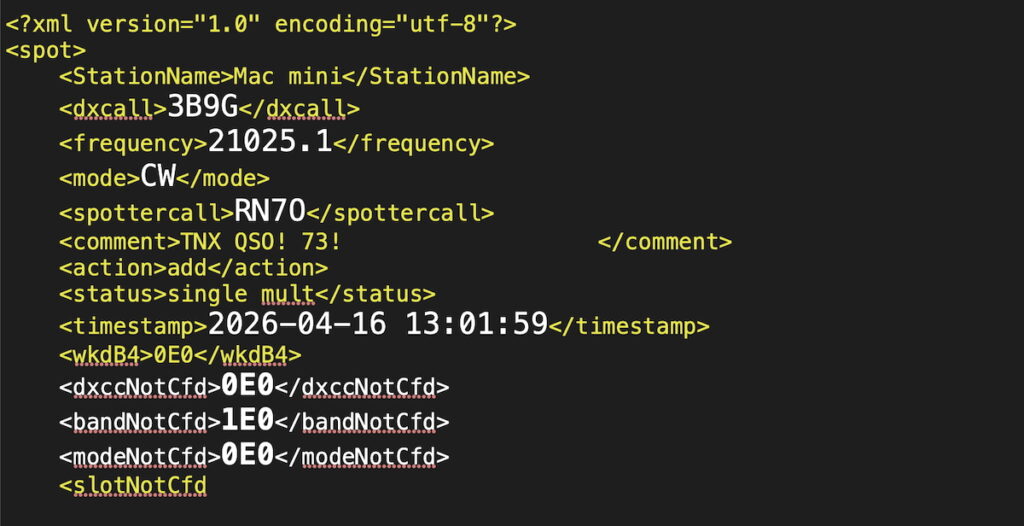
A questo punto sulla porta Udp 12070 (nel mio caso) RumLog invierà le informazioni degli spot che superano i filtri impostati ed il pacchetto inviato è di questo tipo:
Now we have RumLog sending spots over Udp (port 12070 in my case) and for each spot matching filter condition we receive this kind of message
In questo messaggio troviamo Call,Qrg,Modo,Spotter,Data ed Ora. In aggiunta RumLog ha controllato il log per il country relativo al call 3B9G e ci dice anche (vedi campi dxccNotCfd-bandNotCfd-modeNotCfd) che per questo country in questo modo abbiamo già ricevuto la conferma ma ci manca la conferma di banda (infatti io 3B9G ce l’ho a log in 20m Cw)
In the above message we find Call, Qrg, Mode, Spotter, Timestamp. RumLog for this incoming spot checked my log for (in the example) 3B9G country (Rodriguez Island) and discovered that I have country confirmed only in 20m CW (I filtered spots only in CW and only for some bands) but I miss confirmation in 15m (current spot Qrg is for 15m). So in the message we can see that dxccNotCfd is False (0E0), bandNotCfd is True (1E0), modeNotCfd is False (0E0)
queste informazioni sono quelle che ci servono per alimentare gli switches dei criteri della Dashboard
these info are just what we need to feed Dashbord criteria switches
Elaborazione degli spot inviati da RumLog / RumLog Udp spot processing
Per prima cosa dobbiamo ascoltare la porta Udp sulla quale gli spot vengono inviati e con un minimo di elaborazione trasformarli in un messaggio che sarà inviato sul nostro Telegram.
First of all we need to listen to the Udp port RumLog uses to send spots, then with a simple process we will transform each of them in a message that will be sent via Telegram
Per questa attività ho utilizzato Node Red, un’ambiente di sviluppo molto intuitivo con un’approccio grafico. Node Red è multipiattaforma (Windows, Mac e Linux) e pubblica l’applicazione che abbiamo sviluppato su una Dashboard che si raggiunge col browser. Questo garantisce una grande fruibilità e portabilità, ad esempio se il nostro Node Red gira su un pc con Linux noi potremo interagire con un browser da un pc windows o un telefonino.
To do this job I’ve choosen “Node Red” that’s a development enviroment very intuitive with a graphic approach. Node Red is multi-platform (Windows-Linux-Mac) and consist of two main “bricks” based on web pages one is the workspace and the second one is the “dashboard” that’s the graphic user interface. This kind of this architecture grants flexibilty and portability, in fact we can have the Node Red “server” running on a Linux machine and we can interact with it from a Windows computer or a mobile device….only a browser is required
Node Red è molto diffuso ed in rete si trova molta documentazione. In Node Red le applicazioni che sviluppiamo vengono chiamate “Flow” e la programmazione consiste nel collegare tra loro graficamente “mattoni” che svolgono funzioni e sono chiamati “Nodi”. Naturalmente esistono nodi nei quali si può programmare uno di questi è il nodo chiamato “function” (nel mio flow ne troverete qualcuno.
Node Red is very widespread and very much documentation can be found in the Internet. In Node Red what we design is named “flow” and coding consists in to place the functional blocks (called “nodes”) we need and connect them with some “wires”. Of course there are some nodes for example a node named “funcion” in which you can code as usual (here in my flow you’ll find some)
Per installare Node Red fare riferimento a questo sito https://nodered.org/docs/getting-started/local ed in particolare in funzione del proprio sistema operativo alle indicazioni riportate in alto
To install Node Red please refer to instructions you’ll find here https://nodered.org/docs/getting-started/local and depending on which operating system you’re runningopen the link indicated by red arrows
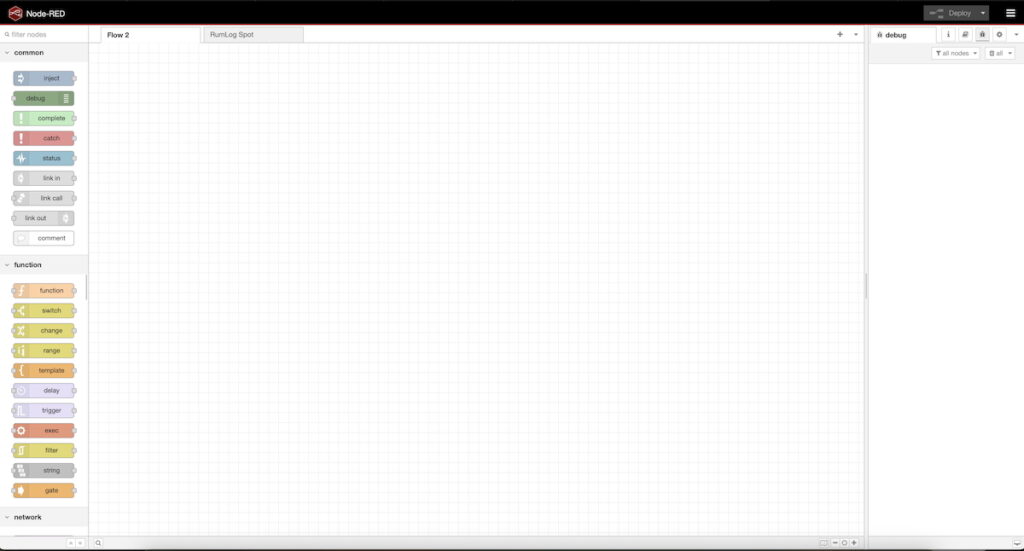
Con Node Red installato e in esecuzione col nostro browser aprendo l’indirizzo: http://127.0.0.1:1880 ci troveremo nella pagina di Node Red, ovviamente vuota
Once Node Red installed and running by opening your browser at this address (assuming your Node Red is running on the computer hosting RumLog) http://127.0.0.1:1880 you will meet the Node Red workspace (empty of course)
Download e importazione del mio flow/ My flow Download and Import
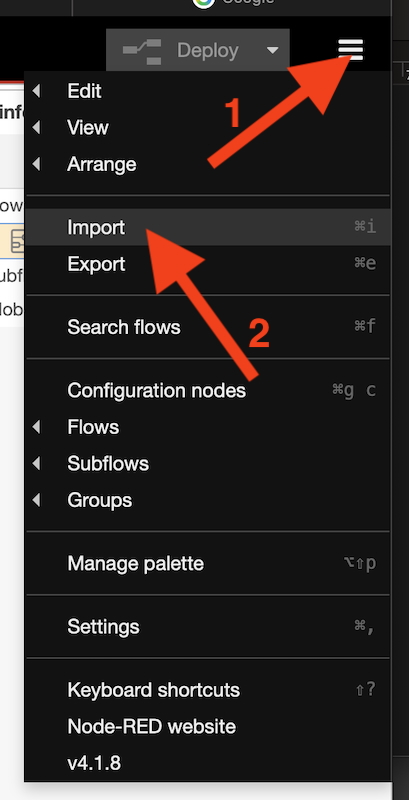
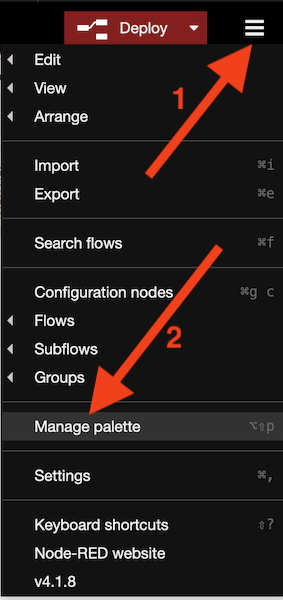
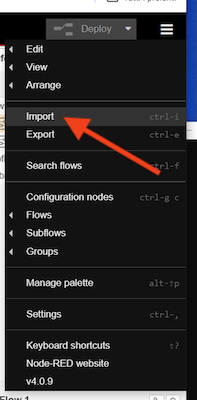
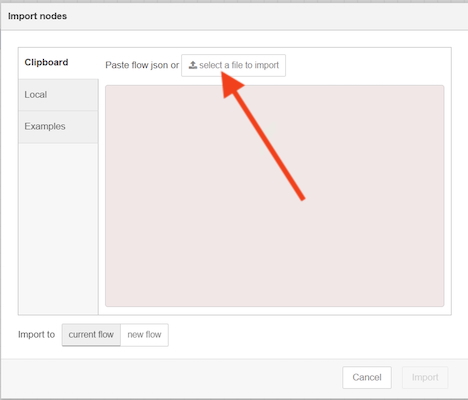
Dalla pagina di Node Red cliccare come da freccia 1 poi 2 / From Node Red workspace in the top right corner click as indicated by red arrow #1 and then click Import as per red arrow #2
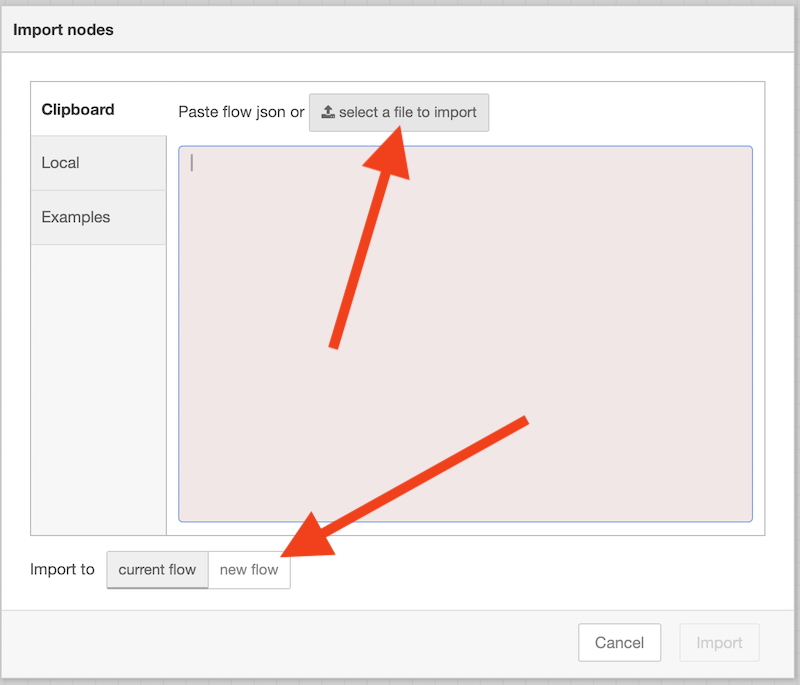
nella finestra selezionare “new flow” e cliccare “Select a file to import” / a window will appear, select “new flow” and “select a file to import”
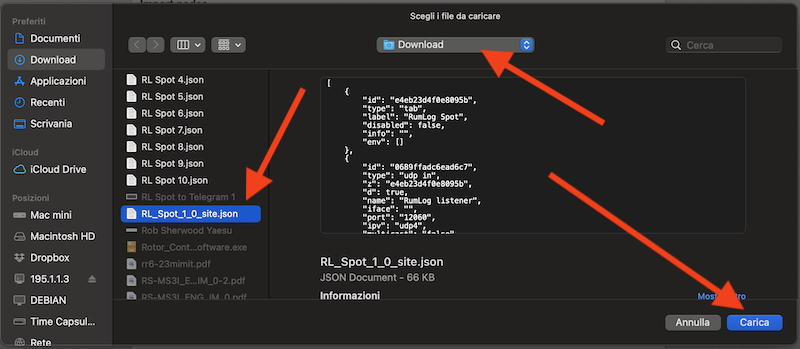
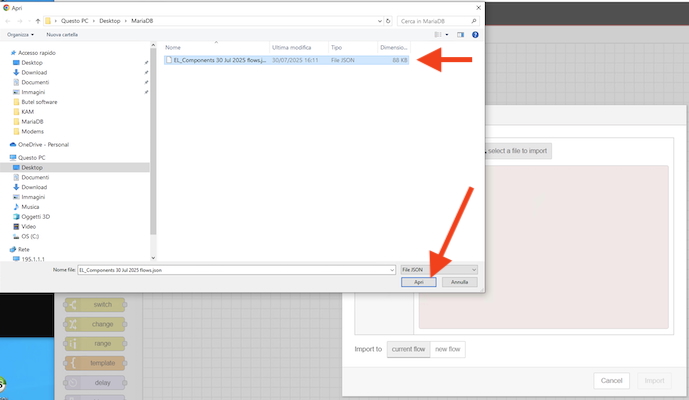
ora navigate nella cartella dove avete scompattato il mio flow, selezionatelo e premete “Carica” / navigate now to the folder in which you unzipped the file you downloaded and select that file then press “Load”
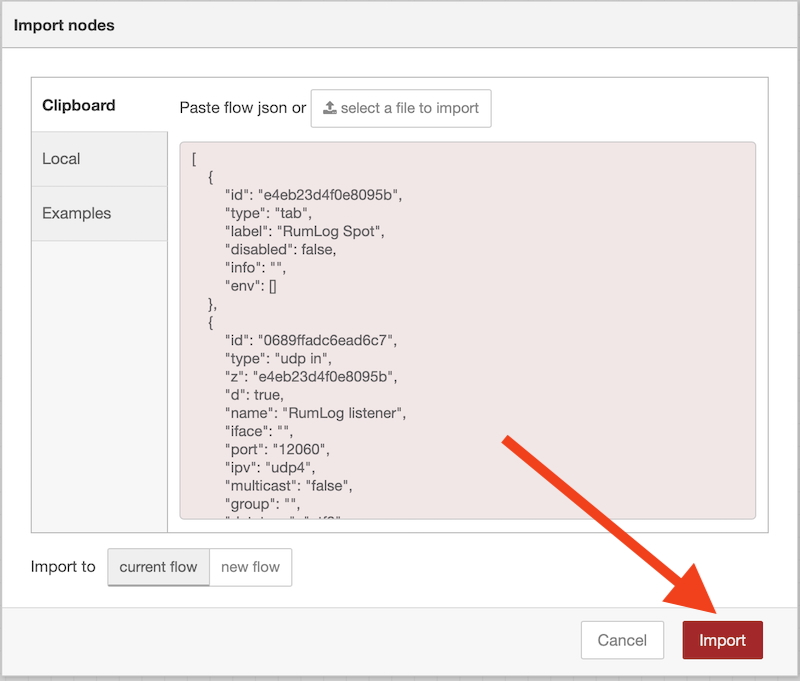
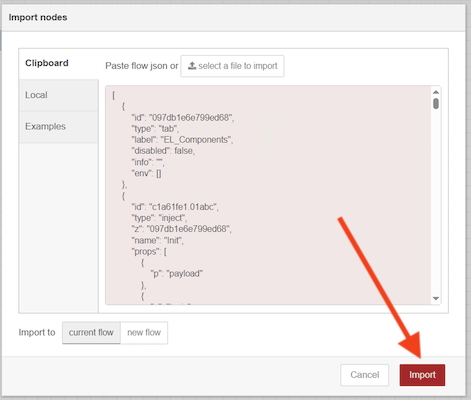
nella finestra che si apre premete “Import” / in the window press Import
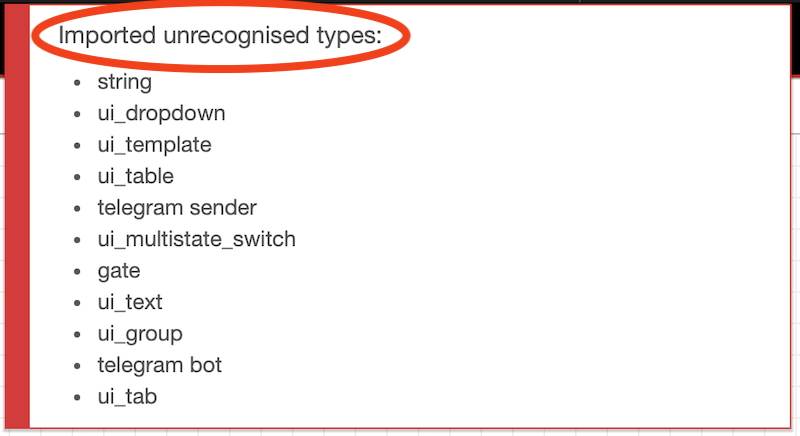
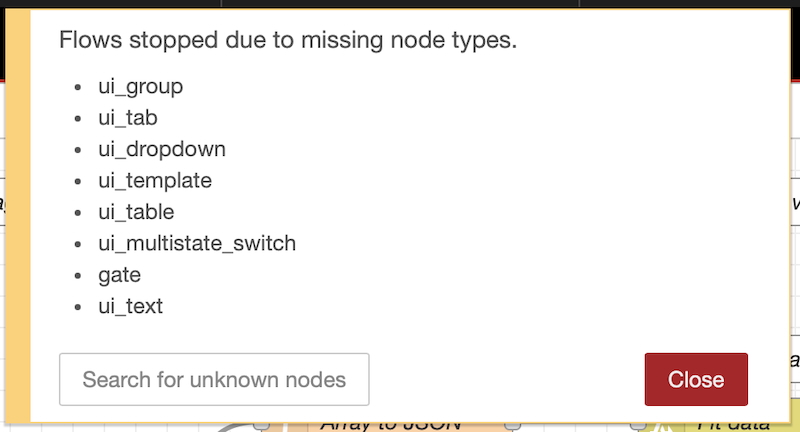
verrà visualizzato questo messaggio / you’ll get this message
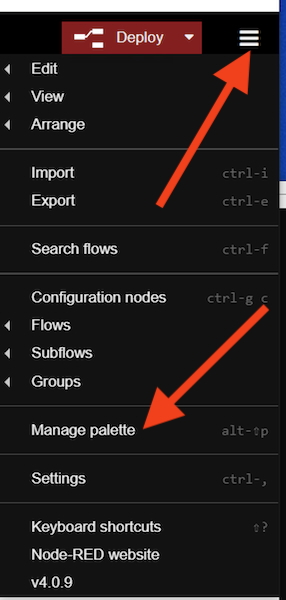
che significa che nel mio flow sono usati “nodi” non installati su Node Red, questo perchè l’installazione di Node Red installa un set di nodi basilari / this means that in my flow there are nodes that your workspace doeasn’t recognize. This is normal because Node Red installation install a basic node set
Aggiunta dei nodi mancanti/ How to add missing nodes
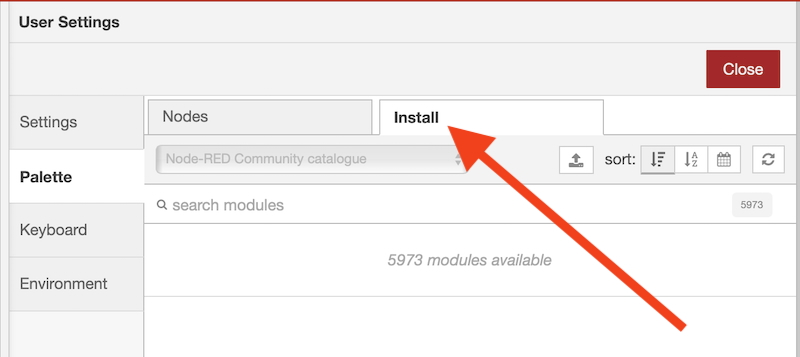
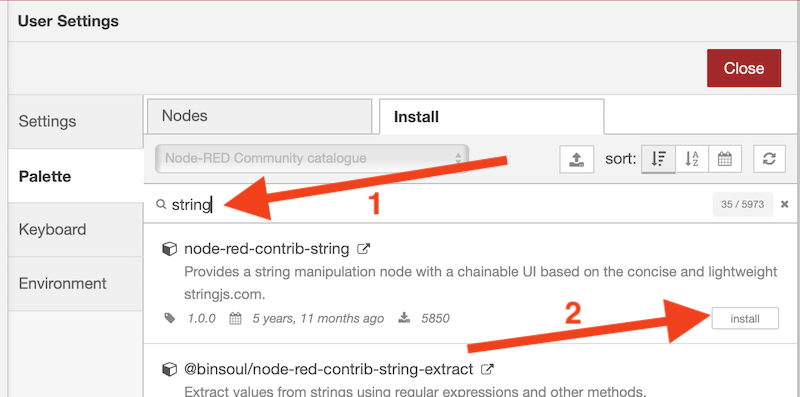
Step 1
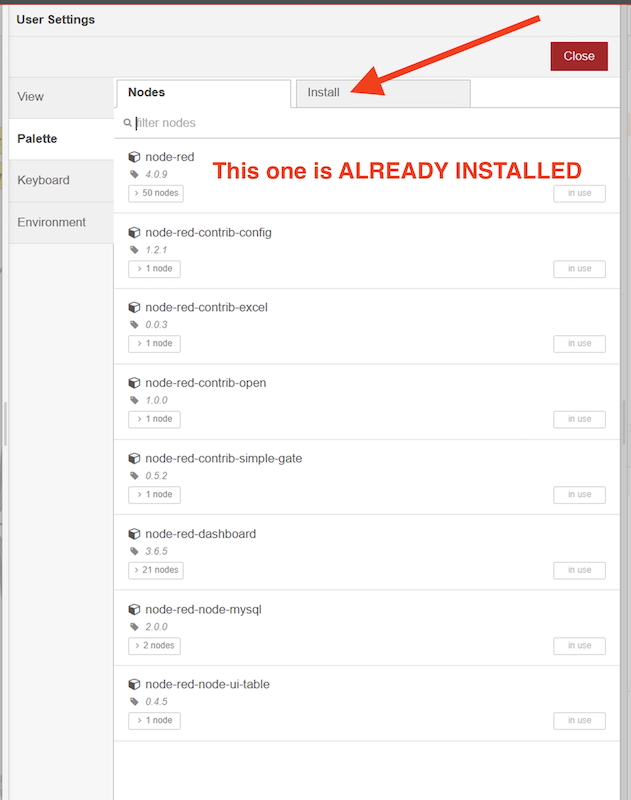
verrà aperta questa pagina, clicchiamo su Install / in this window choose Install
Step 2
e nel campo di ricerca digitiamo il nome di uno dei nodi mancanti (nell’esempio il nodo “string”) e premiamo invio. Apparirà una lista di “nodi” che contengono il nome “string” ma quello che interessa a noi è il primo quindi premiamo “Install”.
in the search field (lens) type the name of one of the missing nodes above shown (in the example the node named “string”) and press Enter. A list of available nodes containing “string” in their name will appear. The one we need is the first listed (node-red-contrib-string) so let’s press Install
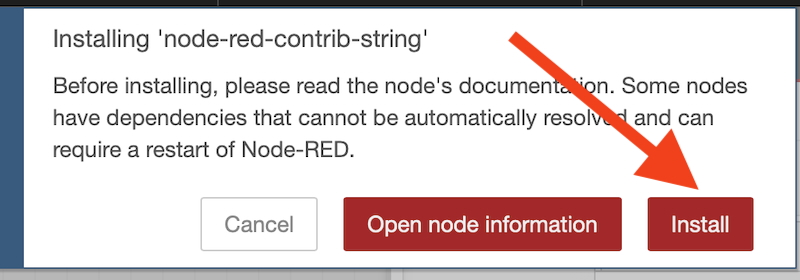
a questo punto un messaggio ci chiederà di confermare l’installazione quindi premiamo “Install” / A message will ask us for confirmation, so press Install
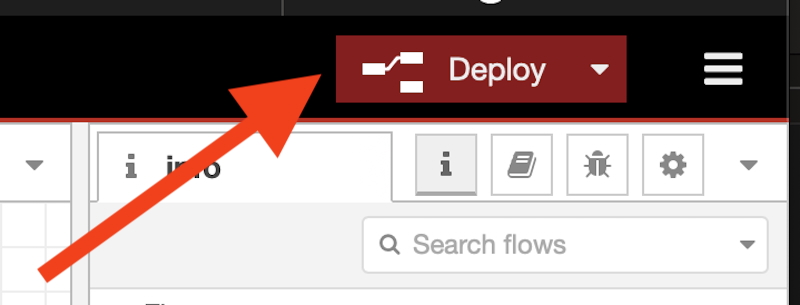
ora facciamo il “Deploy” e osserviamo che il nodo “string” non figura più nell’elenco dei nodi mancanti / now let’s apply modification by pressing Deploy button. If we correctly add the “string” node it will disappear from the missing nodes list
Nota: Deploy corrisponde a salvare la modifica, quindi TUTTE le volte che qualcosa nel flow verrà cambiato occorre fare il Deploy
Remark: Deploy means “apply modifications” and it MUST be performed any time you touch something in a flow
Step 3
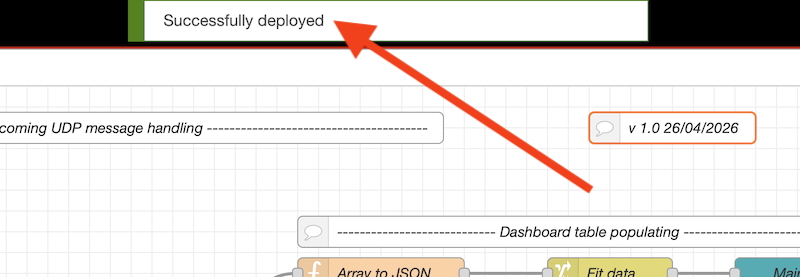
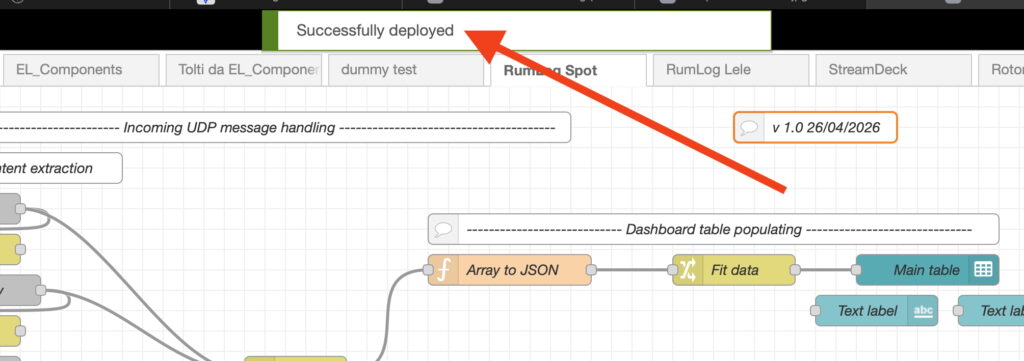
ma mancano altri altri nodi ! Ripetiamo i passaggi da Step 1 a Step 3 per tutti i nodi mancanti. Quando li avremo aggiunti tutti eseguendo il Deploy riceveremo il messaggio “di OK “Succesfully deployed”
as expected “string” node is no longer listed, but some other nodes are still missing. Repeat from Step 1 to Step 3 for all missing nodes. When we will have all missing nodes installed doing Deploy we’ll get message “Succesfully deployed”
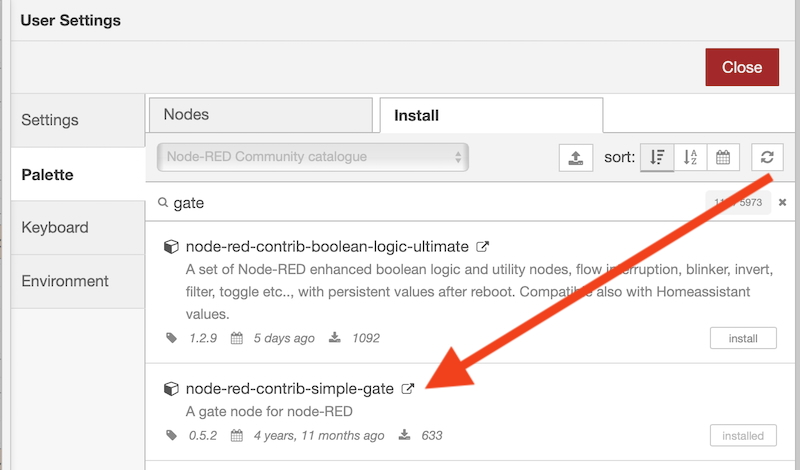
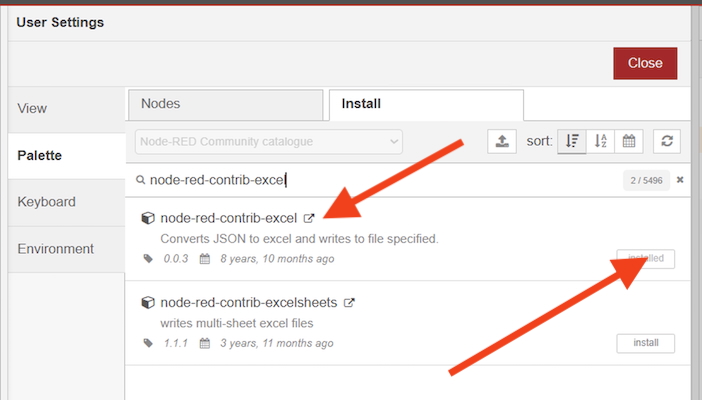
Nota: per il nodo “gate” va installato questo
Remark: about the “gate” node you must choose this one
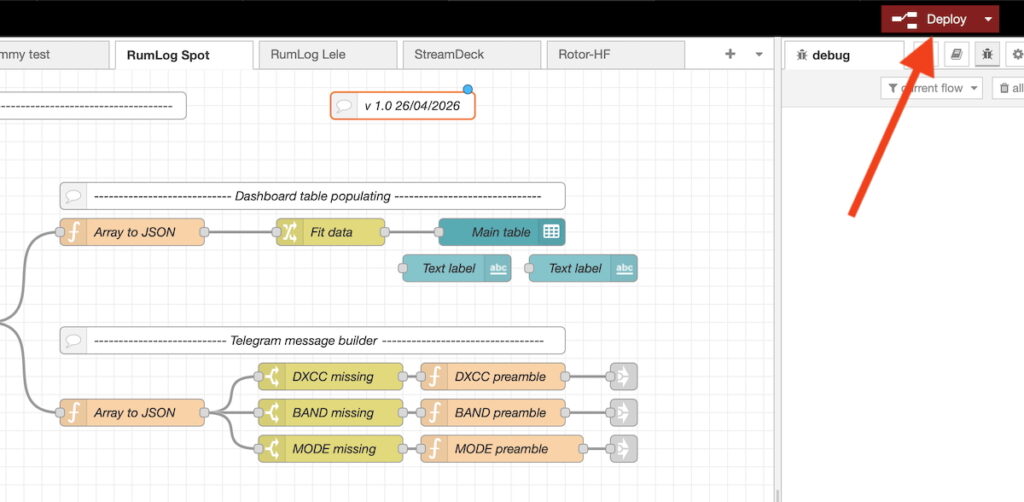
Tip: se il pulsante Deploy non fosse attivo basta spostare un nodo qualsiasi (ad esempio quello dove sono indicate versione e data) e così facendo Node Red si accorgerà di una modifica ed attiverà il pulsante Deploy che diventerà rosso
Tip: if Deploy button was grayed drag (just a bit) a node (for example the one that indicates version and date) by doing this Node Red will notice a modification and it will activate again the Deploy button
Come funziona/ How it works
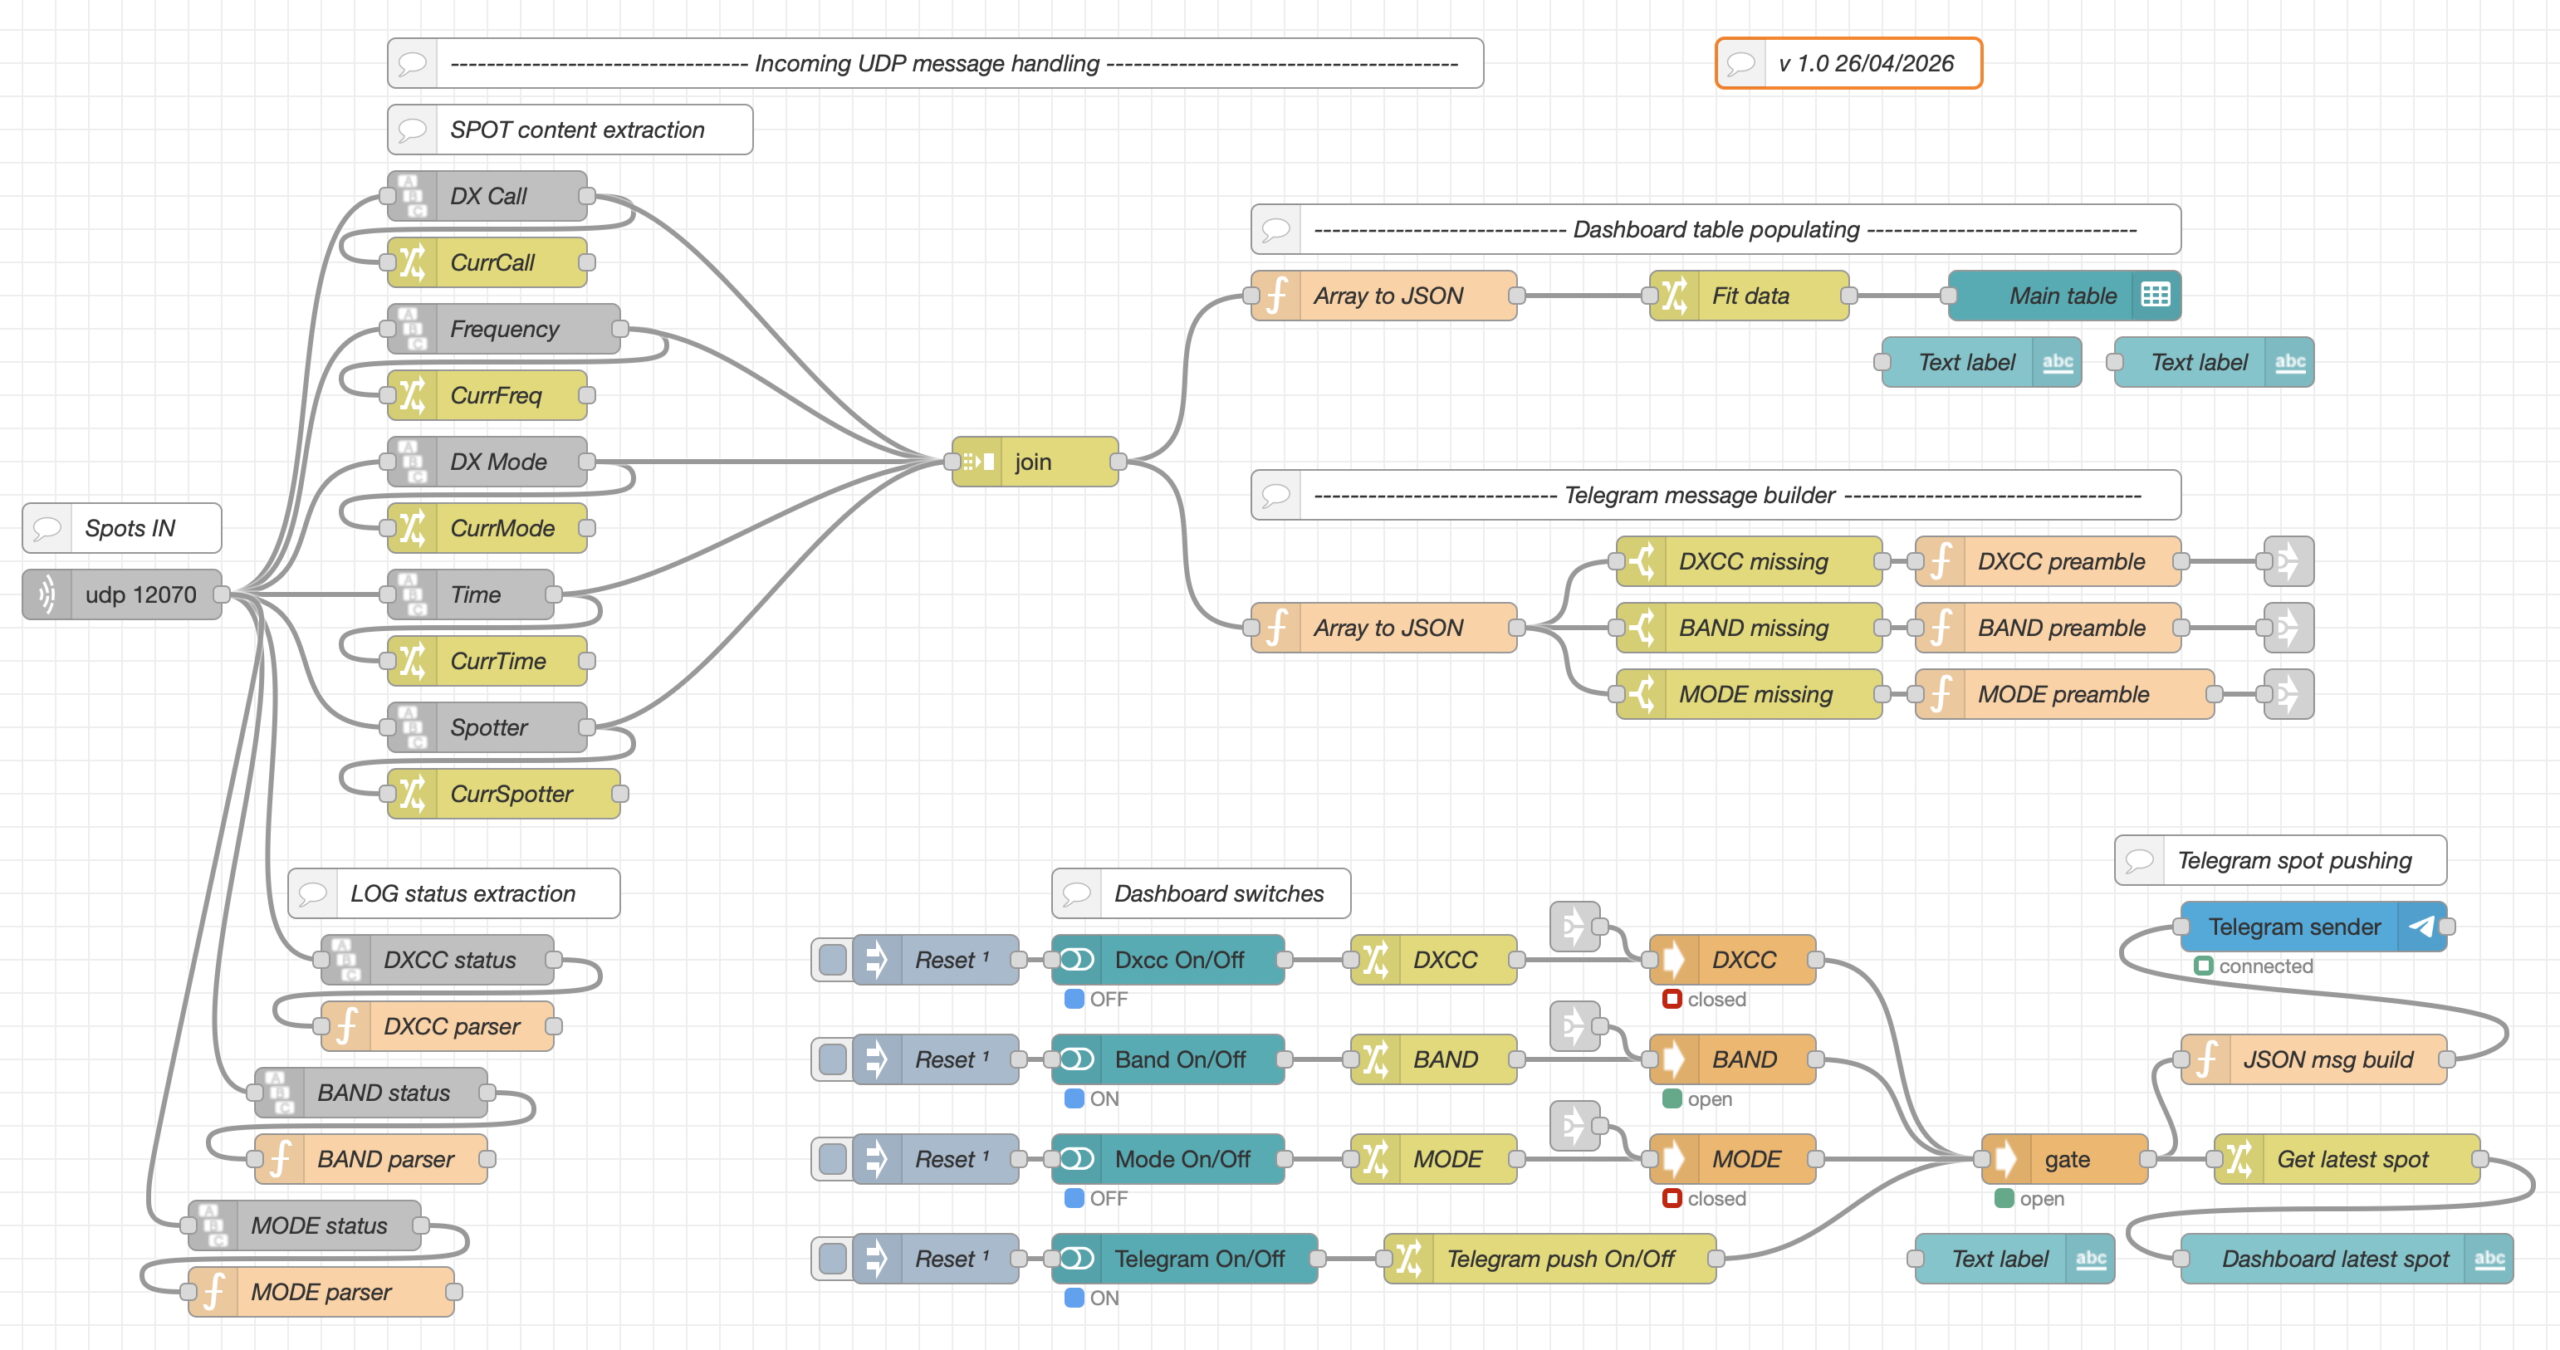
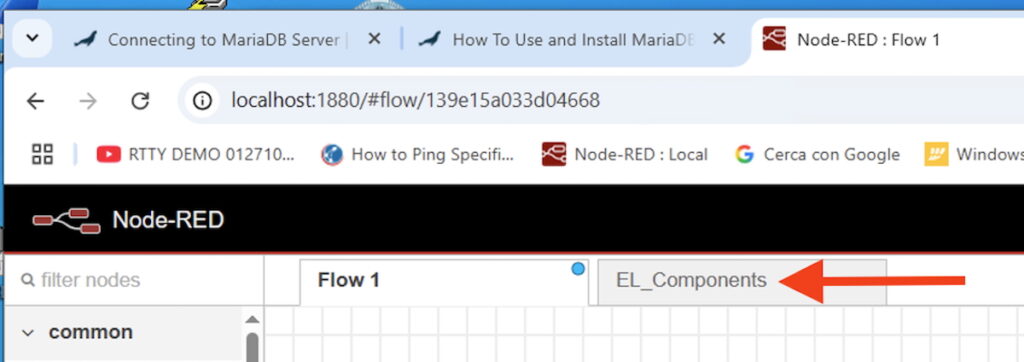
Questo è il “Flow” di Node Red per questa applicazione che si occuperà di ascoltare i dati in arrivo da RumLog sulla porta UDP, ne tratterà il contenuto, creerà la Dashboard del programma, confezionerà il messaggio da inviare a Telegram e lo invierà (per una visualizzazione più comoda tasto destro del mouse sull’immagine -> apri in un nuovo pannello)
This is my flow for this application and at this point you shoud see it in your workspace. This flow cares of listening Udp port 12070 (for me), will handle its content, will create the Dashboard, will build the Telegram message and will send it via Telegram. For a more confortable view right click on the image and open it in a separate panel
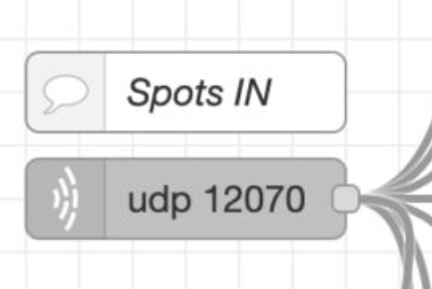
Nella parte sinistra abbiamo il nodo Udp In che ascolta i dati UDP sulla porta 12070 (nel mio caso) e li passa ad una serie di nodi che si occupano di estrarre da ciascuno spot in arrivo le stringhe nelle quali sono contenuti i dati che ci servono (Call, Frequenza ecc) e li salvano in una serie di variabili. I dati estratti vengono poi assemblati in un array e da qui passati ai due bracci in alto a destra:
Left side you can see the node “Udp In” that listen Udp port 12070 (for me) and its output goes to a group of “string” nodes that extract from each spot the info we are looking for (Call, Qrg and so on) and load correspondant flow variables. All info so extracted are passed to a “join” node that assembles the data into an array and its output feeds 2 paths:
quello più in alto si occupa di visualizzare tutti gli spot che arrivano da RumLog (ovvero quelli che hanno superato i filtri che abbiamo impostato) / the highest path treats all incoming spots from RumLog (thath means the spots that satisfied the filter we set in RumLog) and show the in the dashboard
quello più in basso si occupa di preparare i messaggi verso Telegram e selezionerà gli spot in base alle scelte di invio a Telegram che avremo impostato nella dashboard (ad esempio DXCC non confermato). Per ciascuna scelta impostata viene confezionato il messaggio per Telegram e viene aggiunto un preambolo (DXCC-BAND-MODE) in modo che da Telegram sapremo se lo spot ricevuto riguarda un country mancante ad esempio / the lowest path cares of preparing Telegram messages according to the dashboard criteria switches (for example DXCC not confirmed)For each Telegram message a preamble (DXCC-BAND-MODE) is added so reading the Telegram message we can understand which missing confirmatio that message is relevant to
I 3 nodi in basso a sinistra estraggono lo stato delle conferme (Dxcc-Banda-Modo) per il country spottato e lo caricano in variabili che verranno poi usate per selezionare quali spot vogliamo ricevere su Telegram
The 3 string nodes located in bottom left extract the confirmation status (Dxcc-Band-Mode) for the country just spotted and load 3 correspondant flow variables that will be used to select which spot will be pushed via Telegram
Nella parte in basso troviamo gli switches che dalla dashboard ci permettono di selezionare il criterio di invio a Telegram. Gli spot così trattati prendono quindi la strada per l’invio su Telegram ed a questo punto se da dashboard abbiamo attivato l’invio verso Telegram il messaggio del nostro spot verrà passato al nodo di invio Telegram ed in parallelo verrà visualizzato sulla dashboard
In the bottom region of the flow we find the dashboard criteria switches and Telegram message pushing On/Off switch. A copy of latest message pushed by Telegram will be published on the dashboard
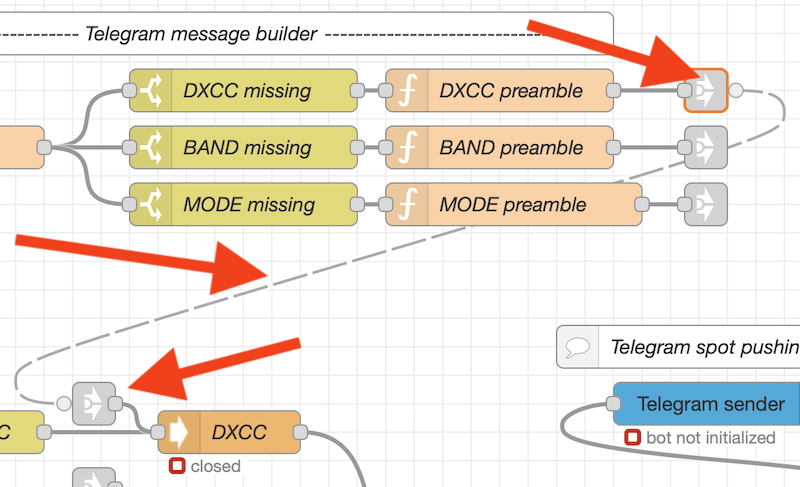
Nota: i nodi “Link In” e “Link Out” sono collegamenti “nascosti” ed apparentemente non sembrano collegati a nulla. Cliccando su di loro però viene visualizzato il collegamento tratteggiato perchè sono collegamenti reali e funzionanti ma nascosti per rendere più leggibile il flow
Remark: there are “strange” nodes (called Link In and Link Out) that seem to go nowhere. If you single click them a dashed connection will appear because they are connected and running but they are hidden in order to get the flow better readable
Messa a punto del flow/ Flow setup
Naturalmente il flow che potrete scaricare da questo articolo fa riferimento alla mia installazione, quindi dovrete modificare alcuni “nodi” affinchè siano coerenti con la vostra installazione come di seguito indicato
Obviously the flow you downloaded refers to my installation so you must touch it in order to get it working for you. Here the list of what needs be modified
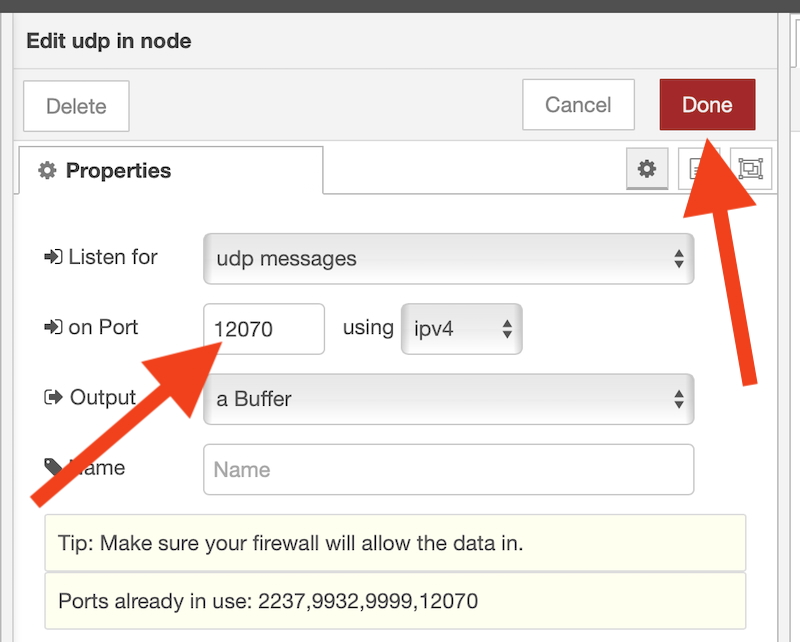
nodo “udp 12070” (a sinistra nel flow) / udp 12070 node (flow left side)
facendo doppio click sul nodo si aprirà la finestra delle proprietà / double click the node and you get the properties window
nella casella “on Port” dovrà essere indicato lo stesso numero di porta Udp definito in RumLog / in the “on Port” field you must enter the same port you assign in RumLog configuration
Premere Done per salvare la modifica / press “Done” button to save modification
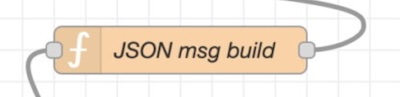
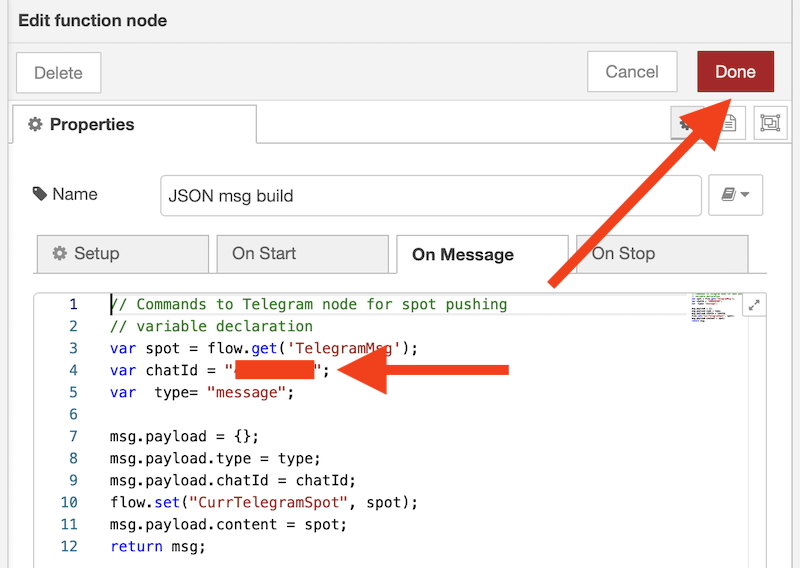
nodo “JSON msg build” (in basso a destra) / “JSON msg build” node (flow bottom right)
facendo doppio click sul nodo si aprirà la finestra delle proprietà / double click the node and you get the properties window
nella riga “var chatId” inserire il numero di ChatId che vi ha fornito Telegram durante la configurazione (vedi oltre in questo articolo) / in “var chatId” enter the chatId number you got from Telegram when you created the Telegram BOT (further down in this article)
Premere Done per salvare la modifica / press “Done” button to save modification
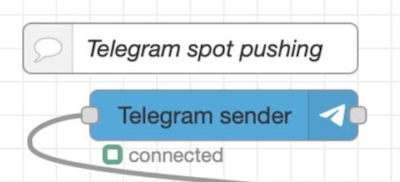
nodo “Telegram sender” (in basso a destra) / “Telegram sender” node (flow bottom right)
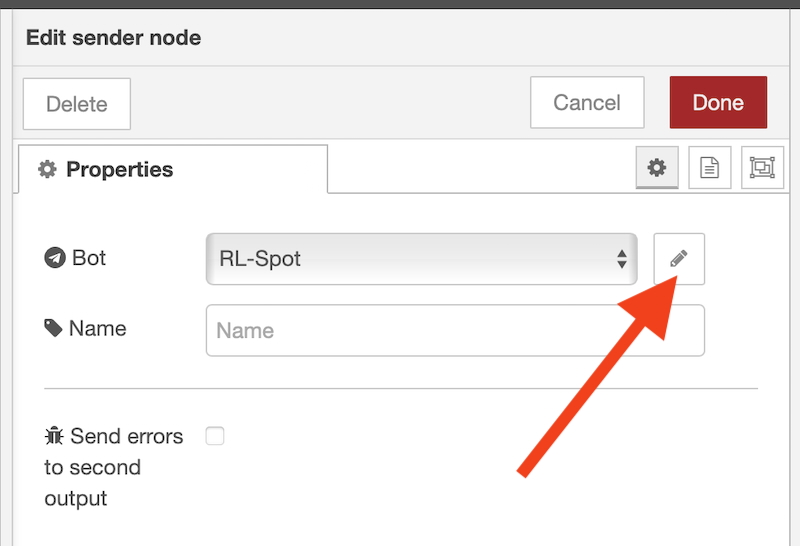
facendo doppio click sul nodo si aprirà la finestra delle proprietà / double click the node and you get the properties window
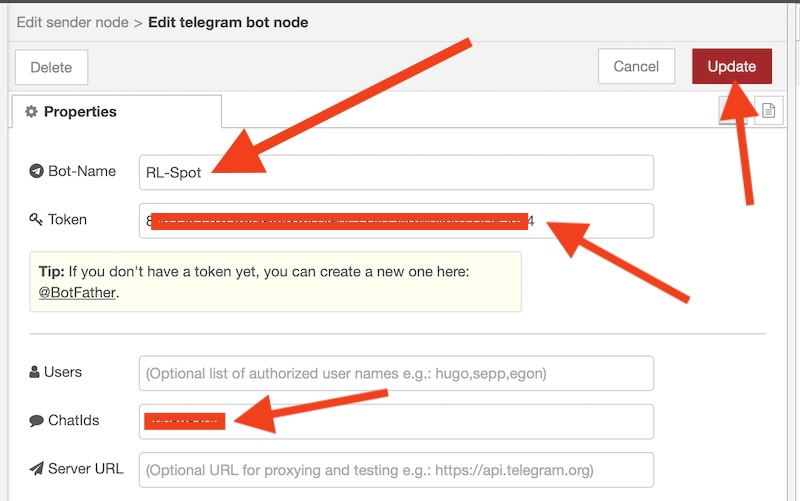
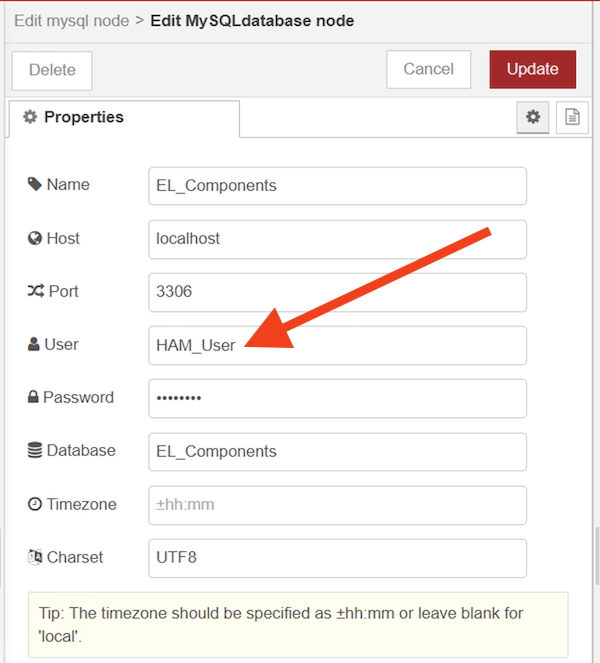
premiamo sul pulsante di modifica indicato dalla freccia e si aprirà questa finestra / press modify button (red arrow) and you’ll get this window
nella casella “Token” inserire la “HTTP API” che vi ha fornito Telegram durante la configurazione BOT (vedi oltre in questo articolo) / in the “Token” field enter the “HTTP API” you got from Telegram when you created the Telegram BOT (further down in this article)
nella casella “ChatIds” inserire il numero di ChatId che vi ha fornito Telegram durante la configurazione del BOT(vedi oltre in questo articolo) / in the “ChatIds” field enter the chatId number you got from Telegram
Nella casella “Bot-Name” indicare il nome che avete dato al vostro BOT (vedi oltre in questo articolo) / in the “Bot-name” field enter the BOT name you assigned when you created the Telegram BOT (further down in this article)
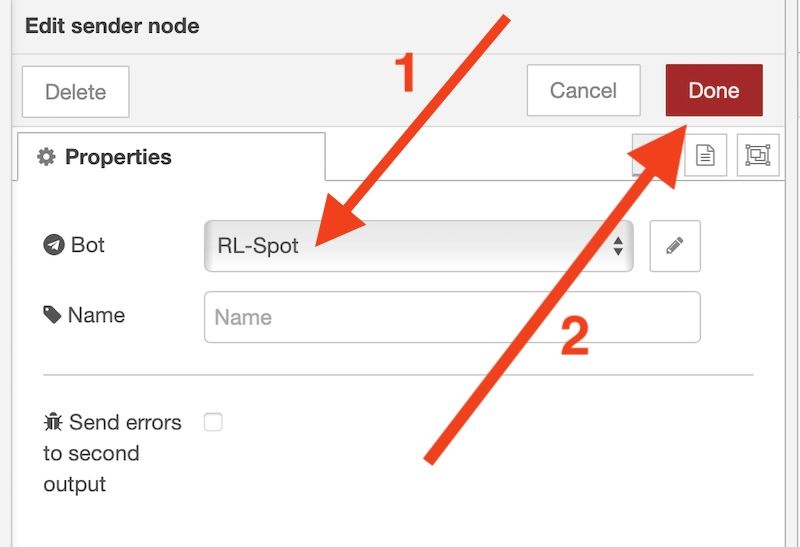
Premere Update per salvare la modifica, si aprirà questa finestra nella quale occorre scegliere il nome del vostro BOT (freccia 1) e successivamente premere Done per salvare la configurazione del nodo
Press “Update” button to save modification and you’ll get this window in which you have to select your BOT name from the list (red arrow 1) then press “Done” to save modification
A questo punto le modifiche sono completate, premere “Deploy” (in alto a destra nella finestra di Node Red) / Now the flow is ready to work for you, press “Deploy” (flow top right)
successivamente premere “Confirm deploy” e se non ci sono stati errori troveremo il messaggio “Succesfully deployed” / you’ll be asked now to confirm deployment so press “Confirm deploy” and if everything is OK you’ll get “Successfully deployed” message
La dashboard/ The dashboard
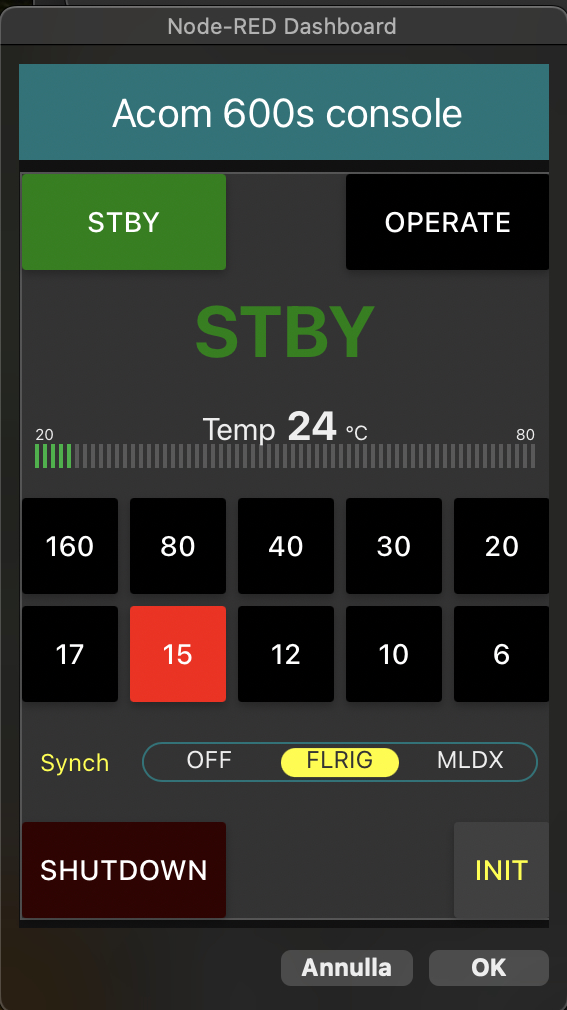
La dashboard è l’interfaccia di gestione di questa applicazione. Si tratta di una pagina web che si raggiunge all’indirizzo http://127.0.0.1:1880/ui/ (ovviamente se Node Red è sullo stesso computer dove si trova RumLog)
Dashboard is the management interface for this application. It’s a web page you can open with your browser at this URL http://127.0.0.1:1880/ui/ (of course if Node Red is running on the local computer that hosts also RumLog)
Nota: ad ogni riavvio del computer o ad ogni Deploy del flow o ad ogni riavvio di Node Red la dashboard si avvia con tutti i pulsanti su OFF quindi occorre aprire la dashboard ed attivare le funzionalità desiderate. Durante il funzionamento dell’applicazione NON è necessario tenere aperta la pagina web della dashboard, si potrà aprire in qualsiasi momento se si vuole cambiare qualche funzionalità
Remark: at any computer reboot or any flow deployment or any Node Red “server” restart the dashboard restarts and all its buttons are set to OFF. During activity is not necessary to keep dashboard web page opened, you can open it any time you need to change some switches position
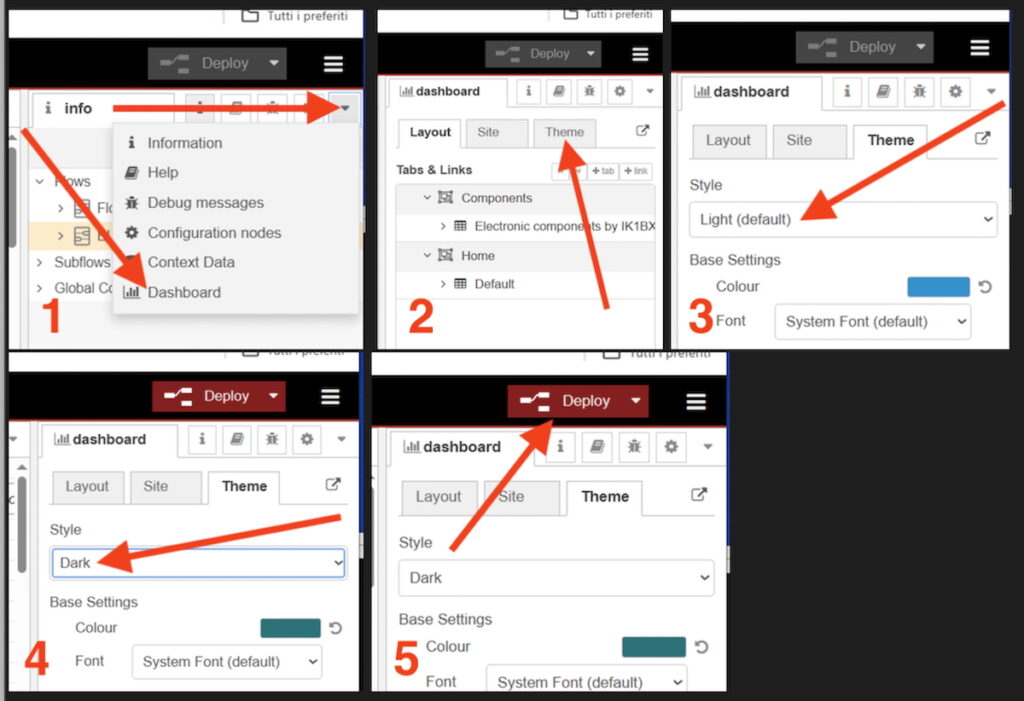
Nota: Ho usato il tema Dark per la dashboard quindi probabilmente la vostra la vostra apparirà in questo modo
Remark: I used Dark theme for dashboard design (that’s not Node Red default) so probably first time you’ll open the dashboard you’ll see it in this awful appearance
per sistemarla seguite i seguenti passaggi / to fix it please follow these steps
e finalmente OK / and finally it will be OK
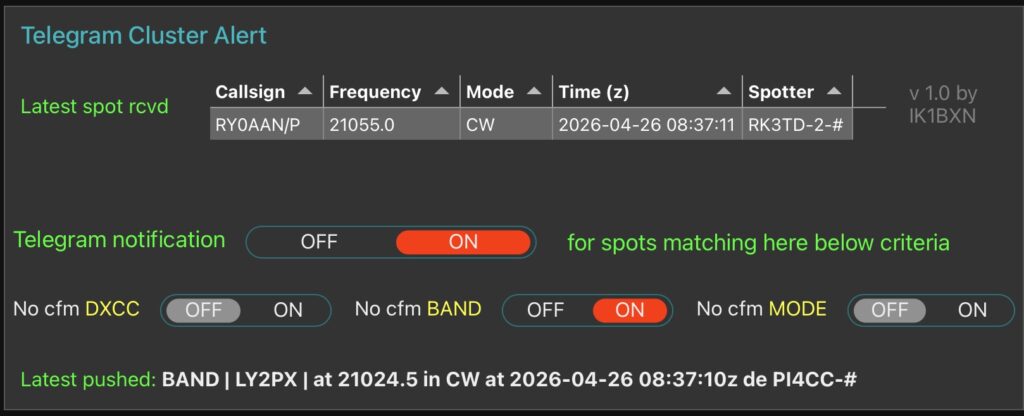
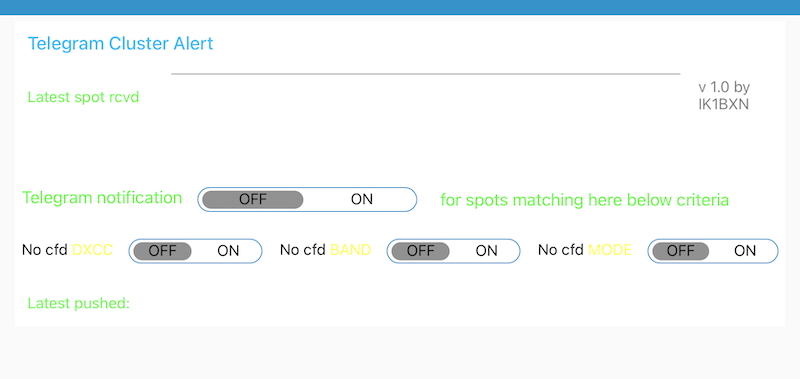
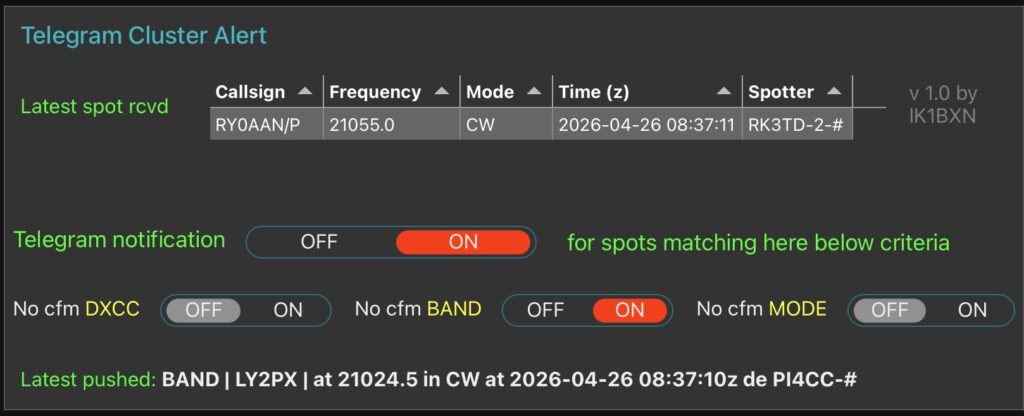
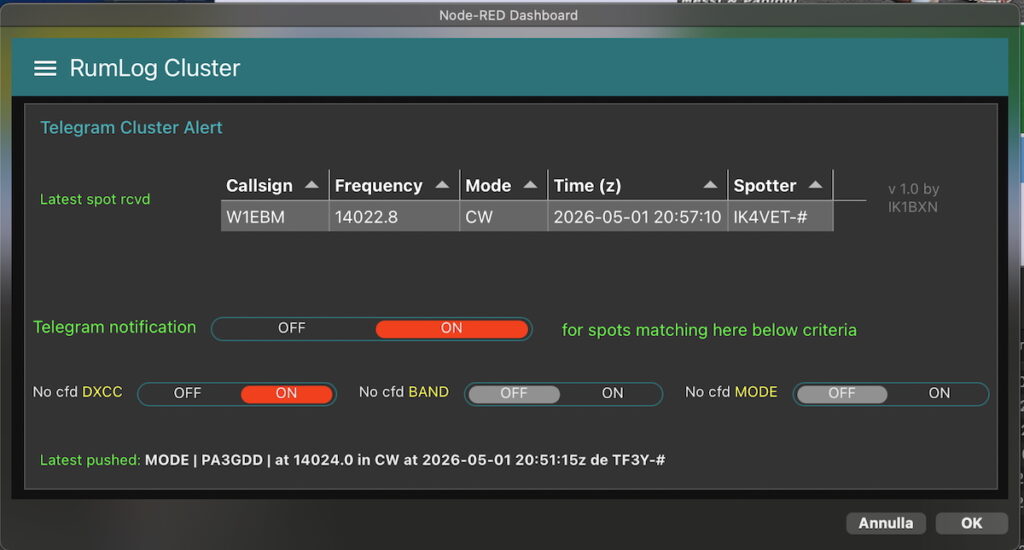
Dalla dashboard possiamo scegliere se attivare oppure no l’invio degli spot a Telegram e scegliere quali spot inviare impostando gli switches, ovvero quelli per i quali ci manca la conferma DXCC oppure Banda oppure Modo. Possiamo attivare anche più scelte, vorrà dire che se ad esempio uno spot ci manca sia come modo che come banda il messaggio che riceveremo su Telegram conterrà come preambolo sia MODE che BAND
Using the dashboard we can activate Telegram sending and choose which spots we want to be notified (by touching the 3 dedicated switches “Not cfd DXCC” – “Not cfd BAND” – “Not cfd MODE”). We can activate more than one switch simultaneously For example if we activate BAND and MODE the telegram message will show 2 preambles (BAND and MODE)
Nella riga in alto “Latest spot rcvd” verrà mostrato l’ultimo spot ricevuto da RumLog (ovvero spot che ha soddifatto i filtri da noi impostati nelle proprietà del cluster di RumLog). La riga in basso “Latest pushed” mostra l’ultimo messaggio inviato a Telegram
Dashboard top line (Latest spot rcvd) shows the latest spot received from RumLog (as told the spot that satisfied RumLog cluster filtering). The bottom line (Latest pushed) shows the latest spot sent via Telegram
Lo switch “Telegram notification” Attiva / Disattiva l’invio di notifiche a Telegram / “Telegram notification” switch activate/deactivate Telegram notification sending
Lo switch “No cfd DXCC” con “Telegram notification” su ON invierà lo spot a Telegram se non abbiamo la conferma per il country Dxcc / “No cfd DXCC” switch when Telegram switch is ON activates sending via Telegram for spot relevant to not confirmed DXCC for that country
Lo switch “No cfd BAND” con Telegram notification” su ON invierà lo spot a Telegram se non abbiamo la conferma di Banda per quel country / “No cfd BAND” switch when Telegram switch is ON activates sending via Telegram for spot relevant to not confirmed BAND for that country
Lo switch “No cfd MODE” con Telegram notification” su ON invierà lo spot a Telegram se non abbiamo la conferma di Modo per quel country / “No cfd MODE” switch when Telegram switch is ON activates sending via Telegram for spot relevant to not confirmed MODE for that country
Su Telegram riceveremo un messaggio per ciascuno spot che ha soddisfatto i filtri impostati su RumLog ed i criteri che abbiamo impostato sulla dashboard
Our Telegram client will receive one message for each spot that satisfied RumLog cluster filter settings and criteria (the 3 switches) we set in the dashboard
Screenshot
La configurazione di Telegram/ Telegram setup
Affinchè tutto funzioni è consigliabile che Telegram sia installato sul computer dove è installato Node Red. Se Node Red è installato su un computer di rete (nel mio caso gira su una macchina LXC sotto Proxmox) occorre aprire la porta 8123 Tcp
It’s suggestable/advisable to have Telegram installed on the computer hosting and running Node Red in order to get this application running. If Node Red is installed and running on a network computer (this is my case as my Node Red is hosted by a Proxmox LXC machine) Tcp 8123 port must be open
Per poter inviare gli spot a Telegram occorre creare un BOT i cui riferimenti andranno inseriti nel flow come detto più in alto (paragrafo Messa a punto del flow). In rete si trovano molte pagine dove viene spiegato come fare. Io ho usato questa
To be able to send spots via Telegram we have to create a BOT and its configuration parameters must be entered in the positions above discussed (Flow setup paragraph). In the Internet there are lot of guides on how cretare a Telegram BOT. I used this one
seguendo SOLO i paragrafi “Creating a Bot in Telegram” e “Obtaining your Telegram Chat ID” . Per i passaggi successivi indicati nel sito fate riferimento a quanto ho indicato più in alto nel paragrafo “Messa a punto del flow”
in the above web page please follow ONLY paragraphs “Creating a Bot in Telegram” and “Obtaining your Telegram Chat ID”. For subsequent steps follow what is written here in “Flow setup” paragraph
SEGNATEVI i dati durante la creazione del Bot (Bot name, Bot username, HTTP API, ChatId number)
TAKE NOTE of parameters you set/get during BOT creation (Bot name, Bot username, HTTP API, ChatId number)
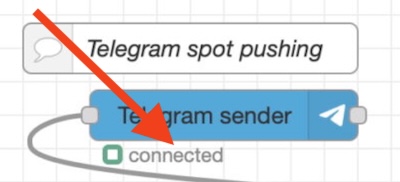
A questo punto inserite i riferimenti del vostro BOT nei nodi “JSON msg build” e “Telegram sender” come indicato nel paragrafo “Messa a punto del flow”, fate Deploy e se tutto sarà OK sotto al nodo “Telegram sender” apparirà la scritta “Connected”
At this point enter BOT parameters in the nodes “JSON msg build” and “Telegram sender” as written above in “Flow setup” paragraph then press Deploy and if everything will be OK under “Telegram sender” node you’ll see “Connected”
A questo punto attivando dalla dashboard l’invio delle notifiche su Telegram ed a seconda dei criteri selezionati dovreste ricevere su Telegram gli spot relativi
Now by activating from the dashboard the Telegram sending you should receive spot messages according to the criteria switches you set
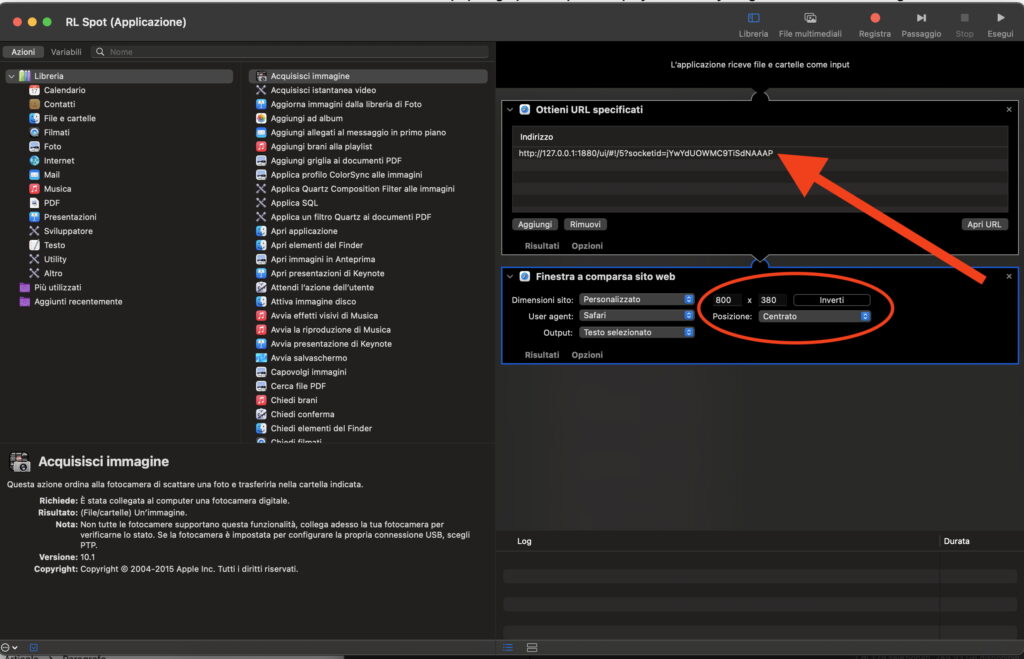
Suggerimento: di solito creo un’applicazione di Automator che mi apre in una nuova pagina del browser direttamente il link all URL della dashboard ed imposto la dimensione della finestra. In questo modo in qualsiasi momento apro e chiudo agevolmente la dashboard
Tip: Typically I create an Automator application that opens in a new browser page the dashboard URL and in it I customize window size. In this way I can easily open/close the dashboard.
questa è la mia configurazione in Automator / here is my Automator configuration
August 2nd – An observation to better understand. Today was the month first sunday so as per scheduling configuration the system performed a Full Backup (instead of a Differential as it happens on each other Sunday). Next jobs (until next month first sunday when a new full backup will be performed) will use this Full backup as reference to understand which files are touched or newly cretaedso they need to be saved in future daily backup sessions.
July 8th – This article bottom added paragraph: My considerations after running Bacula “in production” for a significant amount of time
June 24th – Mac client setup paragraph: added clarification and warning about paths
June 23th 2026 – added Tips & Workaroundsparagraph
June 17th 2026 – added Mac file daemon setup and configuration
April 10th 2026 – First issue
Il backup è uno strumento fondamentale che ci permette di mettere i nostri dati al riparo non solo dai guasti al disco sul quale li salviamo ma anche dai nostri possibili errori (cancellazioni non volute, sovrascritture ecc).
Backup is an important tool that keeps our data safe from faults or our operating mistakes (data deletions, overwrites and so on)
Spesso quando si parla di “backup” si pensa ad una copia dei dati su un’unità esterna (Nas, chiavetta Usb , dischi removibili, Cloud ecc) ma questo significa sprecare tempo e spazio dal momento che di solito si copia tutta la/le cartella/e anche se magari dall’ultimo “backup” è stato aggiunto o modificato un solo file. Dobbiamo anche ricordarci di fare il “backup” o pianificarne l’esecuzione in modo che il computer lo esegua automaticamente. Inoltre se volessimo ripristinare un file a come si trovava 10 giorni fa probabilmente non avremmo speranza perchè di solito si salva tutto sovrascrivendo la copia precedente di quello che chiamiamo “backup”. Infine nel caso avessimo più computer dovremmo organizzare e gestire il “backup” per ciascuno di essi.
Often when talking about backup people thinks to a raw copy onto an external media (Nas, Usb stick, removable HD, Cloud etc) but this means a waste of time and space because very often all directories content is copied without caring of what has really been touched or fresh created. In addition it may be very hard (if not impossible) to restore a file as it was 10 days ago for example. Furthermore this operation habit works only if you remember to perform the copy or if you had configured the automatic copy process…if you have more than 1 computer you have to instruct each one of them for this job
Il backup propriamente detto è invece un sistema organizzato e strutturato in modo da salvare i dati solo quando è necessario (ovvero nuovi o modificati rispetto a quanto già salvato in precedenti sessioni di backup), di storicizzarne le versioni, di rendere agevole il ripristino mediante funzioni di ricerca, di gestire la tenuta dei dati salvati ed altro ancora.
A properly said Backup is an organized system that cares of saving data only when needed (that means when a file has been modified or just created) cares of keeping the versions history, cares of easily restore data (search funcion) cares of keeping saved data for the time we defined we need to keep…and more
Detto questo gli obiettivi del mio sistema di backup sono / All above stated, my goals were
salvare sul Nas i dati che ho deciso di salvaguardare sui vari computer della rete / tosave onto my Nas the data I decided to keep safe
tenere traccia di tutte le operazioni sul database in modo da trovare facilmente ciò che in futuro potrebbe servirmi / totrace and save in database all backup sessions in order to easily access them in future
gestire in maniera intelligente lo spazio occupato sul Nas salvando solo i dati modificati o di nuova creazione / storage space intelligent management as only modified or new data are copied
conservare i salvataggi per il periodo di tempo che ho deciso / toretain data for the time I desire
grazie ad una interfaccia testuale o meglio ancora grafica avere la possibilità di controllare lo stato di funzionamento del sistema e di ripristinare facilmente e rapidamente dati che ho perduto o che ho erroneamente modificato / thanks to a text or better a graphic interface data restore will be friendly and quick
in qualsiasi momento voglio poter modificare la configurazione del sistema di backup (aggiungere o togliere files/cartelle da backuppare, modificare la pianificazione dei backup, modificare il periodo di conservazione dei backup via di seguito) / at any time I can modify setup i.e add/remove directories and files to be backupped, change retention time and so on
non voglio dover compiere azioni quotidianamente, deve girare autonomamente ed in maniera trasparente / no need daily actions, the system runs automatically as planned
In questo articolo farò esplicitamente riferimento ad un software free chiamato BACULA (NON Bacula Enterprise) ma i concetti sono comuni agli altri sistemi di backup propriamente detti. Nella trattazione farò riferimento alla mia implementazione su Linux (Debian) ma Bacula mi risulta esistere sia come “server” che come client anche per Mac e Windows. Questo è il mio scenario
In this article I’ll specifically refer to a backup software named “Bacula” (not Bacula Enterprise) but concepts are common even for other backup system solutions. I’ll describe my implementation in a Linux context, but as far as I know Bacula (“server” and client) exists also for Mac and Windows. Here is my scenario
NOTA: per una visualizzazione migliore delle immagini contenenti molti dettagli consiglio di fare tasto destro del mouse sull’immagine ed aprirla in un nuovo pannellodel browser
REMARK: for better images viewing I suggest you to right click images and open them in a separate browser pane
Bacula Backup
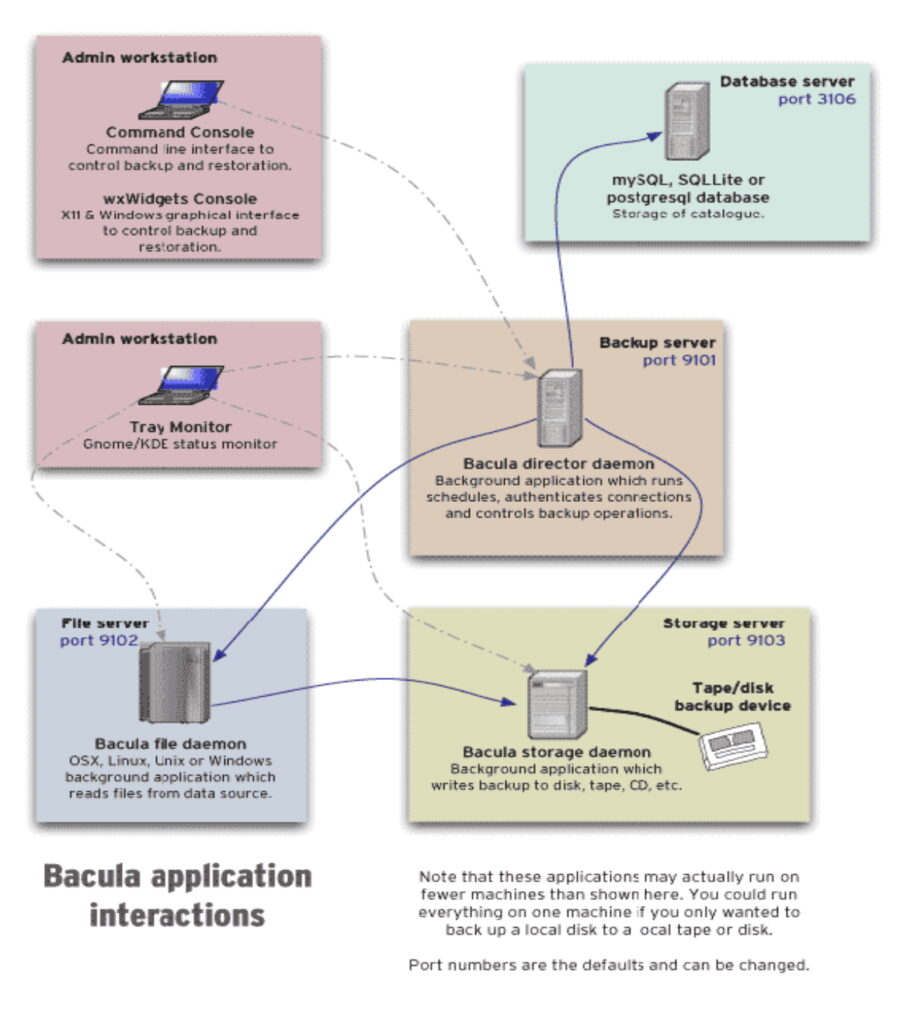
Bacula è un sistema modulare composto da “mattoni” distinti per funzione, in sintesi / Bacula is a modular system and consists of functional “bricks”
Director : il cuore del sistema, al suo interno troviamo descritte tutte le operazioni da eseguire, la definizione delle relazioni con gli altri “mattoni”, la pianificazione del lavoro, la destinazione dei salvataggi, la configurazione per le operazioni di restore / The system core in which operations, relationship with other bricks, storage destination, restore basic configuration are defined
Database : tutte le informazioni relative ai dati salvati nel tempo vengono conservate su un database SQL (di solito PostgreSQL). Ogni volta che il Director esegue un’operazione di backup (o Restore) scrive sul database che file/s ha salvato, data e ora dell’operazione, dove ha salvato, in quale volume, esito dell’operazione / All info about operations are kept in the database. Each time the Director does an activity a database entry is created containing activity type, time, destination, volume used, exit status
File daemon : è l’agente che gira a bordo di ciascun computer messo sotto backup. Quando il Director avvia una sessione di backup questo agente mette in comunicazione il Director col file system del computer (secondo le direttive descritte nel Director per quel computer) in modo che possano essere copiati sullo storage di destinazione del backup o ripresi da quest’ultimo e ripristinati sul disco del computer / is the local computer file system agent that grants communication with the Director in order to let him to access file for saving or restoring them
Storage daemon : mette in comunicazione il Director con la periferica di storage definita nel Director. In caso di Restore veicola i dati che il Director gli chiede verso il computer sul quale devono essere ripristinati. I sistemi di backup nelle applicazioni professionali salvano su nastri removibili o librerie di nastri robotizzate, ma in questo articolo tratteremo solo dell’utilizzo di un NAS / is the agent that connects the Director with the storage device for save/retrieve operations. Professional backup systems use tape library units, here I’ll talk only about one Nas as storage unit
Il dialogo fra i diversi “mattoni” avviene attraverso porte Tcp, in particolare 9101 per il Director, 9102 per il File daemon, 9103 per lo Storage daemon e 3306 per il database SQL. Ciascun “daemon” per comunicare col Director usa la password definita all’interno del Director / Communications among all the “above listed bricks” is up to Tcp, in particular: Director uses port 9101, File daemon/s use port 9102, Storage daemon use port 9103 and Database uses port 3306. Each daemon/s use the password set in Director configuration file to authenticate to
Due parole sulla terminologia usata di un sistema di backup (per approfondire andare al link alla fine di questo paragrafo) / Few words about terminology here used (for more info please refer to documentation, see link below)
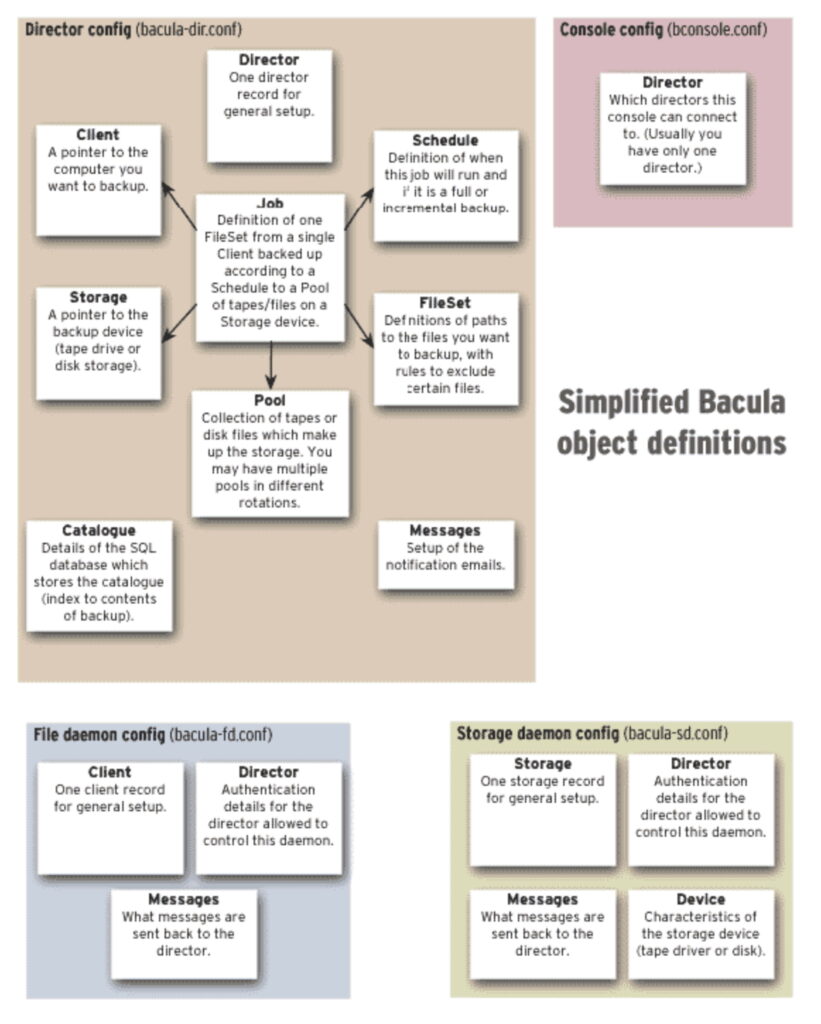
Job : è la descrizione di una attività di backup (o di Restore). Al suo interno troviamo: Type Backup o Restore o Verify – Level che sarà Full se vogliamo salvare tutto o Incremental/Differential se vogliamo salvare solo ciò che è cambiato o è stato creato dopo l’ultimo backup – FileSet ovvero l’elenco dei file/s e/o directory (per ciascun computer se parliamo di backup centralizzato) che vogliamo salvare – Storage l’unità sulla quale verranno salvati i dati / Job is the activity description. In the job object basically we find: activity type (Backup, Restore or Verify) – Level (Full to save averything or Incremental/Differential to save only files modified or created since last full backup) – Fileset (files and/or directories to treat) – Storage (destination storage device)
Client : il computer tenuto sotto backup. NOTA: invece dell’IP è preferibile utilizzare il nome del computer nella notazione FQDN (Fully Qualified Domain Name) ovvero il suo nome DNS nella nostra rete (nel mio caso computer_name.fritz.box) / Computer DNS name we are going to backup. REMARK better to use FQDN notation instead of IP address (in my case: computer_name.fritz.box)
Catalog : il database sul quale vengono salvate in dettaglio tutte le operazioni eseguite del Director / The database used by Director to save/retriev action data
Console : interfaccia testuale per interagire col sistema di backup / Bacula builtin command line console to interact with the system
Session : l’attività che viene svolta dal Director a fronte di un job (ad esempio il backup di oggi sarà una sessione, quello di domani un’altra sessione con un nuovo nomero assegnato) / The file activity done when a job is executed(that means today’s backup will be a numbered session, tomorrow backup will be another session with a ne number)
Volumes : è l’unità di archiviazione e viene etichettata in automatico dal sistema. Trattando di archiviazione su Nas questo concetto è poco significativo, ma se archiviassimo su nastri removibili sarebbe fondamentale perchè prima di fare un backup o un restore ci sarebbe chiesto di “montare” il nastro opportuno (ovvero un nuovo nastro oppure un nastro che è finito nello “scratch pool” in quanto è terminato il suo Retention period) / The archive unit automatically labeled by Bacula. Extremely important when the storage is a tape unit, not so much important for us as we are saving onto a Nas so volumes are all always online and no need to mount relevant tape
Retention period : il tempo per il quale le attività vengono storicizzate ed è quindi disponibile il recupero dei loro contenuto. Il concetto di Retention period si applica in maniera distinta ai record del database, ai Files, ai Jobs ed ai Volumes. Scaduto il termine dichiarato in Retention period i relativi records vengono cancellati dal database (Purge), i files i jobs ed i volumi vengono eliminati / Time to retain backup files in the history, when retention time decays database relevant entries are purged and volumes are deleted
Qui per una visione più approfondita di Bacula / Here the Bacula documentation
Essendo Bacula in grado di gestire anche sistemi abbastanza complessi la sua configurazione prevede numerosi possibili settaggi (ad esempio la parte che riguarda la gestione dei nastri) quindi cercherò di agevolare la configurazione utilizzando come esempio la mia implementazione. Io utilizzo Bacula in maniera centralizzata ovvero in grado di backuppare altri computer sulla rete. Nel caso si voglia limitare il backup al solo computer sul quale gira Bacula sarà necessario eliminare dai files di configurazione le chiamate ed i riferimenti ai computer della rete / Bacula is able to handle quite wide context consisting of many devices to be treated. In addition it supports istibuted functionality resource (for example DB hosted on an external server, several storage devices and so on). In this article I’ll try to simplify the setup by describing my implementation in which few computers are in the game and all “central bricks” are hosted in one computer. Of course if you are interested in setting up the backup for one only computer you can simply define only the file daemon for that computer, into other words you’ll delete (or better comment) from configuration files references to network clients
Installazione / Installation
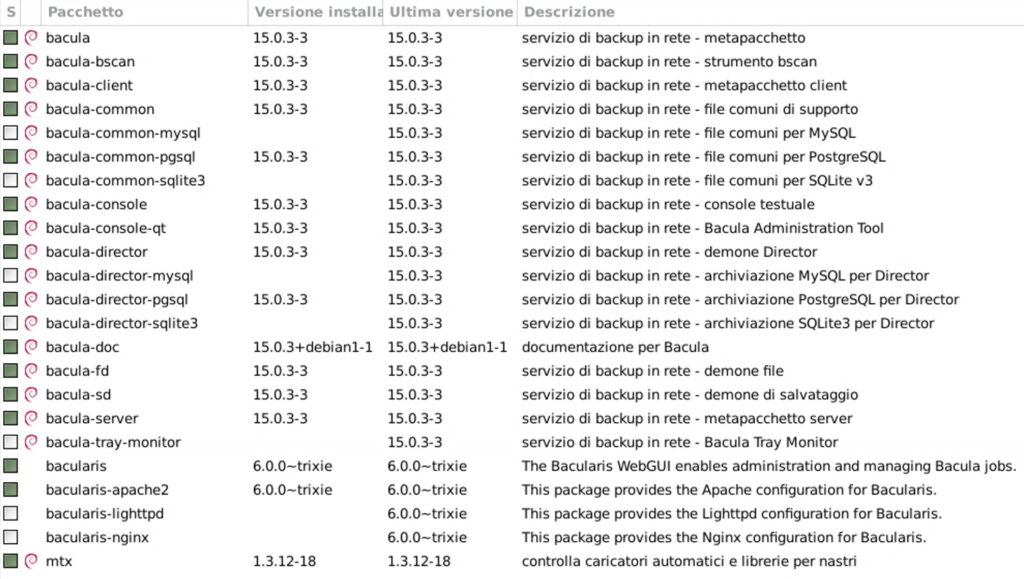
Bacula è presente nei repository della distribuzione Linux che usiamo, quindi nel mio caso usando Synaptic come gestore dei pacchetti e PostgreSQL come DB selezioneremo questi elementi (ovviamente si può usare anche apt install) / Bacula is available for installation in distribution repository so by using Synaptic (in my case) it is enough to mark packages as per the image here below (of course you can use apt install too). I selected postgreSQL as database but also mysql and sqlite are availalable
Durante l’installazione del database verrà chiesto di creare una password per il database mi raccomando di annotarla ! / During installation you’ll be asked to set a password for the database PLEASE memorize it !
Completata l’installazione verifchiamo con questi comandi che Bacula sia correttamente installato / Once installation has completed let’s check if everything is OKby executing these commands
sudo systemctl status bacula-director
sudo systemctl status bacula-sd
sudo systemctl status bacula-fd
sudo systemctl status postgresql (se è stato scelto Postgresql / (if you select postgreSQL)
Configurazione / Configuration
Ciascun “mattone” di Bacula si configura agendo sul relativo file di configurazione (bacula-dir.conf per il Director, bacula-fd.conf per i/il File daemon, bacula-sd.conf per lo Storage daemon. Terminata l’installazione dovremo mettere mano a questi files per adattarli alla nostra configurazione quindi prima di agire fare una copia di bacula-dir.conf bacula-fd.conf e bacula-sd.conf così in caso di errori potremo tornare indietro agevolmente. I 3 files di configurazione menzionati si trovano in /etc/bacula
To configure each Bacula “brick” you must touch relevant .conf file (bacula-dir.conf for the Director, bacula-fd.conf for the File daemon, bacula-sd.conf for the Storage daemon). After installation you must modify these .conf files in order to adapt them to your context. I strongly recommend you to make a safe copy of original files before modify them. The .conf files are located in /etc/bacula directory
Di seguito prenderò come esempio la mia configurazione. Il file di configurazione del director (bacula-dir.conf) contiene molte opzioni possibili quindi estrapolerò dal mio file solo le parti che ho dovuto modificare per adattarle al mio contesto.
In this article I’ll refer to my implementation/configuration. Director configuration file (bacula-dir.conf) contains many possible options so in this article I’ll extrapolate only file parts I touched
Qui c’è una guida benfatta che può essere utile per capire dove modificare i files di configurazione / Here you’ll find a well written guide that may be useful to better understand where to act
Per comodità questi sono i miei files di configurazione che potete usare come traccia (trovate 2 files di configurazione del file daemon, bacula-fd relativo al computer dove gira il Director e l’altro bacula-fd-068 relativo al computer in rete debian068)
Just to give you a complete example here below you can download my configuration files in which you’ll find nr 2 File daemon agent. The one named bacula-fd.conf is relevant to my computer hosting the Bacula Director and the second file named bacula-fd-068.conf is for a network computer called debian068 in my netowrk
Spostiamoci in /etc/bacula ed editiamo il file bacula-dir.confcon il comando / Let’s move to /etc/bacula and start editing bacula-dir.conf
sudo nano bacula-dir.conf
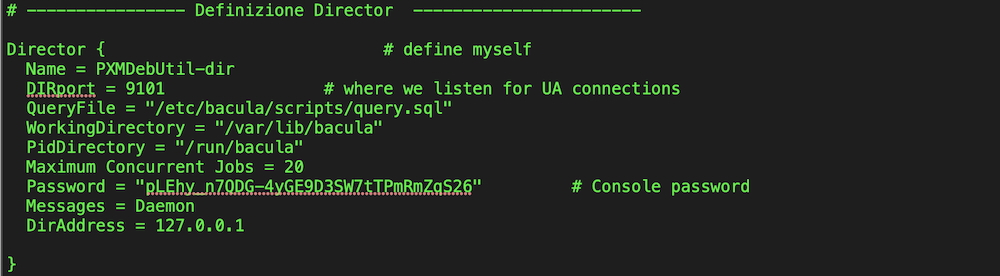
Cominciamo col definire il nostro Director / Here is Director definition
Name: dovremmo trovarlo già confezionato in quanto costruito automaticamente dall’installatore aggiungendo “-dir” al nome su rete del computer sul quale abbiamo installato Bacula. Nel mio caso il computer si chiama PXMDebUtil quindi il Director è stato chiamato PXMDebUtil-dir / Thanks to the installation you should already find the computer name followed by -dir. In my case as the computer name is PXMDebUtil I found PXMDebUtil-dir
DIRport: è la porta sulla quale il Director comunica ed anche qui troviamo già la porta 9101 Tcp / Director communication port Tcp 9101
Password: questa è la password che gli altri “mattoni” dovranno usare per comunicare col Director, ovviamente si può cambiare anche se non ne vedo la necessità / Password to authenticate to the Director. This password has been created by the installer, if you like you can change it even if I don’t see this need
DirAddress: dal momento che abbiamo un solo director sulla nostra rete e si trova su questo computer va bene 127.0.0.1 / As Director is running on this computer it will be 127.0.0.1 (as told Bacula may handle wide context so you should have more than 1 Director in the network)
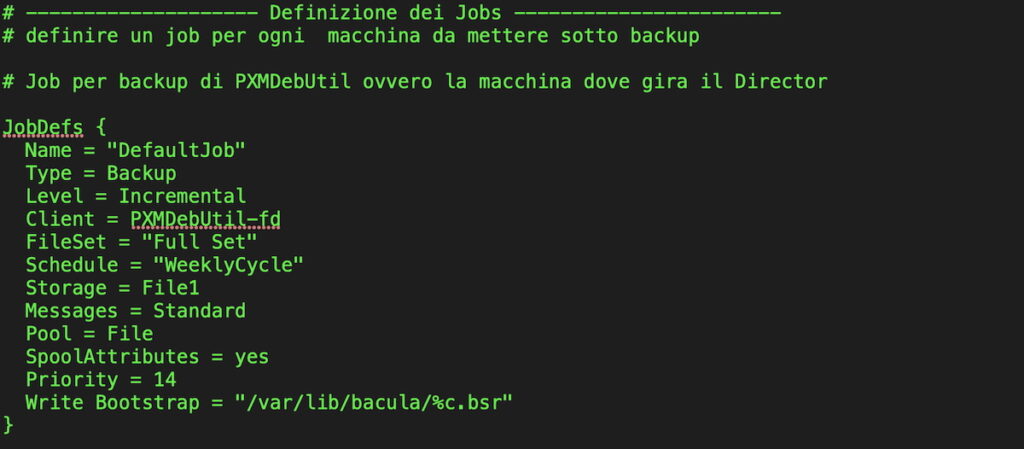
Scorrendo il file troviamo la definizione dei jobs / Scrolling down we meet jobs definition
Name: è il nome col quale verrà richiamato il job / Job name that will be used to invoke the job
Type: azione del job ovvero Backup/Restore/Verify / job action that may be Backup/Restore/Verify
Client: il nome del File Daemon / File daemon name
FileSet: insieme degli elementi da trattare, più in basso sotto questo nome troveremo il dettaglio della/le directory da backuppare / Set of file/directory this job will handle (they will be detailed later in this conf file)
Schedule: nome della pianificazione, più in basso sotto questo nome troveremo il dettaglio della pianificazione / Schedule name this job will use (will be detailed later in this conf file)
Storage: nome del device sul quale il backup verrà salvato / Storage device name this job will use (will be detailed later in this conf file)
Pool: nome del pool di risorse da utilizzare / Pool type, File in our case
Priority: se abbiamo più jobs attivi questo numero permette di sequenziare i jobs / “Weight ” indicator that let you to sequence jobs executionin case you have more than onejob scheduled
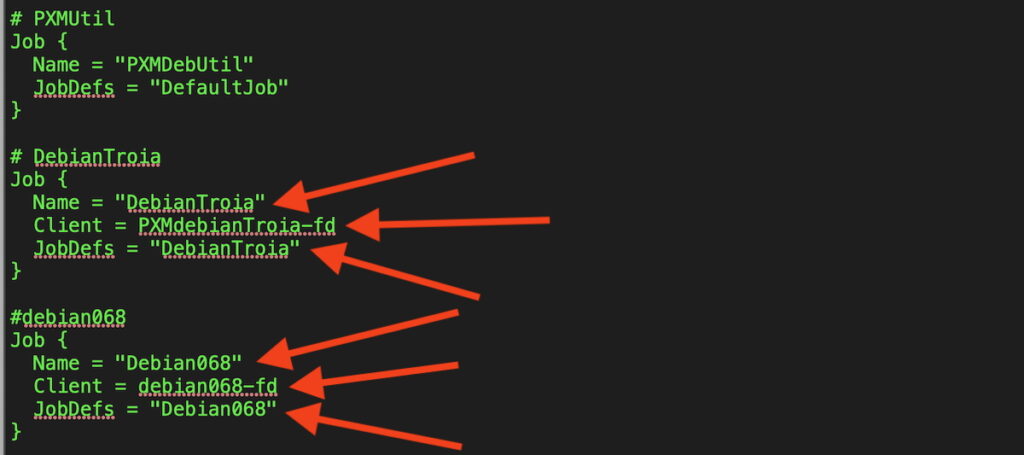
Nel caso intendiamo backuppare altri computer della rete i jobs relativi dovranno essere indicati di seguito / If you’re going to backup some additional network clients place here their jobs definition
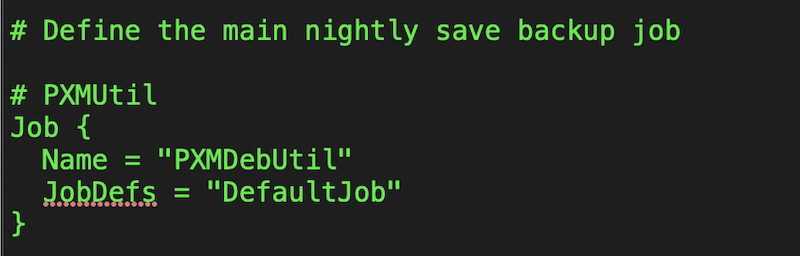
Scorrendo il file troviamo l’attribuzione del tipo di azione che vogliamo eseguire sul computer, nel mio caso il backup del computer PXMDebUtil seguirà le direttive contenute nel job chiamato DefaultJob / Scrolling down the file you’ll find something more about each job. For example here below you’ll see that the backup job named “PXMDebUtil” will follow instructions stated in “DefaultJob”
Nel caso intendiamo backuppare altri computer della rete la configurazione dei jobs relativi relativa andà aggiunta di seguito / If we have additional network clients to backup relevant job will be added here
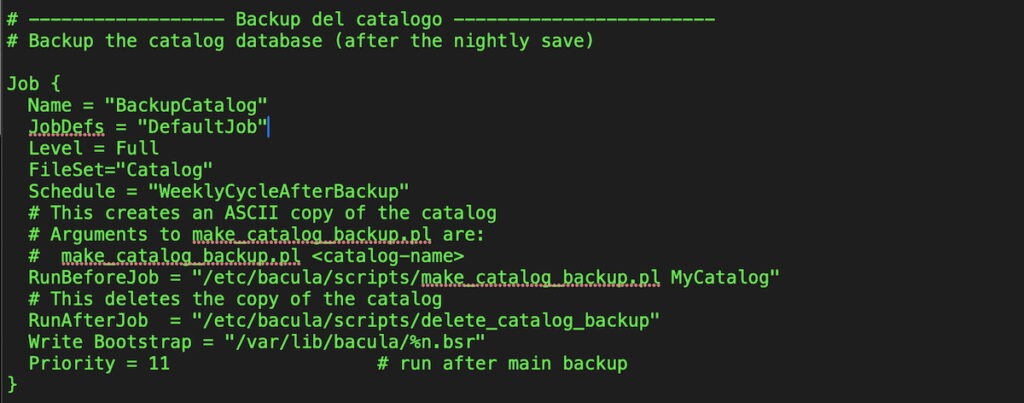
Scorrendo il file troviamo la configurazione del backup del database. Qui ho lasciato la configurazione creata automaticamente all’installazione. Notare priorità 11 che significa che il backup del DB verrà effettuato DOPO l’esecuzione del/dei jobs di backup per il quale la priorità è 14 / Scrolling forward here is the database backup definition. Please observe Priority level set to 11 that means DB backup will be executed AFTER all othe backup jobs were completed as they have Priority level = 14. I Didn’t touch this part, I left it as it was created by the installer
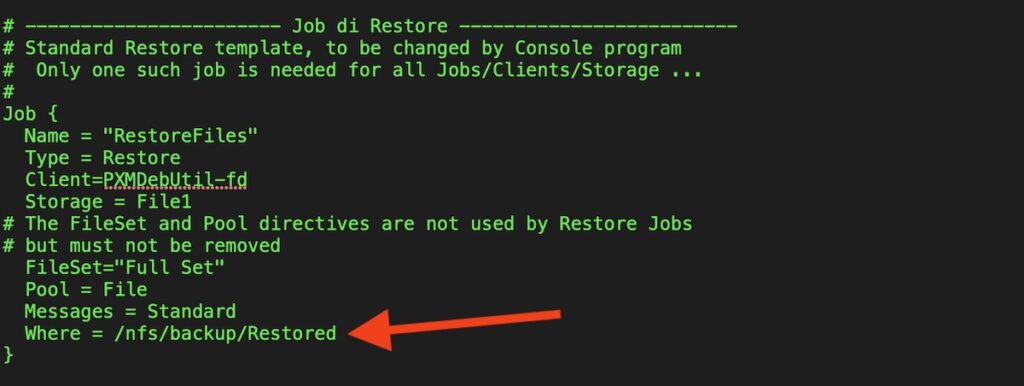
Scorrendo ancora il file troviamo la configurazione del job di Restore / Then we’ll meet Restore functionality definition.
Name: nome del job di restore (potremmo averne più di uno) / RestoreJob name that will be used to invoke the job
Type: Restore / Type of job activity so Restore
Client: il nome del File Daemon che verrà invocato per accedere ai files che si intende recuperare / Job name that will be used to invoke the job.
Storage: il nome del device sul quale sono stati backuppati i files da ripristinare / Storage device name
Where: dove verranno salvati i file recuperati dal job di Restore / Path in which restored files/directories will be saved
Scorrendo ancora il file troviamo la definizione del “File set” ovvero l’elenco dei files/directories che dovranno essere backuppati / Scrolling one more time here is “File set” definition into other words what we want to backupwhen this job will run
Name: il nome col quale questo File set verrà richiamato dal job / FileSet Name that will be used to invoke it
File: la/le directory da backuppare / directories will be backed up
Exclude: se ad esempio volessimo backuppare a partire dalla root qui andrebbero indicate le directory sotto la root da ecludere / directories that will be excluded in case we set root as backup path origin
Nel caso volessimo backuppare altri computer in rete le definizioni dei files/directories relativi dovranno essere indicate di seguito / In case we want to backup other clients in the network relevant FileSet must be defined and their FileSet will have a dedicated name.
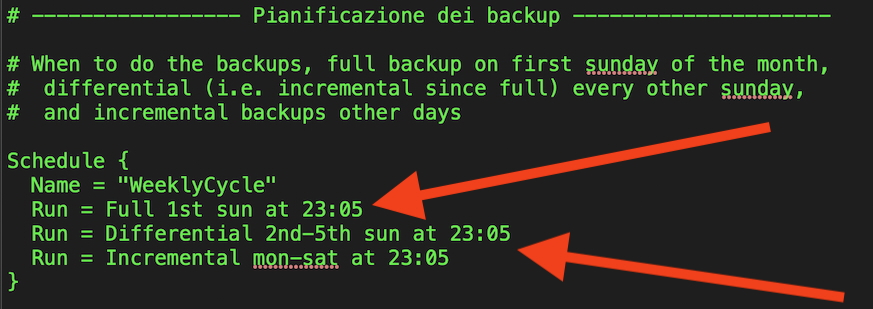
Scorrendo il file troviamo la pianificazione del backup. E’ interessante osservare che / Next file section is dedicated to backup Scheduling. Let’s have a quick glance to
il Full backup (ovvero tutto ciò che è indicato alla direttiva “File” nella schermata precedente) viene eseguito alle 23:05 della prima domenica di ogni mese / Full backup will backup ALL is declared in the Job Filset without care if its elements have been modified or fresh created. In my case it will run each month 1st Sundayat at 23:05
Il backup Differential (ovvero di ciò è stato modificato dall’ultimo backup Full all’interno delle directory indicate nella direttiva “File” della schermata precedente) viene eseguito ogni altra domenica del mese / Differential will save what has been modified inside the declared Job FileSET since the last Full backup. In my case it will run each month Sunday at except the first Sunday (there’s a Full backup scheduled the 1st Sunday) at 23:05
Il backup Incremental (ovvero di ciò è stato modificato e/o creato dall’ultimo backup Full all’interno delle directory indicate nella direttiva “File” della schermata precedente) viene eseguito ogni giorno alle 23:05 / Incremental will save what has been modified or fresh created inside the declared Job FileSET since the last Full backup. In my case it will run mon-sat at 23:05
Il backup del Catalog (ovvero il database) è sempre del tipo Full (salvato tutto indipendentemente ci siano state modifiche oppure no) viene eseguito tutti i giorni alle 23:10 / Catalog (the database) Full backup will be executed each day at 23:05 after other backup job due to Priority “weight” set above (remember priority 14 for backup jobs and priority 11 for catalog backup ?)
E’ ovviamente possibile modificare la pianificazione per adattarla alle proprie esigenze ritoccando gli orari e/o creando nuovi schemi ad esempio uno schema mensile e chiamarlo come vi pare / Of course you can modify scheduling as you like in terms of timing or if you need by creating new scheduling for example a “MonthlyCycle”
Name: come al solito il nome col quale viene invocata questa pianificazione. Ovviamente se ne possono aggiungere altre con programmazione e nomi diversi per eseguire backup con cadenze differenti. Se ad esempio avessimo un’archivio di dati che ci basta venga salvato solo ogni domenica dovremo creare una nuova pianificazione, assegnarle un nome diverso (“EachSunday” ad esempio) e richiamarla nella definizione del job che tratta il nostro archivio modificando la direttiva Schedule in Schedule = “EachSunday” (vedi più in alto) / Schedule Name that will be used to invoke it. As told here we can add new scheduling schema with different time plan and new names. If we had (for example) a file/directory that should be enough to backup only each sunday we can create “EachSunday” plan, then above in the Job definition set the directive Schedule = “EachSunday”
Run: definisce per ciascuna modalità possibile quando verrà eseguita / Set the time when the job that invokes this schema will be executed
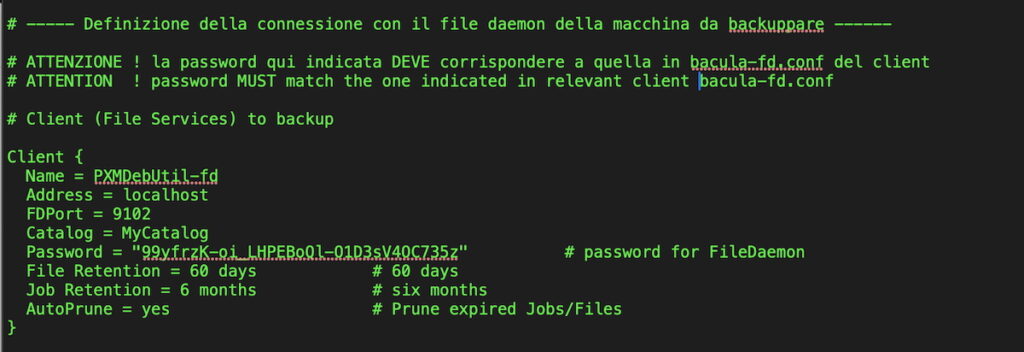
Proseguendo troviamo la definizione della connessione col file damon della macchina da backuppare / Going ahead we define the reference to the file daemon will be used to run the backup
ATTENZIONE: Affinchè la connessione col “file daemon” funzioni è necessario che la password qui indicata sia IDENTICA a quella indicata nel file di configurazione del “file daemon” (bacula-fd.conf) della macchina da backuppare. Se si aggiungono clients di rete all’installazione del File daemon su ciascuno di essi l’installazione creerà una password che sarà inevitabilmente diversa da quella del nostro Director, quindi sul File daemon di ciascun computer di rete occorrerà cancellare la password e mettere quella del nostro Director
ATTENTION: to get each file daemon connected with Director its Password MUST be IDENTICAL to the one set in bacula-dir.conf relevant section ! Into other words if we added network clients to our backup system when we install onto each one the File daemon (bacula-fd) the installer will create a password that probably is different from the one we expect in bacula-dir.conf. Please check this and by touching each bacula-fd.conf and modify password in order to match the one stated in bacula-dir.conf
Name: è il nome del “file daemon” da richiamare. Nella schermata siamo sul computer dove gira il Director (nel mio caso si chiama PXMDebUtil) ma deve comunque essere invocato il “file daemon” affinchè il backup funzioni / File daemon Name that will be used to invoke it(in my case PXMDebUtil-fd). Even if here with are Director onboard (so it’s all local) a File daemon name must be invoked
Address: l’indirizzo del computer da backuppare, in questo localhost / Computer under backup address. In the screenshot we are defining a local backup so “localhost” is OK
FDPort: la porta Tcp 9102 che verrà usata per mattere in comunicazione il Director col “file daemon” / Tcp 9102 is the port the file daemon uses to communicate with the Director
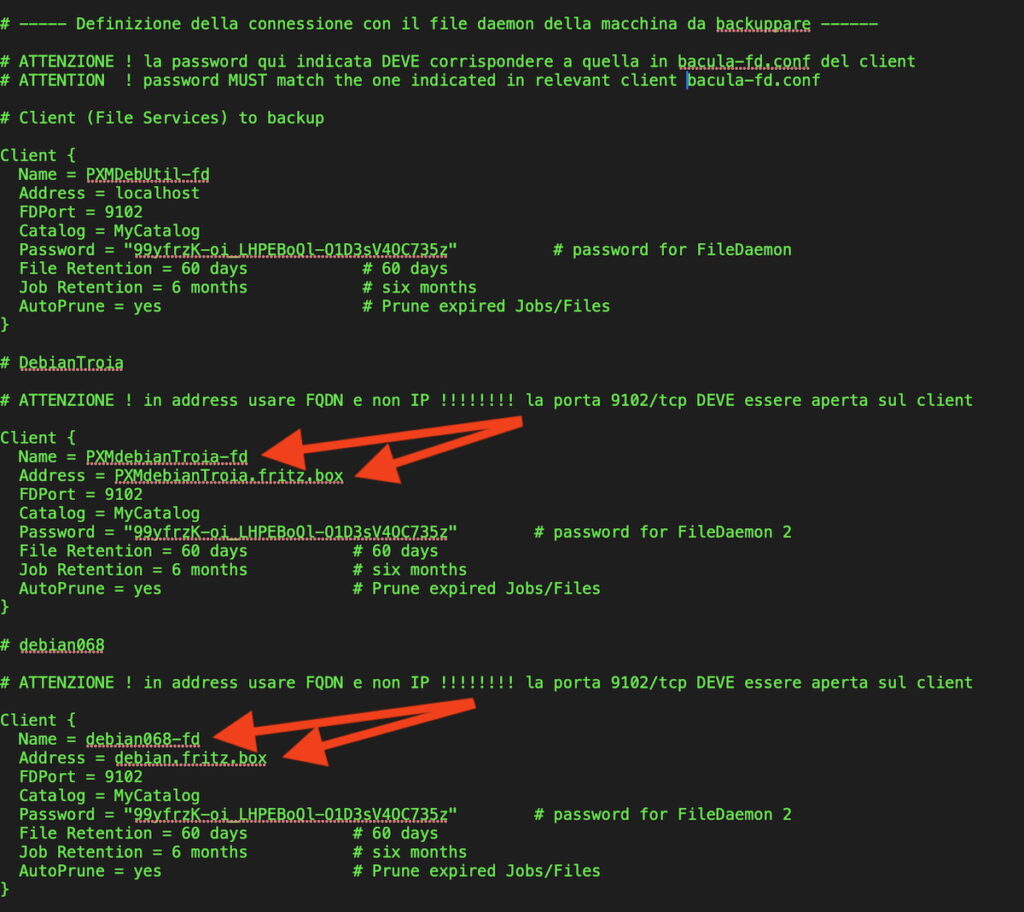
Nel caso avessimo altri computer in rete da backuppare dovranno essere aggiunti di seguito. Nella videata vengono aggiunti 2 computer di rete. Controllate le Password ! / If you had network clients you have to add relevant clients definition in this section. Pay attention to Passwords !
ATTENZIONE: in Name indicare il nome del computer in formato FQDN (fully qualified domain name) / ATTENTION: Name of computer must be indicated in FQDN format (Fully Qualified Domain Name)
ATTENZIONE: su ciascun computer di rete da backuppare dovrà essere aperta la porta Tcp 9102 / ATTENTION: if you have a firewall network computers defined in Bacula must have Tcp 9102 port opened
Infine troviamo la definizione dello Storage dove il Director salverà i dati del backup eseguito secondo le regole finora definite / Finally we reached the Storage definition that’s the share on which our backup data will be placed
Name: al solito il nome col quale verrà invocato / As usual the device name the Director will use to communicate with
Address: indirizzo del computer sul quale gira lo “storage daemon” in formato FQDN / Computer where the Storage daemon is running in FQDN format
SDPort: la porta Tcp 9103 che verrà usata per mattere in comunicazione il Director con lo “storage daemon” / Tcp 9103 is the port the storage daemon uses to communicate with the Director
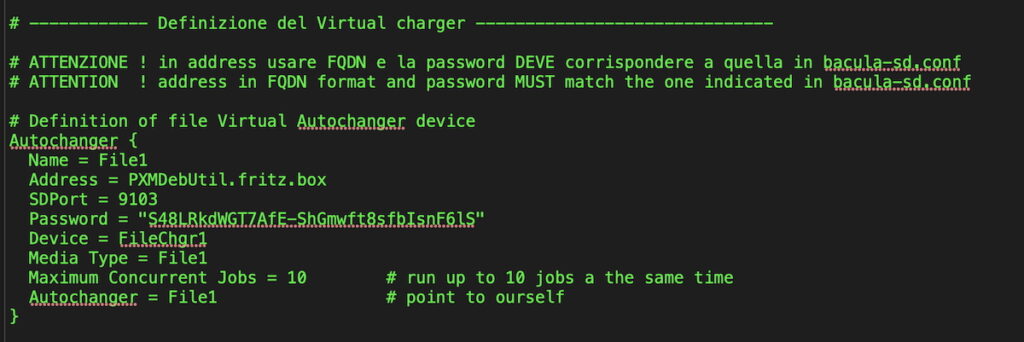
Password: deve essere IDENTICA a quella indicata nel file di configurazione dello “storage daemon” (bacula-sd.conf) / Must be IDENTICAL to the one set in bacula-sd.conf
Device: nome col quale verrà richiamato lo storage
Media Type: essendo un Nas il tipo è File
Per la restante parte del file bacula-dir.conf ho lasciato i valori dell’installazione / Remaining part of bacula-dir.conf has been left as it was after installation
Terminate le modifiche (e se in futuro faremo altre modifiche) è necessario verificare che non ci siano errori e per farlo digitare:
Once modifications are completed (and any time something will be modified in future) you must check for errors by running this command
e se non vengono visualizzati errori / and if no messages are reported digit:
sudo systemctl restart bacula-director
Configuriamo il File Daemon / File daemon configuration
Spostiamoci in /etc/bacula ed editiamo il file bacula-fd.conf con il comando / Let’s move to /etc/bacula and start editing bacula-fd.conf by command
sudo nano bacula-fd.conf
Director-Name: nome del Director che utilizzerà questo File daemon / The Director name will use this File daemon
Director-Password: password per accedere al Director (DEVE essere identica a quella indicata in bacula-dir.conf) / Password to authenticate to Director (again: MUST be identical to to the one declared in bacula-dir.conf)
Director-Name (monitor): nome del Director sul quale è attivo il monitor (servirà alla Console di Bacula per per ottenere informazioni di stato) / Director (monitor) name (it will be used by text console to show info about file daemon work)
Director-Passwordmonitor: password per accedere alla console (DEVE essere identica a quella indicata in /etc/bacula/bconsole.conf) / Password to authenticate to Director monitor (again: MUST be identical to to the one declared in bacula-dir.conf)
FileDaemon-Name: il nome con il quale verrà richiamato questo demone (DEVE essere identico a quello indicato in bacula-dir.conf) / File daemon name the Director will use to invoke this daemon (this Name MUST be identical to the one declared in bacula-dir.conf)
FDPort: porta Tcp 9102 che sarà usata per mettere in comunicazione il demone con il Director / Tcp 9102 is the port the file daemon uses to communicate with the Director
FDAddress: indirizzo di rete del demone. In questo caso essendo il demone installato sul computer dove gira il Director usare 127.0.0.1 / Network address where this daemon runs, in this case it runs on the same computer hosting Director so 127.0.0.1 is OK
Message-director: nome del Director al quale verranno inviati i messaggi / Name of the Director that collects Bacula messages
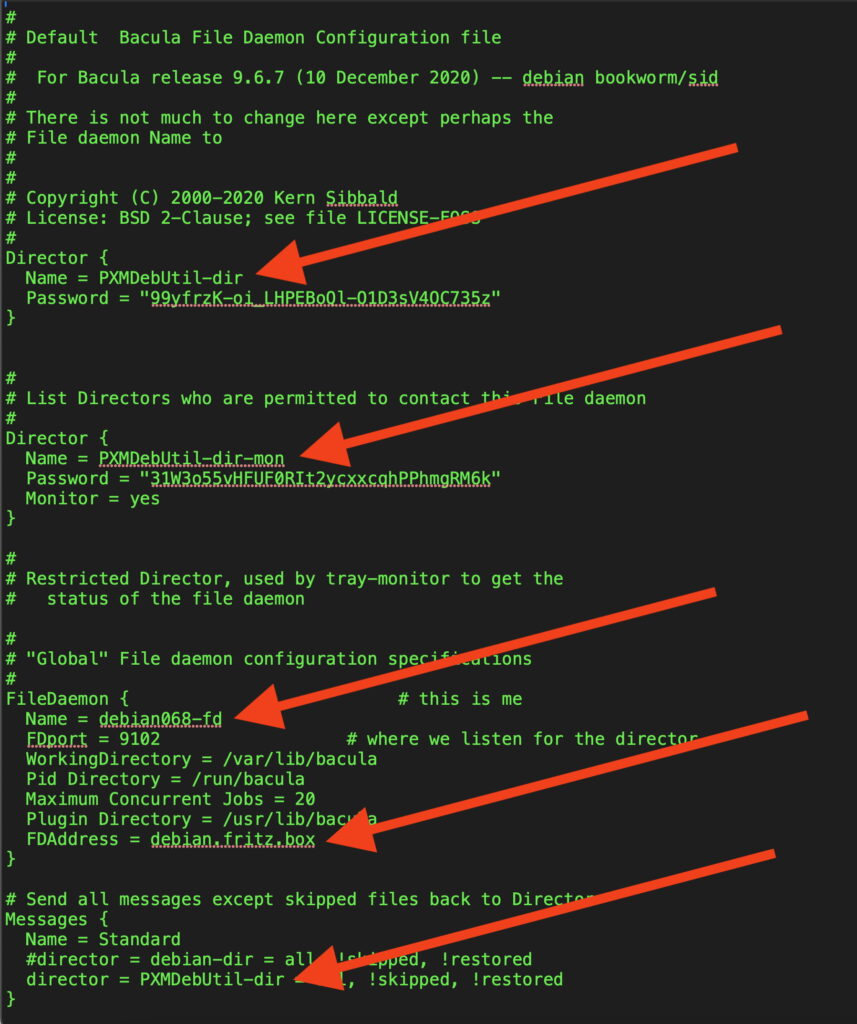
Se invece avessimo centralizzato il backup (ovvero 1 Director e xx computer in rete da backuppare) su ciascun computer dovremo installare SOLO bacula-fd ed in /etc/bacula troveremo solo il file bacula-fd.conf che sarà stato creato con riferimenti locali e dovremo quindi modificarlo adattandolo alla nostra configurazione. Nel mio caso il computer in rete si chiama debian mentre PXMDebUtil è il computer dove gira il Director di conseguenza il file bacula-fd.conf del computer debian dovrà contenere i riferimenti del Director in modo che possa essere backuppato.
If we are implementing a “centralized backup” (that means 1 Director and xx network clients) we have to install on each network client ONLY the File daemon bacula-fd and in its local /etc/bacula you’ll find a file named bacula-fd.conf created by the installer. Of course this bacula-fd.conf local file has been created without any coherent reference to our Director so we MUST edit and modify it in order to integrate this File daemon into our backup scenario. In the example here below you can see one of my network clients (debian.fritz.box) and its file daemon is named debian068-fd, the red arrows show how and where to touch the bacula-fd.conf file
Come si osserva / as you can see
il Director al quale il file daemon del computer debian.fritz.box fa riferimento è il nostro Director centrale (per me PXMDebUtil-dir) e la password deve essere IDENTICA a quella presente in bacula-dir.conf / This network client will refer to the central Director (here PXMDebUtil-dir) and password MUST be IDENTICAL to the one set in bacula-dir.conf
Director-Passwordmonitor: password per accedere alla console (DEVE essere identica a quella indicata in bconsole.conf) / Access to console, password MUST be IDENTICAL to the one set in bconsole.conf
Name: il nome col quale il Director chiamerà il file daemon di questo computer in rete (DEVE essere identico a quello indicato in bacula-dir.conf). In questo caso il computer si chiama debian ma il file daemon l’ho chiamato debian068-fd / File daemon name used by Director to invoke this daemon. In my case this network client is named debian.fritz.boz but its File daemon is named debian068-fd
FDPort: la porta Tcp 9102 attraverso la quale avverrà la comunicazione col Director (porta che deve essere aperta sul firewall del computer debian068) / Tcp 9102 is the port the file daemon uses to communicate with the Director, in case you have a firewall running on this client this port Tcp 9102 must be opened
FDAddress: nome del computer (nel mio caso debian.fritz.box) in formato FQDN (assolutamente non usare l’IP) / Network address where this daemon runs in FQDN format (don’t use IP here !)
Messages: anche qui il riferimento dovrà essere al Director
Terminate le modifiche (e se in futuro faremo altre modifiche) verificare che non ci siano errori e per farlo digitare:
When modifications are completed (and any time something will be modified in future) you must check for errors by running this command
e se non vengono visualizzati errori / and if no messages are reported digit:
sudo systemctl restart bacula-fd
Mac installazione e configurazione del file daemon / MacFile daemon installation and configuration
Ho aggiunto il mio mac Mini M4 al mio backup centralizzato basato su Bacula che gira su una macchina Linux Debian. La descrizione che segue fa quindi riferimento al mio setup su M4 e sottolineo che l’installazione di bacula-fd mediante “brew” usa path differenti a seconda che ci sia un processore ARM o un Intel. Di conseguenza chi installerà su processore Intel dovrà modificare opportunamente i path che trova nell’articolo
Just added to my Mac Mini M4 to my centralized backup system (based on Bacula hosted on a Linux Debian machine). What I’m here describing matches my setup on an M4 processor but I need to underline that bacula-fd brew installation places files in different paths depending on the processor architecture (ARM or Intel). In consequence of this who’s going to setup Bacula Mac client on an Intel based Mac must touch the paths I’m indicating here.
Ho letto che anche Bacula Director (bacula-dir) e Bacula Storage Daemon (bacula-sd) sono disponibili anche per Mac attraverso Homebrew, ma non li ho provati / I read that Bacula Director (bacula-dir) and Bacula Storage Daemon (bacula-sd) too are available for Mac via Homebrew, but I didn’t test them
Bacula File Daemon (bacula-fd) per Mac è installabile attraverso “Homebrew”. Per chi non lo avesse già installato sul Mac andare a questo link e seguire le istruzioni di installazione / Bacula File Daemon (bacula-fd) for Mac is available via Homebrew, for those who never installed Homebrew please go to this URL and follow installation instructions
Consiglio di usare la versione .pkg come indcato dalla freccia / I suggest to use .pkg version (see red arrow)
Una volta installato l’eseguibile si trova in / Once installation is completed the executable file is located here
/opt/homebrew/bin/
per avviare l’installazione digitare nel terminale / to launch installation type in the terminal
./brew
Con Homebrew installato possiamo installare il client di Bacula per Mac digitando da terminale il comando / Once Homebrew is installed we can easily install Bacula file daemon for Mac, to do this in the terminal type
brew install bacula-fd
Quando bacula-fd è installato riceveremo questo messaggio / When bacula-fd has been installed we will get this message
To start bacula-fd now and restart at startup:
sudo brew services start bacula-fd
Or, if you don’t want/need a background service you can just run:
/usr/local/opt/bacula-fd/bin/bacula-fd -f
Avviamo bacula-fd digitando dal terminale/ Let’s start bacula-fd by typing in the terminal
brew services start bacula-fd
Verifichiamo che sia in esecuzione / Check if it is running
Configuriamo bacula-fd sul nostro Mac / It’s time to configure our Mac bacula-fd
Fare una copia di scorta del file bacula-fd.conf installato da brew / Make a safe copy of bacula-fd installed by Brew
spostarsi nella directory / move to directory
cd /opt/homebrew/etc
ed editare il file bacula-fd.conf per adattarlo alla vostra installazione/ edit bacula-fd.conf to match your setup
nano bacula-fd.conf
Attenzione ! Non modificate i path perchè corrispondono all’installazione fatta da Brew ! I path da me indicati sono relativi all’installazione su Mac con processore ARM, con processore Intel sono diversi
Warning ! Don’t modify the paths because they are set by Brew and match your installation ! Paths in my screenshot are valid for Mac with ARM processor, in case of Intel processor they are different
A questo punto verifichiamo che non ci siano errori di sintassi con il comando / Let’s check for possible syntax errors by the command
se non ci vengono mostrati errori la nostra configurazione è OK / if no errors are reported our bacula- fd.conf is OK
Dal momento che abbiamo modificato bacula-fd.conf dobbiamo riavviarlo per attualizzare le modifiche / As we modified bacula-fd.conf we need to restart it
brew services restart bacula-fd
Nota / Remark : dal momento che ho riavviato il servizio come utente e non come root c’è un warning, ma non compromette il funzionamento / as I started bacula-fd as user and not as root there’s a warning but here it doesn’t compromise functionality
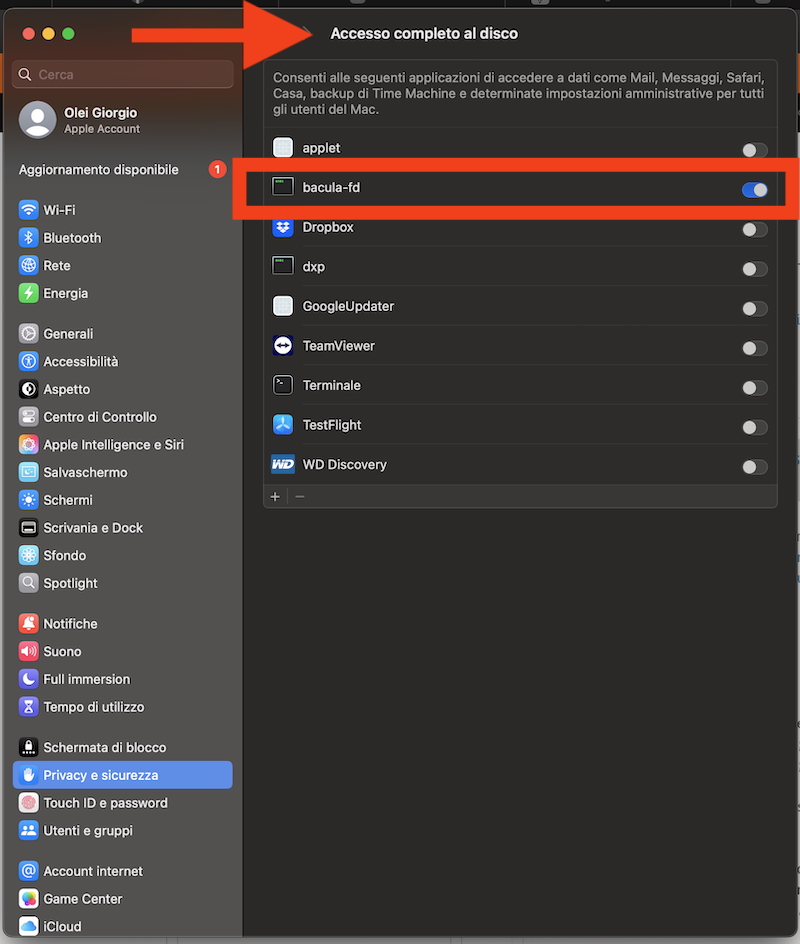
Ora consentiamo a bacula-fd di accedere al disco / Now let’s grant disk full access to bacula-fd
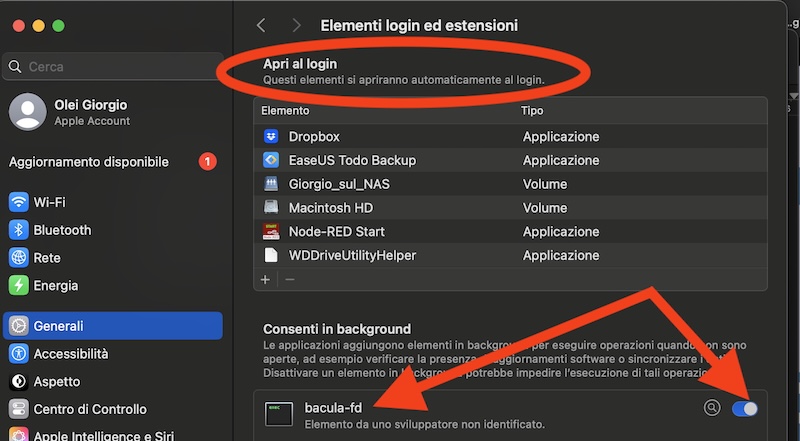
e verifichiamo che bacula-fd venga avviato in background al login / and check that bacula-fd was started in background at login
Riavviamo il Mac / let’s restart the Mac
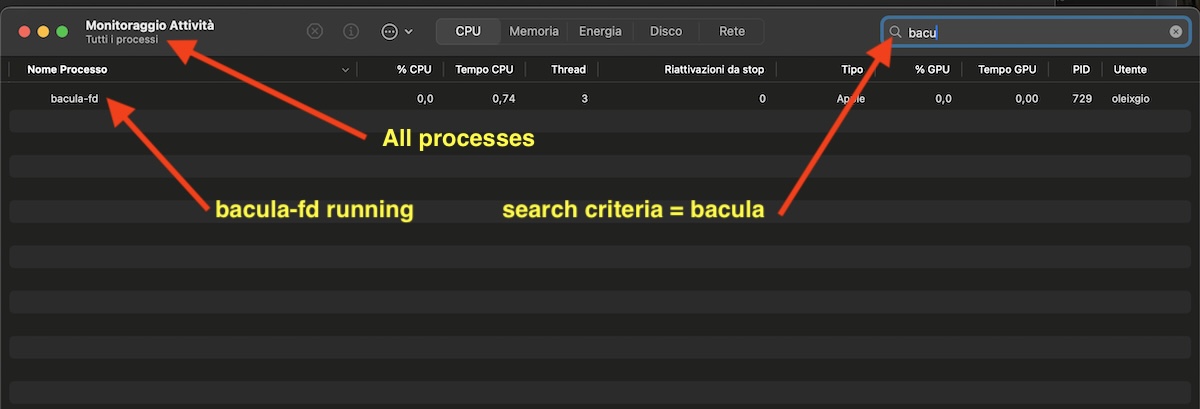
Se tutto è ok aprendo Monitoraggio attività dobbiamo trovare il processo bacula-fd / If everythig is OK we should see listed bacula-fd process
A questo punto dobbiamo aggiungere nel Director (bacula-dir.conf) il nuovo Mac client . Per farlo seguire i passaggi descritti in questo articolo nel paragrafo
At this point we need to add this new Mac client into the Director (bacula-dir). To do this please follow steps described in this article paragraph named
Configuriamo il Director / Director configuration
Come indicato terminata la modifica del file bacula-dir.conf controlliamo che la modifica non contenga errori / Once modifications are completed let’s check there are no mistakes
se non vengono mostrati errori riavviamo bacula-dir / if no errors are reported let’s restart bacula-dir
sudo systemctl restart bacula-director
Verifichiamo che il nostro client Mac sia correttamente inserito in Bacula / Now we check if our Mac client is properly running inside our Bacula system
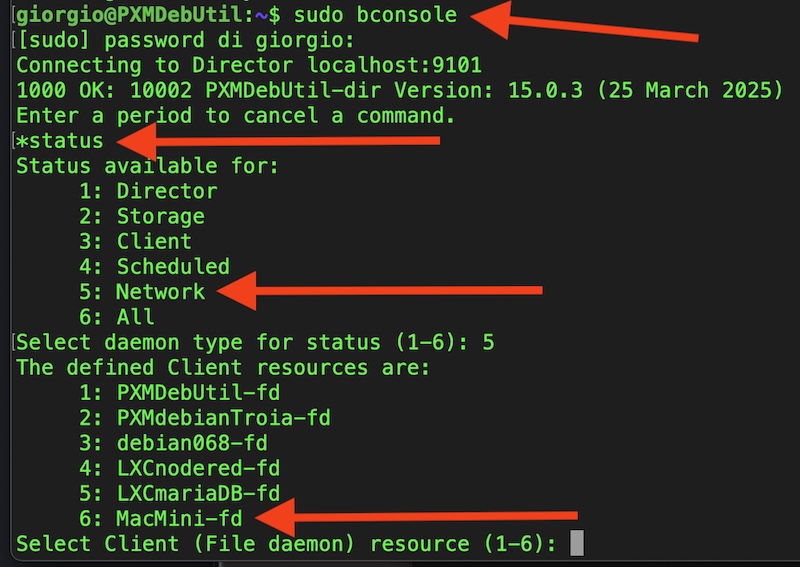
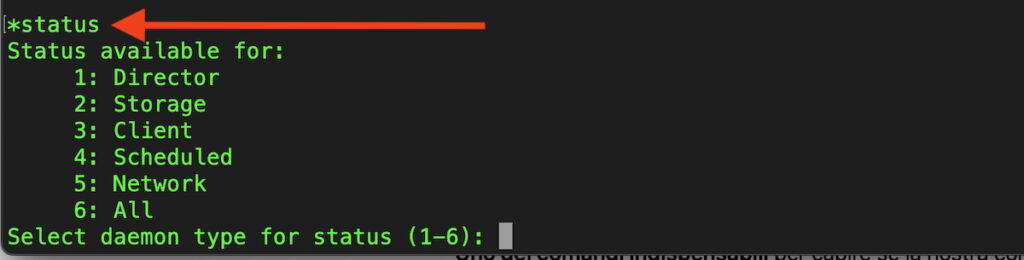
Dal computer sul quale gira il Driector avviamo la console (sudo bconsole) e dal prompt (asterisco) digitiamo “status” poi scegliamo 5 (Network) / From the computer hosting the Director start Bacula console (sudo bconsole) and from its prompt (asterisk) digit “status” and then 5 (Network)
dovremmo vedere elencato il client Mac (nel mio caso “MacMini-fd”) / we should see our Mac client listed (in my case “MacMini-fd)
scegliamo di visualizzare lo stato del nostro client Mac digitando il numero corrispondente (nel mio caso 6) / let’s check our Mac client network status by choosing its number (in my case it’s 6)
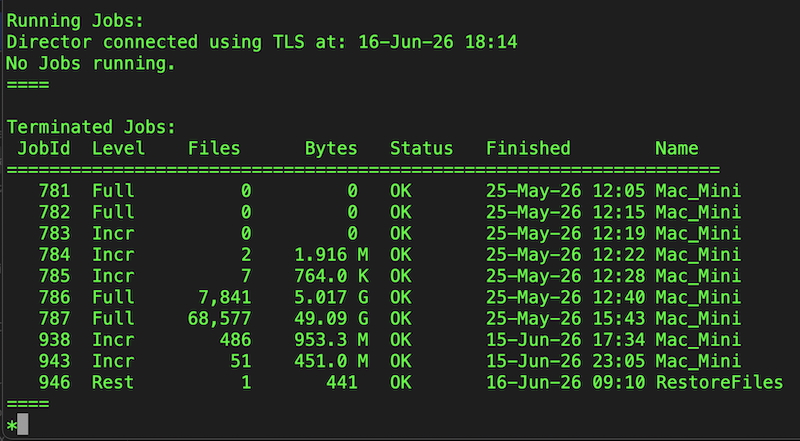
se tutto è OK dovremmo ricevere un rapporto simile a questo / if everything’s OK we should receive a report similar to mine
Se tutto è OK al prossimo backup schedulato Bacula eseguirà il backup (che sarà Full perchè è la prima volta che il nostro Mac è inserito in Bacula) delle cartelle del nostro Mac che abbiamo messo sotto backup (indicate in bacula-dir.conf nel File Set per il Mac). Se vogliamo testare il backup dalla console digitiamo run ed il numero che corrisponde al nostro Mac
If it is all OK Bacula next scheduled backup (that will be a Full backup because it is the first time our Mac is under Bacula) will backup directories we have indicated in bacula-dir.conf in the Mac File Set. If we want to check the backup without waiting for scheduling let’s type run and then the number corresponding to our Mac
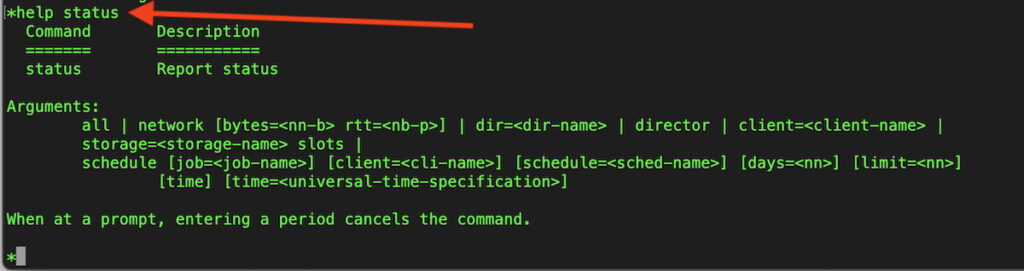
Dalla console andando su status-client-il nostro Mac troveremo l’elenco dei jobs eseguiti ed il loro stato / From Bacula console by choosing status-client-our Mac we will see jobs list and their status
o dall’interfaccia Bacularis / or using Bacularis web page
Configuriamo lo Storage Daemon / Storage daemon configuration
Come detto io salvo le sessioni di backup sul Nas dove ho creato una condivisione NFS (nel mio caso con mountpoint sul NAS 192.168.1.33:/nfs/PXM_Backup) che ad ogni riavvio monto manualmente in /mnt/backup/ (il mio computer PXMDebUtil è acceso h24) con il comando
As stated I’m saving my backup sessions onto my NAS and for this puprose I created on it an NFS share (in my case 192.168.1.33:/nfs/PXM_Backup) and I preferred to manually mount it in /nfs/backup/ at any reboot (computer hosting Bacula is under Ups and h24 7/7 up) by executing this command:
sudo mount 192.168.1.33:/nfs/PXM_Backup /nfs/backup/
e questo è il risultato sul Nas. Come si osserva vi sono più “volumi” salvati e questo deriva dalle prove di backup che ho eseguito nel tempo / this is the situation on the Nas filesystem. You can see there are several “volumes” because they are backup some tests I made before arriving to today’s “in production” situation
La mia implementazione di Bacula lavora in modalità “append” al volume corrente (fino quando non scade il suo tempo di vita) quindi ogni sessione di backup si aggiunge al volume corrente, ad oggi il volume con etichetta “Vol-0027” / my Bacula implementation works in “append” mode that means each new backup session is “appended” to the “volume” in use (until that volume doesn’t reach its retention time end). At today the volume in use is the one labeled “Vol-0027)
Spostiamoci in /etc/bacula ed editiamo il file bacula-sd.conf con il comando sudo nano bacula-sd.confLet’s move to /etc/bacula and start editing bacula-sd.conf by command
sudo nano bacula-sd.conf
Storage-Name: il nome con il quale verrà richiamato questo demone (DEVE essere identico a quello indicato in bacula-dir.conf) / Storage daemon name the Director will use to invoke this daemon (this Name MUST be identical to the one declared in bacula-dir.conf)
SDPort: porta Tcp 9103 che sarà usata per mettere in comunicazione il demone con il Director / Tcp 9103 is the port the storage daemon uses to communicate with the Director
SDAddress: indirizzo di rete del demone (nel mio caso PXMDebUtil.fritz.box) in formato FQDN / Network address of the computer where this daemon runs (for me PXMDebUtil) in FQDN format (don’t use IP here !)
Director-Name: nome del Director che utilizzerà questo Storage daemon / The Director name will use this Storage daemon
Director-Password: DEVE essere identica a quella indicata in bacula-dir.conf nella definizione del Virtual Charger / MUST be IDENTICAL to the one set in bacula-dir.conf in “Virtual Charger” paragraph
Director-Passwordmonitor: password per accedere alla console (DEVE essere identica a quella indicata in bconsole.conf) / Access to console, password MUST be IDENTICAL to the one set in bconsole.conf
Archive Device: directory dove i dati backuppati verranno salvati (nel mio caso condivisione NFS montata sotto /nfs vedere nota all’inizio di questo paragrafo) / Directory where to save backup sessions (see at this paragraph beginning)
Terminate le (e se in futuro faremo altre modifiche) ènecessario verificare che non ci siano errori e per farlo digitare:
When modifications are completed (and any time something will be modified in future) you must check for errors by running this command
e se non vengono visualizzati errori / and if no messages are reported digit
sudo systemctl restart bacula-sd
Tips & Workarounds
Passaggi suggeriti per l’implementazione del vostro sistema di backup / Suggested steps to implement your backup system
installare dei pacchetti sul computer dove risiederà il Director / Install required packages on the computer that will host the Director
fare una copia di riserva dei files bacula-dir, bacula-fd, bacula-sd / perform a safe copy of files bacula-dir, bacula-fd, bacula-sd
adattare bacula-dir alla vostra situazione / adapt bacula-dir to your scenario(host names, daemon names, passwords, paths to backup, scheduling etc)
adattare bacula-fd alla vostra situazione / adapt bacula-fd to your scenario(host names, daemon names, passwords etc)
creare la condivisione NFS sul Nas e adattare bacula-sd alla vostra situazione (aprire TCP 9103) / adapt bacula-fd to your scenario(host names, daemon names, passwords, share name etc) remember to open TCP 9103
avviare la console di Bacula (bconsole) / Start Bacula console (bconsole)
verificare con il comando status che il Director stia funzionando e comunichi col file daemon (bacula-fd) e lo storage daemon (bacula-sd) . Controllare eventuali messaggi digitando message / By using “status” command verify that the Director is up and running and it can dialog with file daemon (bacula-fd) and storage daemon (bacula-sd)
lanciare il job di backup / run the backup job. Check for messages (if any) by typing message
dare il comando “list jobs” per vedere cosa ha backuppato (nr di files, dimensioni ecc) / Type “list jobs” to see what was in the backup session we just executed (files quantity, size etc)
Avviare Bacularis e indicare quanto richiesto (host name, DB password ecc) / Start Bacularis and input requested parameters (host name, DB password etc)
Provate a fare un Restore (con bacularis è molto più semplice rispetto alla console) / Try to perform a Restore (via Bacularis is much more simple than restore via Bacula console)
Se tutto ha funzionato ora potete aggiungere i clients di rete (ricordarsi di aprire la porta TCP 9102 sia sul computer del Director che sui clients) / If everything was OK you can add network clients (don’t forget to open TCP 9102 in the Director hos and on each client)
Per semplificare il backup del DB senza usare un’agente specializzato per il DB (al momento mi interessa backuppare solo il DB chiamato EL_Components) ho configurato cron affinchè prima dell’avvio del backup giornaliero faccia un dump del DB in una cartella locale messa sotto backup / In order to simplify database backup without using a specialized agent I setup cron to perform (before the backup daily job starts) a DB dump into a local directory that’s defined under backup (at present I need to backup only DB named EL_Components)
Dal momento che Node-Red salva tutti i flows in un unico fila chiamato flows.json ho configurato cron affinchè prima dell’avvio del backup giornaliero faccia una copia di flows.json in una cartella locale messa sotto backup / As Node-Red keeps all flows inside one only file (named flows.json) I setup cron to perform (before the backup daily job starts) a flows.json file into a local directory that’s defined under backup
La console di Bacula/ Bacula Console
A questo punto Bacula è configurato e possiamo interagire attraverso la console testuale. In realtà esisterebbe anche la “Bacula Admin Tool” che permette di interagire in modalità grafica ma presenta diversi limiti, prima di tutto non è pensata per poter accedere da un’altro computer ed è piuttosto complicata. Io ho preferito installare “Bacularis” che appoggiandosi su Apace permette di accedere da qualsiasi computer attraverso pagine web, ne parleremo più avanti
Now Bacula is configured for use and we can interact with it by using the builtin textual console. It exists indeed a GUI console (named “Bacula Admin Tool”) but it has some linitations and It’s not so friendly IMHO. I prefer to use “Bacularis” that’s a web console published by the computer hosting Bacula Director and it is very easy and friendly and you can use from any computer in the network. I’ll show it in the next paragraph
Dal computer dove gira bacula-dir ( o in una sessione SSH)apriamo la console mediante il comando / from the computer hosting the Director or in SSH session let’s execute:
sudo bconsole
il prompt della console è l’asterisco e digitando “help” invio avremo la lista dei comandi mentre per visualizzare le opzioni di un comando (ad esempio il comando “status”) basterà digitare “help status” invio / bconsole prompt is an asterisk and if we digit “help” we can see a list of bconsole commands. If we need to know options for a command it’s enough to digit help followed by the command (help status in the example)
La console è uno strumento completo dal quale si possono compiere TUTTE le operazioni (ad esempio eseguire un job, eseguire un restore ecc) anche se non è proprio di uso immediato (ad esempio il restore non è proprio immediato) molto semplice da fare invece usando Bacularis. Qui descriverò le funzioni che più utilizzo, ma per conoscere in dettaglio l’uso e le potenzialità della console vi rimando alla documentazione:
The console (bconsole) it’s a complete and powerful tool and from it we can do ALL Bacula operations (for example run a job, make a restore etc). Restore operation from bconsole is not so friendly indeed, but it works fine. Doing a Restore from Bacularis instaed is very easy and friendly. In this paragraph I’ll describe bconsole operations I often do, to go more in deep about bconsole possibility please refer to its documentation
Uno dei comandi indispensabili per capire se la nostra configurazione sta girando correttamente è il comando “status” (abbreviato “s”). Quindi se dal prompt (asterisco) della console digitiamo “status” avremo un menu nel quale dovremo scegliere quale status ci interessa
One of the commands more useful to check if and how our Bacula backup works is STATUS (short command s). By digiting status we get a list of possible modules to check for status
Vediamo subito che le prime scelte riguardano i “mattoni” principali di Bacula, ovvero il Director lo Storage ed il/i Client/s. Digitando “1” visualizzaremo lo stato del Director
As you can see the first 3 choices are relevant to Bacula main “bricks” (Director, Storage and Clients). Let’s digit “1” (so we’re looking for the Director status)
digitando “status” e poi 2 avremo lo stato dello Storage / if we digit “status” and then “2”we’ll get info about Storage status
osserviamo che ci mostra quale “Autocharger” usa (io ne ho solo uno) e in quale directory i dati verranno salvati (sul NAS in /nfs/Backup ovvero la condivisione NFS che abbiamo montato in /nfs/Backup). Ci viene detto che il device “is not open” in quanto verrà aperto solo quando verrà utilizzato ed visto che al momento non ci sono jobs in esecuzione non è necessario che sia aperto.
Please observe that it shows which Autocharger is in use (I have only 1 defined in bacula-dir.conf) , in which path backup sessions will be saved (in my case the NFS share previously described and mounted in /mnt/backup). As you can see it says the device “is not open” and that’s because there are no jobs running in this moment so the device doesn’t need to be opened
Digitando “status” e poi 3 avremo lo status del/i client/s. Ricordo che io ho sotto backup computer in rete quindi dovrò scegliere di quale dei 5 computer mi interessa conoscere lo stato
if we digit “status” and then “3”we’ll get info about clients status. Remember I have some network clients under Bacula backup so I have to choose which client status I want to see.
Supponendo di voler vedere lo stato del client LXCnodered digiteremo 4 ed otterremo questa videata / let’s choose client nr 4 (a Proxmox LXC hosting Node Red)
osserviamo che il job 459 del 3 Aprile alle 23:05 è fallito (infatti ha salvato zero bytes) perchè si è spento l’Ups alle 22:55 / nicely we can see that on April 3rd at 23:05 backup failed (yes I had an UPS failure at 22:55)
Dalla console è anche possibile eseguire un job in qualsiasi momento senza dover aspettare la sua esecuzione programmata. Per farlo sempre dalla console digitiamo run e dobbiamo selezione quale client vogliamo backuppare
From the console we also can execute a job at any time without waiting for the job schedule. Simply digit “run” and choose which job to run
visto che il backup di LXCnodered di ieri sera è fallito facciamo un backup adesso quindi scegliamo 4 poi digitiamo Y per confermare l’esecuzione del backup
As I had a backup job failure (was LXC Node Red) , let’s backup that client now. Digit “run” and then “4”and finally “Y”
ora digitando message avremo le informazioni circa l’esecuzione di quest’ultimo backup appena eseguito / After a short time let’s digit “message” and we get a detailed report about the job we just executed
Altro comando molto utile è “list jobs” che elenca tutti i jobs eseguiti con le informazioni relative al tipo (B=backup, R=restore, V=verify) al livello (F=full, I=incremental) a quanti files sono stati salvati e la dimensione totale ed allo stato finale (T=terminated, f=failed)
One more useful command is “list jobs” that lists all jobs with basic info about them: Jobid (job number) Name (job name I set equal to client name) Start time (time when job was started) Type (B=backup, R=restore, V=verify) Level (F=full, I=incremental) Jobfiles (how many were backupped) Jobbytes (how many bytes were written) and Jobstatus (T=terminated, f=failed
se vogliamo visualizzare solo un job anzichè “list jobs” basterà digitare “list jobid=nr del job” (nell’esempio job nr 466)
if we want to see on only job instead of “list jobs” command we will digit “list jobid=job number” (in the example job #466)
Bacularis alternativa web alla console / Bacularis web console
Come dicevo esiste uno strumento molto più comodo basato su interfaccia web per utilizzare Bacula. Si tratta di Bacularis il quale usando un web server (Apache nel mio caso) permette di interagire con Bacula da qualsiasi computer della rete.
As I told before there’s a more confortable web based tool to interact with Bacula. It’s Bacularis that using a web server (Apache in my case) makes Bacula managing easy and friendly. In addition you can interact with your Bacula backup from any browser in the network
Nel paragrafo Installazione fra i pacchetti marcati per l’installazione vi sono bacularis e bacularis-apache2. Bacularis va installato sul computer dove si trovano bacula-dir ed il database. Per la sua configurazione invito a leggere la documentazione che si trova a questo link:
In the Installation paragraph you found bacularis and bacularis-apache2 marked for installation because they must be installed on the computer hosting the Director. Setup is really easy and you can find setup guide here:
Per utilizzare Bacularis basterà aprire col browser la pagina web del computer dove gira Bacula alla porta 9097(192.168.1.xx:9097) ed inserire i riferimenti richiesti. Fatto questo Bacularis sarà agganciato al nostro bacula e potremo utilizzalo da qualsiasi computer della rete. Per accedere ci verrà richiesto nome utente (bacula) e la nostra password in uso sul computer dove gira Bacula. Una volta autenticati ci troveremo in questa pagina
Once installed to use Bacularis simply open your browser at Computer_hosting_Director_IP on port 9097 (for example 192.168.1.xx:9097) and insert required references (among them you need database password you memorized during Bacula installation). If everything is correct your Bacularis is connected to your Bacula. Refreshing Bacularis web page you’re asked for a username (bacula) and a password (your user password for computer hosting Bacula) and if all is OK you’ll be in this page
e da qui navigando fra le molte possibilità offerte dal menu di sinistra potremo visualizzare tutti i nostri backup. Non solo ma da qui in maniera estremamente agevole potremo fare Restore di ciò che ci serve ed alla data che desideriamo.
In the left side there’s a menu with many choices available and in the central panel what you asked will be shown. From this menu we can execute a Restore in simple and guided way
Facciamo un esempio: ripristinare il file “flows.json” (file che contiene i flows sviluppati in Node Red). Dal menu di Bacularis andrò su Restore e mi verrà chiesto di scegliere il client dove si trovano i files di Node Red (inteso come nome che abbiamo assegnato al file daemon di quel computer nel mio caso LXCnodered-fd)
Let’s see how to Restore a file, for example a file named “flows.json” (that contains all flows developed in Node Red). From Bacularis Menu go to Restore and we will be asked to select which client (or better which file daemon) is in charge for “flows.json” backup. In my case the computer hosting Node Red is a Proxmox LXC machine and its file daemon is named LXCnodered-fd
selezioniamo LXCnodered-fd e premiamo Next. Nella casella “File by filename” scriviamo flows.json e clicchiamo sulla lente
we select LXCnodered-fd and click Next. Now we write flows.json insidethe textbox “File by filename” and click on the lens to perform the search
ci verranno mostrati tutti i salvataggi del file flows.json con indicata del giorno e dell’ora in cui sono stati backuppati (ovviamente i salvataggi presenti nel periodo di tenuta dei dati (Retention) che abbiamo configurato in bacula-dir). Marcando la casella Select (a destra) selezioniamo quale salvataggio vogliamo ripristinare. Osserviamo che vengono elencate solo le sessioni di backup che hanno salvato quel file questo perchè la nostra pianificazione prevede backup differenziale/incrementale tutti i giorni e full backup una volta al mese, quindi se quel file non ha subito modifiche nella sessione giornaliera non è stato salvato (in altre parole se un file non è stato modificato dall’ultimo full lo troviamo nella sessione full backup più recente)
all backup session containing a saving (and its backup sessions date and time) of the file flows.json will be listed. Of course only sessions inside to the Retention time we set in Bacula configuration will be considered. Please observe that the listing contains only sessions in which our file has been saved. That’s because Full backup saved everything but the Incremental backup saved our file only if it has been modified otherwise it skips our file saving. Now let’s find the file saved session we want to Restore and mark the correspondant Select checkbox
premiamo Next e navighiamo fra le directories nel pannello di sinistra fino a trovare il file che vogliamo ripristinare. Una volta trovato clicchiamo su “Add” ed il nostro file apparirà nella sezione in basso a destra con la data e l’ora nella quale è stato backuppato. Se avessimo sbagliato basta premere sul cestino per rimuoverlo dalla nostra sessione di Restore. Premiamo Next e Bacularis ci chiederà dove vogliamo salvare il file ripristinato (nella posizione originale o in un’altra directory, se vogliamo sovrascrivere un eventuale file esistente)
by pressing Next we go to this screen in which in the left panel we have to have to navigate the directory tree until we find the file we asked to Restore. Once found press Add aside the file name and it will appear in the right bottom panel. If we wanto to remove press the trash icon. Of course here we can add more than 1 file to restoreor a whole directory
premiamo Next ed ora ci sono opzioni da scegliere ovvero se ripristinare il file nella posizione originale o in un’altra diretory e se sovrascrivere eventuali file con lo stesso nome oppure no / by pressing Nextwe have some option to select such as Restore to original position or a given path and if overwrite an existing file with the same name
premiamo Next e ci sarà presentato il riepilogo dell’operazione (o più correttamente del job) che stiamo per eseguire. Se tutto è corretto premiamo “Run Restore” ed in brevissimo tempo il file desiderato sarà disponibile come era alla data/ora che abbiamo richiesto e nella directory indicata. Questo job di Restore verrà riportato nell’elenco del job corredato delle informazioni relative e dell’esito.
let’s press Next and we’ll get an operation summary and if everything matches our need we can press “Run restore”. Very soon we will find the restored file in the path we have choosen. What we did generated a Job and this job will have a job ID and we will see in the job list , it will be defined as Restore job and completed by date/time it has been executed and the relevant status
Voglio ricordare che la mia pianificazione (che ovviamente potete personalizzare a piacere) prevede un backup Full ogni prima domenica del mese (mentre il backup del Catalogue ovvero il database è sempre Full e viene eseguito quando l’ultimo job di backup è terminato
I want to underline that my scheduling schema (obviously you can adapt it to your needs as you like) does a Full backup on monthly first Sunday ) and Catalog backup (the database) is a Full backup every day after the latest backup job has finished
di conseguenza il backup di Domenica 5 Aprile 2026 è stato del tipo Full
so Sunday April 5th (first April Sunday) listing shows this list of jobs
o se preferiamo vederlo attraverso Bacularis / or if we prefer Bacularis listing
Un trucco che ho usato per backuppare mariaDB e Node Red / a workaround I used to backup mariaDB database and Node Red flows
mariaDB: con cron tutti i giorni eseguo un dump del database alle 22:45 in una cartella del computer. Il backup va a prendere quel dump che ho chiamato mariadb-dump (l’alternativa sarebbe stata installare un pacchetto che si occupa di mettere sotto backup il database)
mariaDB: under cron I execute a database dump each day at 22:45 and I save it with name “mariadb-dump” into a computer directory and backup daemon saves this dump. This to avoid a mariaDB backup dedicated backup agent
Node Red: con cron tutti i giorni eseguo una copia del file flows.json alle 22:45 in una cartella del computer. Il backup va a prendere quel file che ho chiamato nodered-dump
Node Red: under cron I execute a copy of file “flows.json” each day at 22:45 and I save it with name “nodered-dump” into a computer directory and backup daemon saves this copy
Considerazioni dopo alcuni mesi di esercizio / My considerations after running Bacula “in production” for a significant amount of time
Essendo trascorso un significativo periodo di essercizio, posso affermare che / As Backup system described in this article is now up and running here since some months, I can assert that:
– è affidabile e stabile / is reliable and stable
– è veloce / is fast
– se un client di rete è irragiungibile va in timeout il job di quel client fallisce ma gli altri client vengono backuppati / if one client was unreachable its job goes in timeout and fails but the system keep on executing other scheduled jobs
– la ricerca di un file per il suo ripristino è velocissima e vengono mostrati tutti i salvataggi disponibili agevolando la scelta di quale versione/i ripristinare / File search for a restore is extremely fast and all file versions saved are promptly shown and this helps very much to decide which version (or versions) you want restore and where (original location or in any other path)
A questo punto mi dedicherò ad affinare la funzionalità del sistema di backup sulla base delle mie esigenze. Aggiusterò il tempo di conservazione delle sessioni per ciascun client, il tempo di conservazione dei volumi di backup, ritoccherò la programmazione dei jobs, probabilmente aggiungerò un secondo storage (Nas) sul quale indirizzare il backup di alcuni clients (sarebbe possibile anche definire uno storage ubicato in qualsiasi locazione e raggiungerlo attraverso la connessione geografica) e così via/ Now is time for me to to refine my backup system in order to get it matching my needs. I’ll touch clients sessions and volumes retention time, I’ll touch jobs scheduling, probably I’ll define an additional storage to use with some clients (you should even define a remote storage located somewhere else and reach it via Wan) and so on.
Bacula è un sistema molto flessibile e personalizzabile. Una volta capito come è organizzato è piuttosto semplice ottimizzarlo per i nostri scopi. L’unico file sul quale si deve intervenire è la configurazione del Director (bacula-dir.conf) dal quale è possibile modificare il comportamento del sistema. Ad esempio io ho gà modificato la programmazione del Mac-Mini. Per farlo ho creato una nuova programmazione alla quale ho assegnato un nome e l’ho richiamata nella definizione del job / Bacula is a very flexible and wearable system. Once you understood how it works it becomes simple to optimize it for your needs. The only file to touch is always the Director configuration (bacula-dir.conf). For example I just modified my Mac-Mini scheduling. To do it in bacula-dir.conf I created a new scheduling schema and I assigned it a new name, then I recall the new scheduling schema by its name into the Mac-Mini job definition
I hope you’ll enjoy !!!
Sì lo so Bacula non è un sistema che si installa con un doppio click e quattro cose da configurare, è necessario un minimo sforzo di analisi e ingegnerizzazione…è una fatica ma una volta fatto ci si dimentica e i nostri dati sono salvaguardati nel tempo / Yes I know Bacula system is not a “double-click-setup application” a bit of analysis and engineering is required…it’s an effort but then you can forget it and your data are safe in the time
Quale appassionato autocostruttore ho in casa parecchi componenti elettronici ed ogni volta che mi serviva un transistor dovevo cercarlo nel contenitore e se mancante ordinarlo. Ho così pensato ad un sistema di gestione dei componenti che mi dicesse cosa ho disponibile ed in quale quantità. Con l’occasione ho aggiunto una sommaria descrizione del componente, il pulsante per aprire direttamente il datasheet ed un campo Note nel quale indicare ad esempio se è un compnente di recupero. Già che c’ero ho aggiunto un paio di funzionalità che ritenevo utili: elencare i componenti con quantità <= 1 e la possibilità di esportare in formato .csv famiglie di componenti (il nome del file viene costruito così: “famiglia di componenti”+ exported on +”DD-MM-YYYY)
Enjoying homebrewing I have lot of electronic components at home, but any time I’d need a transistor (for example) I’ve to spend time to check if it’s present in my storage. To avoid this waste of time I designed this application that can quickly tells me if I have a component, how many of them, a brief description, a note field and a button to open its datasheet. By the occasion I added a function to export in .csv format (file name built with this pattern: “component type”+ exported on +”DD-MM-YYYY) the component list by type. A button let you to list components with quantity <= 1
Questa applicazione è stata pensata per le mie esigenze, ma può servire come base per familiarizzare con Node Red & SQL al fine di sviluppare le più svariate applicazioni (il limite è la fantasia HI). Node Red è un’ambiente molto potente e stabile e grazie al concetto di “nodo” ha il vantaggio di ridurre al minimo la programmazione (intesa come scrittura di codice) che è comunque disponibile usando il “nodo” Function. La “dashboard” è la pagina grafica (HTTP) attraverso la quale si interagisce con la nostra applicazione Node Red.
This application meets my needs of course, but IMO it may be a good and simple way to approach Node Red & SQL database so it may open the way to design further applications. Node Red is powerful and stable and thanks to its “Node” concept grants the advantage to reduce coding (if needed the node called “Function” is available for coding). To interact with a Node Red application there’s the “dashboard” (an HTTP page)
questo è il file esportato (stampato in .pdf per comodità di pubblicazione) / here’s a .csv exported file example
Il funzionamento dell’applicazione è piuttosto semplice. Usando i controlli (pulsanti, listbox ecc) previsti nella pagina grafica di interfaccia (dashboard) si scelgono le azioni (ricerca, visualizzazione elenco per famiglie di componenti, modifica, elimina ecc) ed il flow si fa carico di inviare la query opportunamente costruita al database il quale esegue l’azione richiesta ed aggiorna la visualizzazione nella dashboard.
This application is pretty simple. By using dashboard controls (buttons, listbox etc) you choose the action you need (search, list by type, modify and so on) and the flow sends the appropriate built query to the database that does the job and refreshes dashboard with the result
Per la realizzazione di questa “applicazione” ho usato Node Red e MariaDB come database (database SQL parente di MySQL). Sia Node Red che MariaDB sono multipiattaforma (Windows, Linux, macOS) e questo aggiunge flessibilità. In questo articolo per semplicità di implementazione sia il server Node Red che il database si trovano entrambi sullo stesso computer, ma nel mio QTH il Node Red è su un computer mentre il database è su un’altro computer con Linux (Debian) che uso come server per altri servizi attivi h24. L’applicazione mostrata nel video è sostanzialmente una pagina web, quindi la si può aprire anche dal browser di uno smartphone (a condizione che siano stati adeguatamente settati i permessi di accesso al DB e sul computer che ospita Node Red)
To develop this application I used Node Red and MariaDB for database. Both of them are multi-platform (Windows, Linux, macOS) and this adds flexibility. To simplify the job in this article both Node Red and MariaDB are hosted on the local computer even if here at my home the database is hosted on a Linux (Debian) machine running h24 and Node Red is running on my Mac. The application you saw in the video above is actually a web page so you could use this application even from other devices such as iPad or smartphone browsers (of course permissions and securities must be properly set)
Per l’implementazione di questa “applicazione” sono richieste una basilare conoscenza dei database SQL ed un minimo di familiarità con Node Red. Inserisco comunque di seguito le indicazioni per installare/configurare MariaDB e Node Red al fine di agevolare l’installazione di Node Red e MariaDB.
To implement this application a basic knowledge in SQL database and a basic skill in Node Red are required. Anyway in this article I’m giving step by step instruction to let Node Red and MariaDB installation / setup easier as much as I can
NOTA importante: i nomi del database, della tabella e delle sue colonne sono richiamati dai nodi che li utilizzano per cui se si desidera modificarli occorre modificare di conseguenza anche il flow
Important REMARK: database, table and columns names are built also into the flow nodes using them, so if you’d like to change any name you’ll have to touch the flow accordingly
Installazione di MariaDB /
MariaDB installation
MariaDB è gratuito e scaricabile dal sito https://mariadb.com/downloads/ (ovviamente selezionare la versione idonea per il proprio sistema operativo). Durante l’installazione verrà chiesto di inserire una password (io ho scelto 123456) e la porta TCP attraverso la quale sarà possibile raggiungere il database (lasciare 3306 come da default). Lasciare attivata la funzionalità “Install as service” in modo che MariaDB si avvii al boot.
MariaDB is free and downloadable here https://mariadb.com/downloads/ (choose version for your operating system of course). During installation you’ll be asked to set a password (123456 in my installation) and TCP port the database will use over networking (leave default 3306). By leaving checked “Install as service” MariaDB will start automatically after a reboot
Installazione di Node Red /
Node Red installation
Per installare Node Red fare riferimento a questo sito https://nodered.org/docs/getting-started/local ed in particolare in funzione del proprio sistema operativo alle indicazioni riportate in alto
To install Node Red follow instructions you’ll find here https://nodered.org/docs/getting-started/local and depending on which operating system you’re runningopen the link indicated by red arrows
Al fine di testare l’applicazione partendo con un database popolato questo è il “dump” del mio database. Terminata la fase di test ognuno potrà cancellare i miei componenti (manualmente o se pratico di SQL con un semplice comando) ed inserire i propri
With the purpose to test the application started with a populated database here you’ll find a “dump” of my database. After test finished you’ll have to manually delete (button Delete) each one of my components (if you are skilled with SQL you can of course empty the DB in one shoot)
operazione da fare all’installazione, non sarà più necessaria successivamente / this operation is required once only at first installation
Avviare la console MariaDB console usando / start MariaDB console
inserire la password per MariaDB indicata durante l’installazione (nel mio caso 123456) / digit password you set during MariaDB installation (123456 in my case)
a questo punto si aprirà la console di MariaDB / here is MariaDB console
scaricare dal mio sito e salvare sul computer il file: HAM_ik1bxn-components.sql
download and save somewhere in your filesystem the file: HAM_ik1bxn-components.sql
dal prompt di MariaDB digitare il comando / from MariaDB prompt digit the command
CREATE DATABASE IF NOT EXISTS EL_Components;
a questo punto abbiamo creato il database EL_Components che però è vuoto. Importiamo quindi il dump del mio database
now we have created the database (empty) and it’s time to import my dump file
Chiudere la console di MariaDB digitando il comando / close MariaDB console with command
quit
dalla riga di comando digitare il comando (PRIMA modificando il path per raggiungere il file scaricato HAM_ik1bxn-components.sql)
from the prompt digit the command (BEFORE sending command adapt path to your downloaded HAM_ik1bxn-components.sql)
inserire la password per MariaDB indicata durante l’installazione (nel mio caso 123456) e se non vengono segnalati errori tornerà il prompt
digit the password you set during MariaDB installation (123456 for me) and if everything will be OK the console will return to the prompt
verifichiamo che l’importazione del dump sia andata a buon fine. Avviamo nuovamente la console con il comando mariadb -u root -p e digitiamo la password (123456 nel mio caso)
let’s check now if dump importing is really OK. Start MariaDB console (we closed it before) by sending the command mariadb -u root -p and digit the password (123456 for me)
spostiamoci sul nostro database con il comando: USE EL_Components;
make EL_Components database active with the command: USE EL_Components;
nel database EL_Components c’è solo la tabella Components, possiamo verificarlo con il comando SHOW TABLES;
EL_Components database contains 1 only Table, we can check it sending the command SHOW TABLES;
possiamo vedere la struttura della tabella components con questo comando: SHOW COLUMNS from Components;
let’s now have a look on how table Components is structured with this command: SHOW COLUMNS from Components;
per verificare che il database sia popolato digitiamo il comando: SELECT * from Components;
let’s check now if the database is populated by sneding command: SELECT * from Components;
ora occorre sistemare l’accesso al database. Per farlo creiamo utente HAM_User con password password per accedere al database da Node-Red digitando il comando: CREATE USER HAM_User@localhost IDENTIFIED BY ‘password’;
now we need to setup a user to access the database. It will be username HAM_User with password password. To create this user we’ll send the command: CREATE USER HAM_User@localhost IDENTIFIED BY ‘password’;
verifichiamo che l’utente HAM_User sia OK con il comando: show grants for HAM_User@localhost;
check the user just created is OK using the command: show grants for HAM_User@localhost;
diamo i privilegi di accesso all’utente HAM_User con il comando: GRANT ALL PRIVILEGES ON *.* to ‘HAM_User’@’localhost’ WITH GRANT OPTION;
now we need to set permissions for HAM_User and the command to send is: GRANT ALL PRIVILEGES ON *.* to ‘HAM_User’@’localhost’ WITH GRANT OPTION;
A questo punto il database è pronto per essere utilizzato dall’applicazione Node Red
Finally the database is ready to be used by Node Red application
NOTA / REMARK: l’utente HAM_User e relativa password è scritto nel nodo database / user HAM_User and its password are indicated in the database node
Importazione del mio flow in Node-Red /
Import my flow into Node Red
Apriamo l’interfaccia di Node Red con il browser / with browser open Node Red interface
http://localhost:1880/
seguiamo i seguenti passaggi / follow here below steps
selezionariamo il file EL_Components 4 August 2025 flows.json scaricato premere Apri
select the file EL_Components 4 August 2025 flows.json you downloaded and press Open
a questo punto nell’interfaccia di Node Red abbiamo un TAB nuovo
at this point into our Node Red workspace there’s a new TAB
andando su EL_Components premendo il pulsante Deploy (ovvero la messa in linea del nostro flow)
click on EL_Compnents TAB and press Deploy
riceveremo un elenco di “nodi” sconosciuti alla nostra installazione di Node-Red (all’installazione Node Red installa un set di nodi basilare)
we’ll get a list of “unrecognized types” and Deploy fails(Node Red during installation has a basic node set)
dovremo quindi aggiungerli / let’s add missing nodes
questo è l’elenco dei “nodi” che devono essere installati affinchè il Deploy non dia errori
here is the list of nodes required by this application (the “node-red” is already installed of course)
per aggiungerli premere il Tab Install e digitare il nome di ciascun nodo (nell’esempio il nodo excel)
press Install TAB and write the name of a missing node (one at a time) in the example I’m adding “excel” node
premere il pulsante Install per installare il nodo node-red-contrib-excel
press “Install” to install node-red-contrib-excel onto your Node Red
Ripetere l’operazione per tutti i nodi mancanti.
Repeat step for each missing node
Terminata l’installazione di tutti i nodi mancanti premendo il pulsante Deploy non darà più errori
When you’ve completed missing nodes installation press Deploy button and no more errors will come
a questo punto possiamo aprire col browser la dashboard all’indirizzo indicato (attenzione a /ui/ finale) che probabilmente apparirà con i colori sballati (perchè io ho settato lo stile “Dark”)
at this point we can open using the browser the dashboard at the address here below (pay attention to the /ui/ at the end) and probably will have dashboard in a color mess (because I use “dark”Dark” style)
localhost:1880/ui/
per sistemarla seguire i seguenti passaggi / to fix it follow below steps
ecco la dashboard della nostra applicazione / here is our application dashboard
c’è ancora qualcosa da sistemare / one more thing must be touched
Relativamente al pulsante “Export…” occorre adeguare il path dove il file .csv esportato verrà salvato ! Importando il mio flow troverete il mio path (del Mac) che non sarà certamente valido sul vostro computer. Per adeguarlo alla vostra situazione occorre aprire mediante doppio click il nodo “build filename”
With reference to “Export…” button you need to touch the .csv exported file saving path ! This because in the downloaded flow you’ll find my path in use here on my Mac and it will be wrong for your filesystem. To adapt the path to your situation you have to touch “build filename” node properties (by double clicking the node)
ed adeguare il path coerentemente al vostro computer. Completata la modifica eseguire il Deploy
and adapt the path by modifying Curr_Path variable content as highlighted by the red arrow. After modification press Deploy button (top right screen corner) to actualize changes
Ogni volta che avevo bisogno di ascoltare l’audio in uscita da qualche circuito mi trovavo a dover organizzare con fili volanti un amplificatore con altoparlante e tutte le volte era qualcosa di provvisorio che inevitabilmente andava ad occupare spazio prezioso sul mio limitato tavolo di lavoro
Any time I needed a little AF amplifier to check audio output from some circuit I was building I was oblidged to arrange a temporary one adding mess and wasting time and room on my limited lab desk.
Ho quindi deciso di assemblare una soluzione stabile e pronta all’uso. Ho utilizzato materiale di recupero, ad esempio l’altoparlante proviene da una TV mentre il contenitore ha ospitato altre autocostruzioni in passato.
In order to avoid what above stated, I decided to build a stable and ready-to-use solution. I used components from “the scratch corner” (the loudspeaker comes from a Lcd Tv set, the box has been used several times in the past).
Ho previsto un’ingresso stereo con jack da 3,5 mm ed un secondo ingresso con connettore Rca L’impedenza di ciascun ingresso è dell’ordine di qualche decina di Kohm. I 3 ingressi (Right-Left-Rca) vengono miscelati ed inviati allo stadio di preamplificazione basato su un LM358. Il segnale prosegue verso il potenziometro di regolazione del volume ed inviato al modulo amplificatore di “potenza” basato su LM386 (uno di quei moduli a bassissimo costo che probabilmente molti di noi hanno già in qualche cassetto). I due diodi 1N4148 in antiparallelo servono a limitare il segnale in ingresso al modulo “LM386″di potenza”. All’uscita altoparlante è presente un jack che consente l’ascolto su un altoparlante/cuffia esterna disattivando l’altoparlante interno.
I’ve foreseen a stereo jack input and an Rca input. Each input has a few dozen Kohm impedance. The 3 input lines (Right-Left-Rca) are mixed and sent to a LM358 preamplifier. Then audio signal goes into volume potentiometer and its cursor feeds the LM386 “power amplifier” that’s one cheap module that probably many of us already have somewhere in a drawer. The couple 1N4148 antiparallel diodes cares of limiting signal level amplitude. In the front panel there’s a jack to connect an external speaker or headphone.
Ho inserito anche un misuratore del livello di ingresso a barra di Led con i primi 7 segmenti verdi e gli ultimi 3 rossi che ho tarato in modo da accendere il primo segmento rosso quando il segnale in ingresso raggiunge i 150 mV. Non è certamente uno strumento di misura, ma mi fa comodo se devo fare qualche regolazione grossolana su qualche circuito senza essere obbligato ad accendere l’oscilloscopio.
I added a bar graph input VU meter (7 green+3 red bars) I adjust it to glow up first red bar when input signal is higher than 150 mV. Of course this one is not an instrumental grade meter, but I found it useful any time an approximate indication is enough for what I’m doing (otherwise I use the oscilloscope)
Il tutto è alimentato a 220 v ed è quindi sempre pronto all’uso
An internal 220 Vac power supply has been included so this amplifier is always ready to usewithout any additional cabling.
Questo è lo schema elettrico / Here is the circuit diagram :
Il montaggio non presenta alcuna complessità nè criticità. Le uniche “tarature” da fare sono:
applicare su un’ingresso un segnale audio da 150 mV a 1 KHz e regolare il trimmer RV2 affinche si accenda il primo segmento rosso della barra di Led
applicare su un’ingresso un segnale audio da 300 mV a 1 KHz e mettendo RV1 per il massimo volume regolare il trimmer (se presente) a bordo del modulo LM386 in modo che non ci siano inneschi nè distorsioni. Controllare anche che non scaldi troppo, questi moduli non sono fatti per erogare grandi potenze e proprio per evitare di sollecitarlo troppo ho scelto di alimentarlo a 8 v anzichè 12 v
Building is easy and no critical issues, only few adjustments are required:
feed one of the inputs with a 150 mV audio signal at 1 KHz and adjust RV2 to get the first red bar led glowing
feed one of the inputs with a 300 mV audio signal at 1 KHz, rotate volume potentiometer RV1 full CW and adjust LM386 module input potentiometer (if present) in order to avoid whistles and distorsions. Also keep an eye at LM386 temperature, these modules are not designed for heavy power output (to limit overloads I preferred to feed it with 8 Vdc insted of 12 Vdc)
06 August 2025: added Ethernet -> rs232 adapter details and configuration screenshot
Con questa versione è stata aggiunta la sincronizzazione CAT con RumLog, quindi adesso è possibile inviare la banda corrente (ricavata dalla frequenza del Vfo A o Main rx) all’Acom 600s utilizzando Flrig o MacLoggerDX o RumLog (che usa il formato CAT di N1MM sulla porta Udp 12060). Con l’occasione ho provveduto alla pulizia del flow al fine di renderlo più intelleggibile.
In this version synch to RumLog was added. Now it is possible to send current band info (retrieved from Vfo A or Main rx frequency) to the Acom 600s using Flrig or MacLoggerDX or RumLog (that uses N1MM CAT format published over 12060 UDP port). With the occasion I made flow cleanup in order to make it more readable.
In RumLog deve essere attivato l’invio delle informazioni CAT sulla porta 12060 (dal momento che il mio Node-Red server si trova su un computer diverso da quello di stazione ho preferito indicare il suo IP al fine di limitare il traffico sulla rete , ma normalmente va bene 255.255.255.255).
In RumLog Preferences/UDP “Radio N1MM” must be checked to activate CAT info sending over UDP 12060 port (as here Node-Red server is hosted on a separate computer I preferred to indicate its IP address in order to reduce network traffic, but normally 255.255.255.255 is OK)
Per chi non avesse letto gli articoli precedenti ricordo che questo progetto serve ad eliminare il cavo del segnale di banda che di solito collega il lineare alla radio. La mia soluzione prende l’informazione della frequenza corrente dall’applicazione che gestisce il CAT, ne estrae la banda ed attraverso il protocollo Acom la invia sulla porta rs232 del lineare. Io ho potuto testarlo a fondo solo sul 600s ma mi aspetto che funzioni analogamente anche su altri modelli di lineari Acom in quanto non mi risulta che Acom abbia aggiornato il suo protocollo.
For those didn’t read previous articles about this project I remember that purpose of this solution I developed is to eliminate “band cable” between rig and PA. This project listen for current QRG from CAT manager, retrieves band info and sends it to the PA using the Acom protocol. I deeply tested this project only with the 600s (is the only PA I own) but I think it should work with other Acom models because as far as I know they didn’t update their protocol.
Questo è lo schema di principio in funzione da oltre un’anno presso la mia stazione
Here is the concept diagram that is running here since more than one year
Il primo vantaggio offerto da questa soluzione è che cambiando radio in uso non occorre commutare il relativo cavo di banda, basta che la radio sia agganciata al programma di gestione del CAT selezionare il Cat Synch sulla console ed il lineare seguirà la banda corrente della radio.
First advantage coming from this solution is that if you switch to another rig you don’t need to switch band cable too, it’s enough to get the rig handled and active in the CAT manager. This done you only need to move the console Synch slide switch to the CAT manager you’re using and the PA will follow the rig band.
Altro vantaggio è la disponibilità della “console” a video mediante la quale è possibile dare i comandi operativi Stby/Operate, vedere lo stato del lineare (Stby/Operate/On Air), leggere la temperatura del lineare ed infine essere informati sulla banda selezionata (il pulsante di banda prende lo sfondo rosso per la banda in uso). Sottolineo che tutte le informazioni mostrate sulla console vengono richieste al lineare e pubblicate sulla console (non vengono create dal programma), questo per rendere affidabili i contenuti mostrati sulla console. E’ possibile utilizzare la console anche senza alcuna connessione CAT (mettendo in Off il selettore del sincronismo CAT) e utilizzando i pulsanti di banda presenti sulla stessa (ovviamente appena si attiva un sincronismo CAT la banda viene immediatamente commutata su quella inviata dal CAT). Infine sulla console è presente anche il pulsante di spegnimento del lineare.
Additional advantage is the “WEB Console” on station computer screen that lets you able to send operating commands to PA such as Stby/Operate, read in which state PA is (Stby/Operate/On Air), whatch the PA temperature and have feedback about which band is currently selected at the PA (the current band button becomes Red instead of black). I wish to underline that all info published on the console come as feedback from PA itself (I mean they are not updated by the console) and this makes console info displayed more reliable. It is possible to send commands even without any CAT manager synchronized (Synch slide switch must be in Off position) and in this way the console becomes a sort of “local control box” and you can change band simply by pressing the relevant band button (of course as soon as you select a CAT manager synch the PA will switch to band the CAT manager send). On the console you’ll find also a Shutdown button.
La prima versione di questo progetto prevedeva un collegamento seriale fra il computer ed il lineare. Successivamente l’ho sostituita con un collegamento via rete (impiegando un convertitore rs232/ethernet) in quanto il computer (Debian nel mio caso) che ospita questa applicazione insieme ad altre in servizio h24 (MQTT, MariaDB eccetera) si trova lontano dal lineare quindi non ho ritenuto opportuno usare un cavo rs232. Così facendo ho colto un ulteriore vantaggio perchè qualora ci fossero problemi di RFI la comunicazione via LAN è più affidabile.
First release of this project was based on a serial connection to the PA. Later I moved to an Ethernet connection (by adding an Ethernet -> rs232 adapter) because the computer hosting this project (Debian OS) and other tools running here h24 7/7 (MQTT, MariaDB and others) is far from the PA so it was not thinkable to lay an rs232 serial cable. Doing this I gain another goal because Ethernet communication is more reliable in case of RFI than the serial.
Questo è l’adattatore Ethernet -> rs232 che ho usato e la sua configurazione è estremamente semplice
Here is the Ethernet -> rs232 adapter I used in this project and its configuration it’s easy
Ricordo infine che questa soluzione è stata sviluppata con Node-Red (gratuito e disponibile per Windows-Linux-Mac) e la console si accede aprendo una pagina web della nostra Lan (pertanto fruibile anche con uno smartphone ad esempio) , quindi per avere la console non c’è nulla da installare sul computer di stazione ed il computer sul quale gira Node-Red (il quale pubblica la nostra web console) può trovarsi sia sul pc di stazione che su qualsiasi altro PC della nostra rete.
I remind you this project has been developed in Node-Red (that’s free ad available for Windows-Linux-Mac) and to use the WEB Console you simply will open an our LAN web page (even with a smartphone). This means that in order to get the WEB Console ready you don’t need to install any application and the computer hosting Node-Red (that publishes the WEB Console) can be the hosted by shack computer or any other computer in the LAN.
Con un po di conoscenza informatica è possibile adattare questo progetto ad altri gestori CAT (anche se probabilmente quasi tutti hanno già un interfaccia Udp pronta in formato N1MM sulla porta 12060) e ad altri lineari andando a modificare i contenuti delle “stringhe” di comando ed adeguando il modulo che legge le informazioni rilasciate dal lineare.
With a basic developent knowledge it is possible to adapt this project to interface other CAT manager apps (but I think on today many of them already have the N1MM over UDP 12060 built in) and it is possible to interface other linear amplifiers from other brands by touching command “strings” and adapting incoming info module from the PA.
Per conoscere in dettaglio e capire come è stata concepita e sviluppata questa soluzione e per le indicazioni di come installare ed usare Node-Red vi rimando alla lettura di questi articoli:
Here you can find more and deeper info about this project development and on how to setup Node-Red :
NOTA: dal momento che viene presa in carico la sola frequenza del Vfo A o Main questa console non può essere utilizzata in operazioni in Split su 2 bande diverse (crossband operation).
REMARK: as told this project reads ONLY Vfo A or Main rx QRG so it cannot be used in crossband split operations
Modificate i riferimenti dei nodi Tcp-Udp-XML RPC per renderli coerenti con la vostra rete (indirizzi IP, nomi su rete) in quanto nel flow scaricato trovate i riferimenti alla mia rete
Please modify Tcp-Udp-XML RPC nodes in order to adapt them (in terms of IP addresses, host names) to your networking, because the flow you dowloaded from here contains my networking references
Specialmente per le operazioni in portatile col 705 mi serviva un piccolo keypad che mi permettesse anche di accordare il tuner esterno (non Icom). Ho così pensato di raggruppare le due funzionalità in un unico piccolo contenitore.
Expecially for field operation with my 705 I was looking for a little keypad to recall memories and equipped with a “Tune” button to drive my external ATU (not Icom) for tuning.
Nel mio caso bastavano 4 memorie richiamabili ed usando solo la CW dovevo conservare la possibilità di utilizzare il paddle (il jack Key del 705 viene impegnato dal collegamento col keypad). Lo schema che ho utilizzato per la funzione Keypad è quello presente sul manuale del 705 (limitandomi ai soli pulsanti S1-S4).
In my case 4 memories are enough, but as I work CW I needed a socket to connect the paddle to (keypad must be connected to 705 KEY jack so no other way to plug the paddle in). The keypad diagram I used is the one you can find in the 705 maual (limited to S1-S4 switch as above stated).
Per quanto riguarda il pulsante che permette di mandare una portante con tono fissa necessaria all’accordatore esterno per trovare l’accordo ho trovato questa soluzione già pronta che funziona perfettamente (grazie a BjornSM7IUN) https://sm7iun.se/station/ic705/
“Tune” button stage that cares of sending in Tx a continuous note needed to drive the external ATU for tuning phase comes from a Ham project (many thanks toBjornSM7IUN) I found on the internet at this URL https://sm7iun.se/station/ic705/
Ecco come si presenta la mia realizzazione / Here is my building
Per il corretto funzionamento del keypad occorre seguire quanto indicato nel manuale del 705 (e riportato sul mio schema), mentre per il pulsante Tune occorre cambiare il settaggio del tuner nel menu del 705 come di seguito indicato
In order to have the keypad working please follow set instructios you’ll find in the 705 manual (I recalled them in the diagram). To get the “Tune” button working you need to touch 705 setting as shown here below
a questo punto col 705 spento basta collegare il jack Key alla presa KEY ed il jack Tuner alla presa TUNER del 705
now with the 705 switched Off simply plug Key jack into the 705 KEY socket and Tuner plug into the 705 TUNER socket
ed il gioco è fatto / the game has done
Spero questa soluzione possa essere utile ad altri / I hope this solution could help
Added LAN connection to Acom 600s – 28 February 2024 – Flow stays to v. 2.1
Avendo centralizzato Node-Red ed MQTT su un “server” Linux (Debian 12) posizionato lontano dallo shack non era pensabile collegare la rs232 dell’Acom con un cavo seriale lungo più di 20 metri. Ho risolto inserendo un convertitore Seriale –> Ethernet ed ho conseguentemente aggiornato il flow. Qui in basso il link al convertitore che ho usato
As I centralized Node-Red and MQTT on a Linux (Debian 12) “server” located in a room outside the shack I couldn’t connect anymore the Acom rs232 port with a serial cable (its length would have been more than 20 meters). I solved this issue using an rs232 –> Ethernet adapter, the flow has been touched consequently. Here below you’ll find the adapter I used
Questa modifica rigarda SOLO l’interfacciamento con l’Acom quindi chi intende collegare l’Acom direttamente con il cavo seriale deve usare il flow che trovate più sotto nell’articolo, mentre chi preferisce il collegamento LAN dovrà usare il flow indicato qui sopra.
This revision is relevant ONLY to Acom interfacing so if you are going to reach the Acom using a serial cable you will use the flow downloadable more below in this article. If you prefer to use the LAN to reach the Acom you will use the flow here above added.
New version issued on 10th January 2024 – Flow updated to v. 2.1
Ho aggiornato la precedente versione della console web per l’ Acom 600s aggiungendo la possibilità di prendere l’informazione di banda da FLRIG oltre che da MacLoggerdx.
I just updated “Acom 600s web console” previous version and now band info can be retrieved from FLRIG too. So now it works with FLRIG or MacLoggerDX.
Aggiunto/Added “Did QRG change ?” node – Ora la frequenza viene inviata all’Acom solo se è cambiata / Now QRG is sent to the Acom only if it changed
Aumentato a 20000 il Timeout per la seriale in uscita verso l’Acom / Serial out to Acom Timeout increased to 20000
La nuova versione 2.1 / The new 2.1 version
Resta valido quanto descritto nel precedente articolo (https://www.ik1bxn.it/wp/2023/04/20/acom-600s-web-console-and-macloggerdx-integration/) a meno del “flow” aggiornato (scaricabile da questo articolo), della console e delle informazioni di configurazione per il collegamento con FLRIG. In questo articolo mi limiterò a descrivere solo le differenze rispetto alla versione precedente e le modalità per implementare questa nuova versione
Previous version article contents (https://www.ik1bxn.it/wp/2023/04/20/acom-600s-web-console-and-macloggerdx-integration/) are still valid except for the “flow” new version (you can download from this article) for console and for FLRIG connector configuration.In this article I will describe only differences respect previous version and how to setup this new version
Con l’occasione ho ridisegnato la console per ridurre lo spazio occupato a video. Ho eliminato i “LED” di segnalazione sostituendoli con la colorazione in rosso del pulsante della banda attiva e dei pulsanti di STBY (verde quando selezionato) e Operate (rosso quando selezionato).
With the opportunity I redrawed the console layout in order to reduce its dimensions on the screen. In particular I removed “LEDs” and now the current band button becomes RED backgrounded, STBY button will be in GREEN when in STBY and Operate button will become RED when in Operate
La nuova console / New console
Ecco un breve video che mostra l’operatività / Here’s a short video that shows new console operativity
Le novità / What’s new
Il selettore a 3 posizioni permette di scegliere se sincronizzare automaticamente la banda attiva con il gestore del CAT (FLRIG o MacLoggerDX) oppure no (OFF). UNA sola scelta fra le 3 è possibile. Posizionato su OFF sarà possibile comandare il cambio banda dell’ Acom premendo il corrispondente pulsante di banda della console. Posizionandolo su FLRIG o MLDX (MacLoggerDX) l’Acom cambierà banda automaticamente seguendo la banda corrente in uso su FLRIG o MacLoggerDX.
By clcking the 3 position “switch” labeled “Synch” you can choose whether retrieve current active band fro your CAT managing app (FLRIG or MacLoggerDX) or no synch. Only 1 of the 3 possibilities can be selected at a time. When in OFF position you have the possibility to change band by pressing a console band button. When in FLRIG or MLDX (MacLoggerDX) your Acom will follow band currently selected in FLRIG or MLDX.
Ovviamente quando si è sincronizzati con FLRIG o MLDX la pressione di un pulsante di banda sulla console diventa inefficace perchè l’informazione di banda in arrivo dalla sincronizzazione sovrascriverà immediatamente il pulsante che abbiamo premuto.
Obviously when the console is synchronized with FLRIG or MLDX any band button click will do nothing because the band info coming from synchronization will override any band button choice
Come evidenziato nel precedente articolo la console mostra la banda corrente (ora evidenziandone in rosso il relativo pulsante) ricevendo questa informazione dall’Acom e non a seguito della pressione di un pulsante (il che potrebbe mostrare false informazioni). In altre parole quando un pulsante di banda si illumina significa che è stato l’Acom a dire alla console “sono posizionato su questa banda”.
As underlined in previous article the console shows current band (now relevant button with red background) by receiving band info from the Acom and not by trusting a console button press (this would generate false info). Into other words when a band button becomes red backgrounded it means that the Acom told the console “I am ready on this band”
Stesso concetto vale per i pulsanti STBY/Operate.
Above considerations for band buttons are valid for STBY/Operate buttons too
Per questa ragione i pulsanti non cambiano colore immediatamente appena c’è stato un cambio banda o la pressione di STBY o Operate
For what above described the buttons will not change their background color as soon as a band change or STBY/Operate change is performed, they’ll take a while to actualize their look
Il Flow aggiornato / Updated flow
Occorre aggiungere al nostro Node Red server nr 2 nuovi nodi (se necessita aiuto vedere articolo “PowerPole distributor” paragrafo “Installazione server / Server setup” al punto “Manage palette”):
Nr 2 new nodes must be added to our Node Server (if you need help see “PowerPole distributor“paragraph “Installazione server / Server setup” segment “Manage palette”):
Il nodo “Multistate switch” è il selettore di sincronismo a 3 posizioni
“Multistate switch” node cares of create Synch 3 positions switch
mentre il secondo nodo si occupa della comunicazione XMLRPC con FLRIG
second node needed named “xmlrpc” cares of FLRIG XMLRPC communication
qui premendo il pulsanto a destra del campo Client dovremo indicare l’indirizzo IP del computer sul quale gira FLRIG e la porta di comunicazione XMLRPC
in this window by clicking the button on the right of Client field we have to indicate the IP address for the computer hosting FLRIG and the FLRIG Xmlrpc port (default 12345)
Fatto questo ci resta solo da scaricare il flow aggiornato
ed importarlo nel nostro Node Red server (se necessita aiuto vedere articolo “PowerPole distributor” paragrafo “Installazione server / Server setup”). Eseguito il Deploy la nuova versione della console sarà disponibile.
and import it into our Node Red server (if you need help see “PowerPole distributor“paragraph “Installazione server / Server setup”). Now Deploy and new console will be available
Un grazie a Lele IZ1UKX per la parte di comunicazione con FLRIG / Thanks to Lele IZ1UKX for FLRIG communication block
Note / Remarks
La console è una pagina web generata dal computer dove gira Node Red server. Sul Mac usando Automator è possibile ritagliare solo la parte della pagina che interessa e farla diventare un’applicazione. Il risultato è questo. Non so come si faccia con Windows o linux ad ottenere questo risultato (ma ci sarà sicuramente un modo)
The console is a web page generated by the computer hosting Node Red server. On the Mac by using Automator is possible to select console area and create an app that opens the console web page with console dimensions. I don’t know how to do this under Windows or Linux, but Im pretty sure there’s a way
Molto probabilmente questa console funziona con altri lineari Acom, ma posseggo solo il 600s quindi non ho potuto fare prove
Most likely this console will wotk with other Acom PA too, but as I own only the 600s I can’t test this
….. that’s all folks !
spero il mio progetto vi sia piaciuto e possa essere utile per la vostra attività. Questa è la versione iniziale, in futuro penso di aggiugere nuove funzionalità Buon divertimento !!!!!
I hope you liked my project and I hope you’ll find it useful for your activity. This one is the initial release, for future I think to add additional features Have fun !!!!!
Com’è noto l’IC 7300 prevede la possibilità di utilizzare un tastierino esterno dotato di 4 pulsanti per mezzo dei quali è possibile richiamare altrettanti messaggi memorizzati. In realtà i messaggi memorizzabili sono 8 ma attraverso il tastierino si possono richiamare solo i primi 4 (strano ma pare essere proprio così).
As known with the IC 7300 and IC 7610 it is possible to use an external keypad to recall the 8 messages available. Actually with the 7300 only the first 4 of them are recallable using an external keypad connected to the Mic connector (odd but is that).
L’impiego di questo tastierino (tipicamente denominato “keypad”) fa molto comodo per trasmettere i contenuti ripetitivi che usiamo normalmente, uno per tutti il CQ. Naturalmente i messaggi si possono richiamare anche direttamente dal display della radio.
Thanks to an external keypad to recall typical messages (for example CQ CQ de IK1BXN Pse k) will become really confortable. It is possible to recall them from the touch screen too of course.
Sul manuale dell’ IC 7300 e del l’ IC 7610 è ben descritto come memorizzare i messaggi ed anche come costruire un Keypad (non essendo fornito a corredo della radio). La realizzazione di questo Keypad non presenta difficoltà elettroniche nè criticità, direi che è veramente alla portata di tutti.
In the 7300 and 7610 documentation is well dscribed how to store messages and how to build an external keypad (as it’s not supplied with the rig). To build the keypad is really easy and no critic.
In questa pagina presento la mia realizzazione, una delle tante possibili. Ho impiegato materiali molto economici e reperibili con facilità come un tastierino con 4 tasti a pressione (ampiamente usato nel mondo di Arduino), una scatoletta in plastica e ritagli di basetta millefori.
In this page I’ll describe my built, one of the several possible. I used cheap and easy to find components (buttons strip I used is common in Arduino projects).
Anche la costruzione è estremamente semplice / Even build is absolutely easy
Ora lo schema elettrico, sul quale ho riportato la piedinatura del tastierino che ho impiegato e le voci di menu da modificare sulla radio per attivare la funzionalità del keypad
Now let’s have alook to the diagram on which you’ll find strip button pinout I used and menu to setup on the rig in order to activate the keypad.
Questo è lo schema per il IC 7300 / Here is the diagram valid for IC 7300
Aggiornamento 14 Febbraio 2026 / 2026 February 14th update
Aggiornato schema alla situazione attuale / Diagram update to current setup
Aggiornamento 28 Febbraio 2024 / 2024 February 28th update
Inserito connessione LAN all’Acom / Added LAN connection to the Acom
Aggiornamento 4 Gennaio 2024 / 2024 January 4th update
Inserita nuova Acom 600s web console / Added new Acom 600s web console
Nel capitolo “Autocostruzioni” di questo sito sono presenti soluzioni che ho pensato per “integrare” i componenti della mia stazione HF con la finalità di rispondere alle esigenze del mio modo di operare in radio.
Under “Autocostruzioni / Homebrew” menu you’ll find some solutions I thought to “integrate” my HF shack gears with the goal to match my needs and my operation habit.
I componenti principali della stazione/ Main shack components
Antenna: ho una sola antenna multibanda HF sul tetto ed una filare con accordatore SGC sul terrazzo
Antenna: I have one only multiband HF antenna on the roof and a wire on the balcony connected to SGC autotuner
Radio: normalmente uso 2 radio alternativamente
Radio: usually I run 2 rigs alternately
Amplificatore lineare: ne posseggo uno (Acom 600s)
PA: I own one PA (Acom 600s)
Accordatore d’antenna: uno automatico (Palstar HF-Auto)
Antenna tuner: 1 automatic (Palstar HF-Auto)
Alimentatore: uno per tutta la stazione
Power supply: one for all gears
Computer: Apple iMac 24″
Per chiarire le ragioni che mi hanno spinto a pensare e realizzare certe soluzioni, diamo un’occhiata d’insieme allo scenario complessivo oggi in uso:
In order to clarify the reasons that drove me to design such solutions let’s take a look at whole scenario in use now here:
usare un solo alimentatore dotato delle opportune protezioni (sovracorrente, corto circuito e sovratensione di uscita) capace di alimentare una sola radio da 100 W in trasmissione (ne uso sempre solo una alla volta) e gli accessori di stazione
distribuzione dell’alimentazione selettiva in modo da tenere sotto tensione solo le apparecchiature che sono in uso (ricordo che nei moderni RTX a stato solido anche da spenti se alimentati la tensione raggiunge lo stadio finale per tutto il tempo in cui è presente)
ridurre al minimo le manovre manuali in caso di cambio apparato in uso (CAT, comando Key e info di banda per l’amplificatore) , antenna mentre per i tasti preferisco averne un paio disponibili sul tavolo. Non facendo fonia in HF non mi sono preoccupato del microfono, per questo comunque c’è la mia soluzione di “Switch microfonico” qui sul sito e che uso in Vhf/Uhf)
usare un solo computer per tutte le attività sul quale girano un solo gestore del CAT (al quale i CAT di tutte le radio convergono) un solo logger un solo programma per i contest. Con il 7610 uso WinKeyer (contenuto nella DXP) in quanto Skookumlogger (applicazione Mac per i contest) con Winkeyer è perfetto
Targets:
touse one only power supply equipped with proper protections (overcurrent, short circuit and most important for me OVP Over Voltage Protection) dimensioned to feed one 100 W rig (i use one only one RTX a time) and station accessories
tohaveselective power supply distribution in order to feed only currently active gears (remember that modern solid state RTX keep final stage fed even if main switch is Off until power supply is disconnected)
tolimit as much as possible manual actions needed when I change active rig (CAT, Key and band info to PA, antenna. For CW keys I prefer having more than one key on my desk. As I don’t operate voice mode I didn’t care about microphone, for that you can see my solution I use with Vhf/Uhf rigs here in this site named “Switch microfonico v2” under “Autocostruizioni / Homebrew” menu)
to use one only computer for all activities, running unique CAT manager (all rigs are over there defined/configured), unique logger and unique contest application. With the 7610 I use WinKeyer (built inside the DXP) bacause Skookumlogger is perfect with WinKeyer
Operatività/ Operation
Per passare da una radio all’altra devo compiere le seguenti operazioni:
To switch from a rig to another I’ve to follow these few steps:
commutare l’antenna agendo sul commutatore a matrice Elad. Questa è l’unica manovra manuale perchè purtroppo l’Elad non è comandabile da remoto
switch antenna on Elad matrix switch. This is the only one manual action because the Elad has no remote interface
alimentare l’altra radio comandando dalla sua pagina web il distributore powerpole
switch power supply line to the radio I’m going to use by selecting it on my poerpole distributor web interface