Bacula – Standalone and centralized Backup
August 2nd – An observation to better understand. Today was the month first sunday so as per scheduling configuration the system performed a Full Backup (instead of a Differential as it happens on each other Sunday). Next jobs (until next month first sunday when a new full backup will be performed) will use this Full backup as reference to understand which files are touched or newly cretaed so they need to be saved in future daily backup sessions.

July 8th – This article bottom added paragraph: My considerations after running Bacula “in production” for a significant amount of time
June 24th – Mac client setup paragraph: added clarification and warning about paths
June 23th 2026 – added Tips & Workarounds paragraph
June 17th 2026 – added Mac file daemon setup and configuration
April 10th 2026 – First issue
Il backup è uno strumento fondamentale che ci permette di mettere i nostri dati al riparo non solo dai guasti al disco sul quale li salviamo ma anche dai nostri possibili errori (cancellazioni non volute, sovrascritture ecc).
Backup is an important tool that keeps our data safe from faults or our operating mistakes (data deletions, overwrites and so on)
Spesso quando si parla di “backup” si pensa ad una copia dei dati su un’unità esterna (Nas, chiavetta Usb , dischi removibili, Cloud ecc) ma questo significa sprecare tempo e spazio dal momento che di solito si copia tutta la/le cartella/e anche se magari dall’ultimo “backup” è stato aggiunto o modificato un solo file. Dobbiamo anche ricordarci di fare il “backup” o pianificarne l’esecuzione in modo che il computer lo esegua automaticamente. Inoltre se volessimo ripristinare un file a come si trovava 10 giorni fa probabilmente non avremmo speranza perchè di solito si salva tutto sovrascrivendo la copia precedente di quello che chiamiamo “backup”. Infine nel caso avessimo più computer dovremmo organizzare e gestire il “backup” per ciascuno di essi.
Often when talking about backup people thinks to a raw copy onto an external media (Nas, Usb stick, removable HD, Cloud etc) but this means a waste of time and space because very often all directories content is copied without caring of what has really been touched or fresh created. In addition it may be very hard (if not impossible) to restore a file as it was 10 days ago for example. Furthermore this operation habit works only if you remember to perform the copy or if you had configured the automatic copy process…if you have more than 1 computer you have to instruct each one of them for this job
Il backup propriamente detto è invece un sistema organizzato e strutturato in modo da salvare i dati solo quando è necessario (ovvero nuovi o modificati rispetto a quanto già salvato in precedenti sessioni di backup), di storicizzarne le versioni, di rendere agevole il ripristino mediante funzioni di ricerca, di gestire la tenuta dei dati salvati ed altro ancora.
A properly said Backup is an organized system that cares of saving data only when needed (that means when a file has been modified or just created) cares of keeping the versions history, cares of easily restore data (search funcion) cares of keeping saved data for the time we defined we need to keep…and more
Detto questo gli obiettivi del mio sistema di backup sono / All above stated, my goals were
- salvare sul Nas i dati che ho deciso di salvaguardare sui vari computer della rete / to save onto my Nas the data I decided to keep safe
- tenere traccia di tutte le operazioni sul database in modo da trovare facilmente ciò che in futuro potrebbe servirmi / to trace and save in database all backup sessions in order to easily access them in future
- gestire in maniera intelligente lo spazio occupato sul Nas salvando solo i dati modificati o di nuova creazione / storage space intelligent management as only modified or new data are copied
- conservare i salvataggi per il periodo di tempo che ho deciso / to retain data for the time I desire
- grazie ad una interfaccia testuale o meglio ancora grafica avere la possibilità di controllare lo stato di funzionamento del sistema e di ripristinare facilmente e rapidamente dati che ho perduto o che ho erroneamente modificato / thanks to a text or better a graphic interface data restore will be friendly and quick
- in qualsiasi momento voglio poter modificare la configurazione del sistema di backup (aggiungere o togliere files/cartelle da backuppare, modificare la pianificazione dei backup, modificare il periodo di conservazione dei backup via di seguito) / at any time I can modify setup i.e add/remove directories and files to be backupped, change retention time and so on
- non voglio dover compiere azioni quotidianamente, deve girare autonomamente ed in maniera trasparente / no need daily actions, the system runs automatically as planned
In questo articolo farò esplicitamente riferimento ad un software free chiamato BACULA (NON Bacula Enterprise) ma i concetti sono comuni agli altri sistemi di backup propriamente detti. Nella trattazione farò riferimento alla mia implementazione su Linux (Debian) ma Bacula mi risulta esistere sia come “server” che come client anche per Mac e Windows. Questo è il mio scenario
In this article I’ll specifically refer to a backup software named “Bacula” (not Bacula Enterprise) but concepts are common even for other backup system solutions. I’ll describe my implementation in a Linux context, but as far as I know Bacula (“server” and client) exists also for Mac and Windows. Here is my scenario
NOTA: per una visualizzazione migliore delle immagini contenenti molti dettagli consiglio di fare tasto destro del mouse sull’immagine ed aprirla in un nuovo pannello del browser
REMARK: for better images viewing I suggest you to right click images and open them in a separate browser pane
Bacula Backup
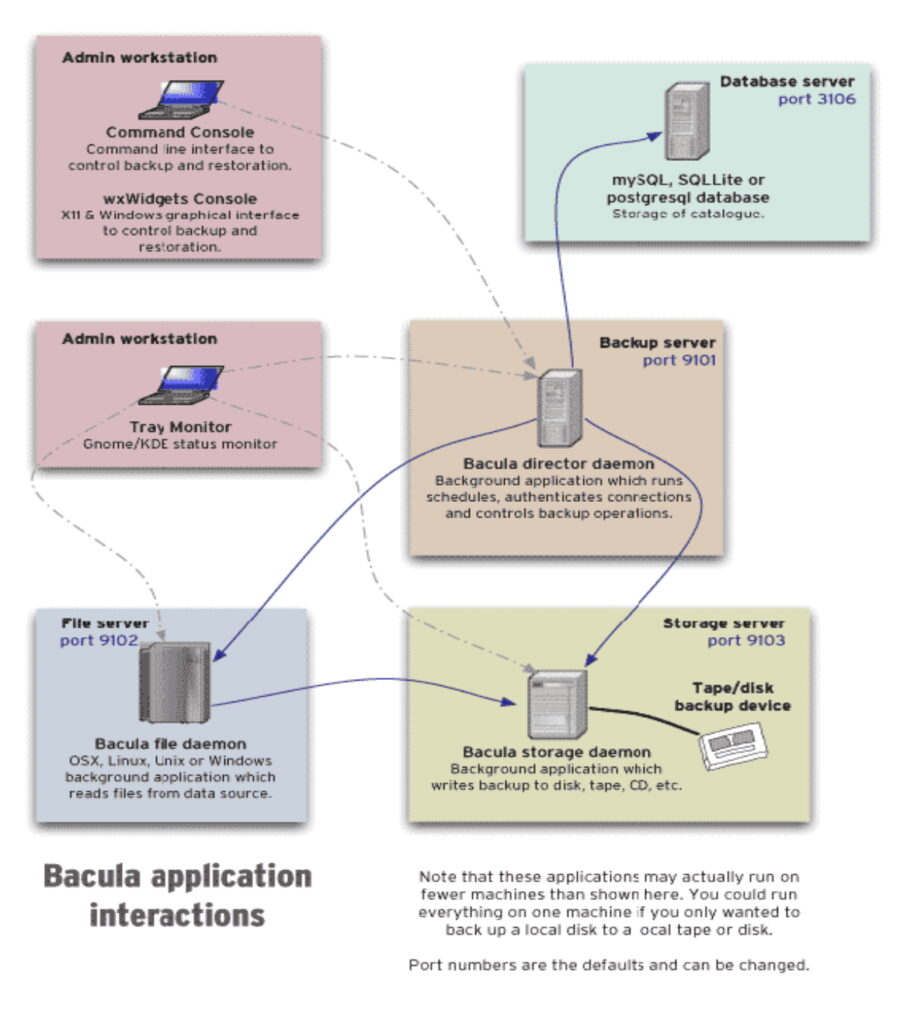
Bacula è un sistema modulare composto da “mattoni” distinti per funzione, in sintesi / Bacula is a modular system and consists of functional “bricks”
Director : il cuore del sistema, al suo interno troviamo descritte tutte le operazioni da eseguire, la definizione delle relazioni con gli altri “mattoni”, la pianificazione del lavoro, la destinazione dei salvataggi, la configurazione per le operazioni di restore / The system core in which operations, relationship with other bricks, storage destination, restore basic configuration are defined
Database : tutte le informazioni relative ai dati salvati nel tempo vengono conservate su un database SQL (di solito PostgreSQL). Ogni volta che il Director esegue un’operazione di backup (o Restore) scrive sul database che file/s ha salvato, data e ora dell’operazione, dove ha salvato, in quale volume, esito dell’operazione / All info about operations are kept in the database. Each time the Director does an activity a database entry is created containing activity type, time, destination, volume used, exit status
File daemon : è l’agente che gira a bordo di ciascun computer messo sotto backup. Quando il Director avvia una sessione di backup questo agente mette in comunicazione il Director col file system del computer (secondo le direttive descritte nel Director per quel computer) in modo che possano essere copiati sullo storage di destinazione del backup o ripresi da quest’ultimo e ripristinati sul disco del computer / is the local computer file system agent that grants communication with the Director in order to let him to access file for saving or restoring them
Storage daemon : mette in comunicazione il Director con la periferica di storage definita nel Director. In caso di Restore veicola i dati che il Director gli chiede verso il computer sul quale devono essere ripristinati. I sistemi di backup nelle applicazioni professionali salvano su nastri removibili o librerie di nastri robotizzate, ma in questo articolo tratteremo solo dell’utilizzo di un NAS / is the agent that connects the Director with the storage device for save/retrieve operations. Professional backup systems use tape library units, here I’ll talk only about one Nas as storage unit
Il dialogo fra i diversi “mattoni” avviene attraverso porte Tcp, in particolare 9101 per il Director, 9102 per il File daemon, 9103 per lo Storage daemon e 3306 per il database SQL. Ciascun “daemon” per comunicare col Director usa la password definita all’interno del Director / Communications among all the “above listed bricks” is up to Tcp, in particular: Director uses port 9101, File daemon/s use port 9102, Storage daemon use port 9103 and Database uses port 3306. Each daemon/s use the password set in Director configuration file to authenticate to
Due parole sulla terminologia usata di un sistema di backup (per approfondire andare al link alla fine di questo paragrafo) / Few words about terminology here used (for more info please refer to documentation, see link below)
Job : è la descrizione di una attività di backup (o di Restore). Al suo interno troviamo: Type Backup o Restore o Verify – Level che sarà Full se vogliamo salvare tutto o Incremental/Differential se vogliamo salvare solo ciò che è cambiato o è stato creato dopo l’ultimo backup – FileSet ovvero l’elenco dei file/s e/o directory (per ciascun computer se parliamo di backup centralizzato) che vogliamo salvare – Storage l’unità sulla quale verranno salvati i dati / Job is the activity description. In the job object basically we find: activity type (Backup, Restore or Verify) – Level (Full to save averything or Incremental/Differential to save only files modified or created since last full backup) – Fileset (files and/or directories to treat) – Storage (destination storage device)
Client : il computer tenuto sotto backup. NOTA: invece dell’IP è preferibile utilizzare il nome del computer nella notazione FQDN (Fully Qualified Domain Name) ovvero il suo nome DNS nella nostra rete (nel mio caso computer_name.fritz.box) / Computer DNS name we are going to backup. REMARK better to use FQDN notation instead of IP address (in my case: computer_name.fritz.box)
Catalog : il database sul quale vengono salvate in dettaglio tutte le operazioni eseguite del Director / The database used by Director to save/retriev action data
Console : interfaccia testuale per interagire col sistema di backup / Bacula builtin command line console to interact with the system
Session : l’attività che viene svolta dal Director a fronte di un job (ad esempio il backup di oggi sarà una sessione, quello di domani un’altra sessione con un nuovo nomero assegnato) / The file activity done when a job is executed (that means today’s backup will be a numbered session, tomorrow backup will be another session with a ne number)
Volumes : è l’unità di archiviazione e viene etichettata in automatico dal sistema. Trattando di archiviazione su Nas questo concetto è poco significativo, ma se archiviassimo su nastri removibili sarebbe fondamentale perchè prima di fare un backup o un restore ci sarebbe chiesto di “montare” il nastro opportuno (ovvero un nuovo nastro oppure un nastro che è finito nello “scratch pool” in quanto è terminato il suo Retention period) / The archive unit automatically labeled by Bacula. Extremely important when the storage is a tape unit, not so much important for us as we are saving onto a Nas so volumes are all always online and no need to mount relevant tape
Retention period : il tempo per il quale le attività vengono storicizzate ed è quindi disponibile il recupero dei loro contenuto. Il concetto di Retention period si applica in maniera distinta ai record del database, ai Files, ai Jobs ed ai Volumes. Scaduto il termine dichiarato in Retention period i relativi records vengono cancellati dal database (Purge), i files i jobs ed i volumi vengono eliminati / Time to retain backup files in the history, when retention time decays database relevant entries are purged and volumes are deleted
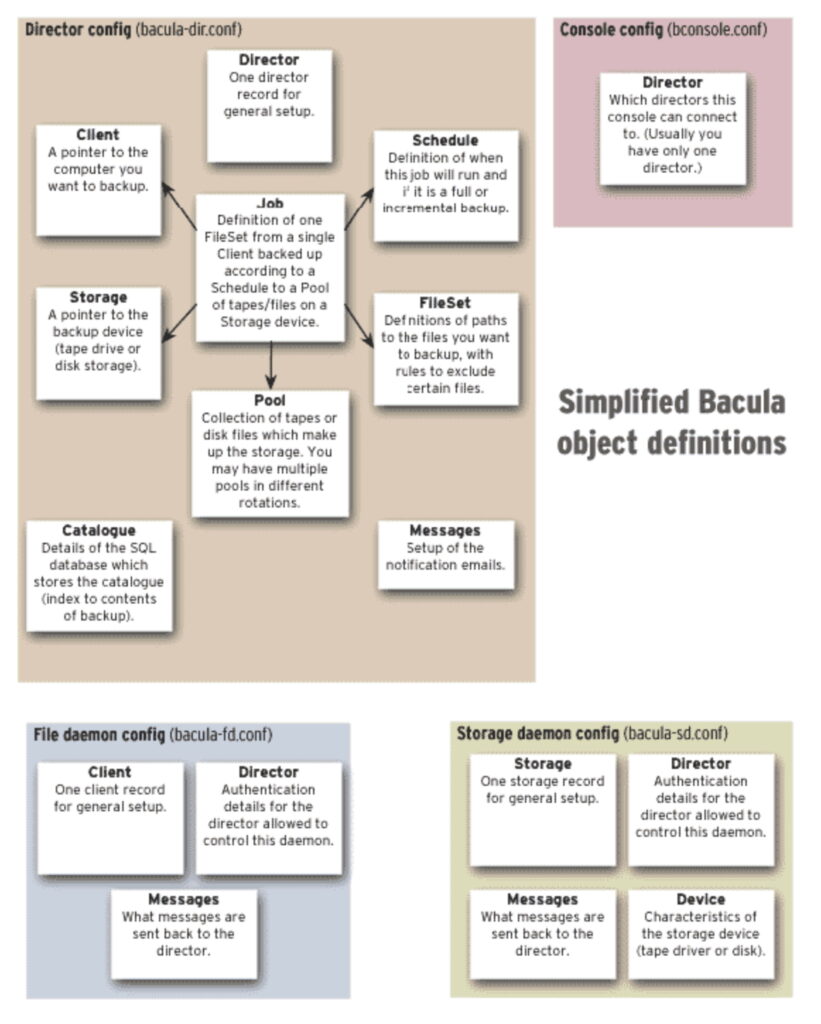
Qui per una visione più approfondita di Bacula / Here the Bacula documentation
https://www.bacula.org/9.0.x-manuals/en/main/What_is_Bacula.html#SECTION00220000000000000000
Bacula setup
Essendo Bacula in grado di gestire anche sistemi abbastanza complessi la sua configurazione prevede numerosi possibili settaggi (ad esempio la parte che riguarda la gestione dei nastri) quindi cercherò di agevolare la configurazione utilizzando come esempio la mia implementazione. Io utilizzo Bacula in maniera centralizzata ovvero in grado di backuppare altri computer sulla rete. Nel caso si voglia limitare il backup al solo computer sul quale gira Bacula sarà necessario eliminare dai files di configurazione le chiamate ed i riferimenti ai computer della rete / Bacula is able to handle quite wide context consisting of many devices to be treated. In addition it supports istibuted functionality resource (for example DB hosted on an external server, several storage devices and so on). In this article I’ll try to simplify the setup by describing my implementation in which few computers are in the game and all “central bricks” are hosted in one computer. Of course if you are interested in setting up the backup for one only computer you can simply define only the file daemon for that computer, into other words you’ll delete (or better comment) from configuration files references to network clients
Installazione / Installation
Bacula è presente nei repository della distribuzione Linux che usiamo, quindi nel mio caso usando Synaptic come gestore dei pacchetti e PostgreSQL come DB selezioneremo questi elementi (ovviamente si può usare anche apt install) / Bacula is available for installation in distribution repository so by using Synaptic (in my case) it is enough to mark packages as per the image here below (of course you can use apt install too). I selected postgreSQL as database but also mysql and sqlite are availalable
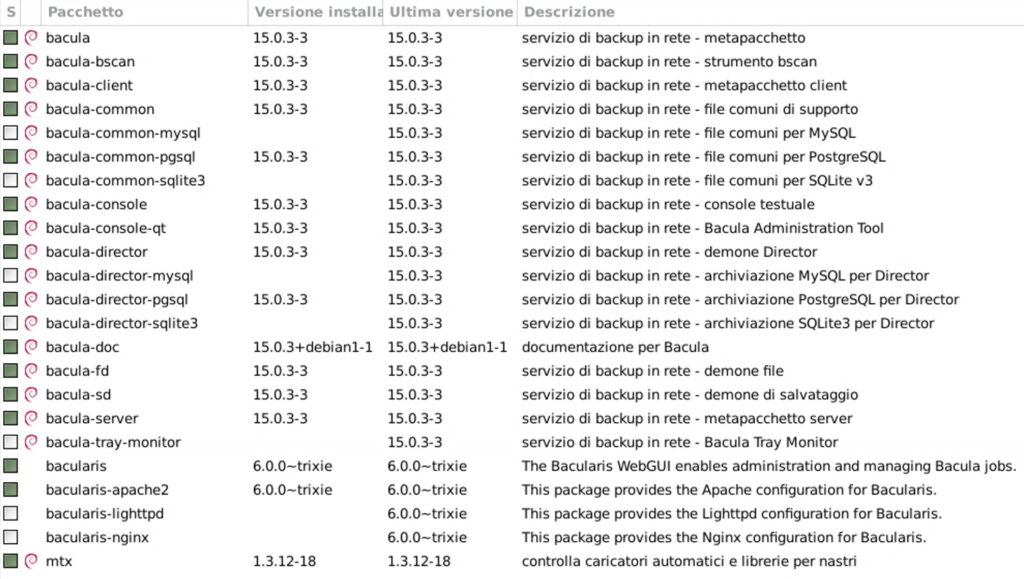
Durante l’installazione del database verrà chiesto di creare una password per il database mi raccomando di annotarla ! / During installation you’ll be asked to set a password for the database PLEASE memorize it !
Completata l’installazione verifchiamo con questi comandi che Bacula sia correttamente installato / Once installation has completed let’s check if everything is OK by executing these commands
- sudo systemctl status bacula-director
- sudo systemctl status bacula-sd
- sudo systemctl status bacula-fd
- sudo systemctl status postgresql (se è stato scelto Postgresql / (if you select postgreSQL)
Configurazione / Configuration
Ciascun “mattone” di Bacula si configura agendo sul relativo file di configurazione (bacula-dir.conf per il Director, bacula-fd.conf per i/il File daemon, bacula-sd.conf per lo Storage daemon. Terminata l’installazione dovremo mettere mano a questi files per adattarli alla nostra configurazione quindi prima di agire fare una copia di bacula-dir.conf bacula-fd.conf e bacula-sd.conf così in caso di errori potremo tornare indietro agevolmente. I 3 files di configurazione menzionati si trovano in /etc/bacula
To configure each Bacula “brick” you must touch relevant .conf file (bacula-dir.conf for the Director, bacula-fd.conf for the File daemon, bacula-sd.conf for the Storage daemon). After installation you must modify these .conf files in order to adapt them to your context. I strongly recommend you to make a safe copy of original files before modify them. The .conf files are located in /etc/bacula directory
Di seguito prenderò come esempio la mia configurazione. Il file di configurazione del director (bacula-dir.conf) contiene molte opzioni possibili quindi estrapolerò dal mio file solo le parti che ho dovuto modificare per adattarle al mio contesto.
In this article I’ll refer to my implementation/configuration. Director configuration file (bacula-dir.conf) contains many possible options so in this article I’ll extrapolate only file parts I touched
Qui c’è una guida benfatta che può essere utile per capire dove modificare i files di configurazione / Here you’ll find a well written guide that may be useful to better understand where to act
https://hostman.com/tutorials/how-to-set-up-backup-with-bacula
Per comodità questi sono i miei files di configurazione che potete usare come traccia (trovate 2 files di configurazione del file daemon, bacula-fd relativo al computer dove gira il Director e l’altro bacula-fd-068 relativo al computer in rete debian068)
Just to give you a complete example here below you can download my configuration files in which you’ll find nr 2 File daemon agent. The one named bacula-fd.conf is relevant to my computer hosting the Bacula Director and the second file named bacula-fd-068.conf is for a network computer called debian068 in my netowrk
Configuriamo il Director / Director configuration
Spostiamoci in /etc/bacula ed editiamo il file bacula-dir.confcon il comando / Let’s move to /etc/bacula and start editing bacula-dir.conf
sudo nano bacula-dir.conf
Cominciamo col definire il nostro Director / Here is Director definition
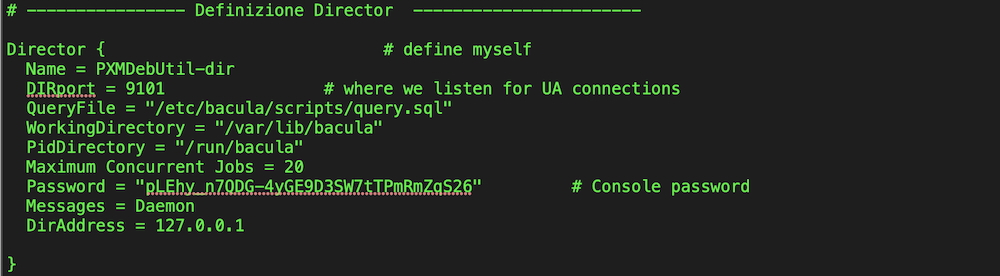
- Name: dovremmo trovarlo già confezionato in quanto costruito automaticamente dall’installatore aggiungendo “-dir” al nome su rete del computer sul quale abbiamo installato Bacula. Nel mio caso il computer si chiama PXMDebUtil quindi il Director è stato chiamato PXMDebUtil-dir / Thanks to the installation you should already find the computer name followed by -dir. In my case as the computer name is PXMDebUtil I found PXMDebUtil-dir
- DIRport: è la porta sulla quale il Director comunica ed anche qui troviamo già la porta 9101 Tcp / Director communication port Tcp 9101
- Password: questa è la password che gli altri “mattoni” dovranno usare per comunicare col Director, ovviamente si può cambiare anche se non ne vedo la necessità / Password to authenticate to the Director. This password has been created by the installer, if you like you can change it even if I don’t see this need
- DirAddress: dal momento che abbiamo un solo director sulla nostra rete e si trova su questo computer va bene 127.0.0.1 / As Director is running on this computer it will be 127.0.0.1 (as told Bacula may handle wide context so you should have more than 1 Director in the network)
Scorrendo il file troviamo la definizione dei jobs / Scrolling down we meet jobs definition
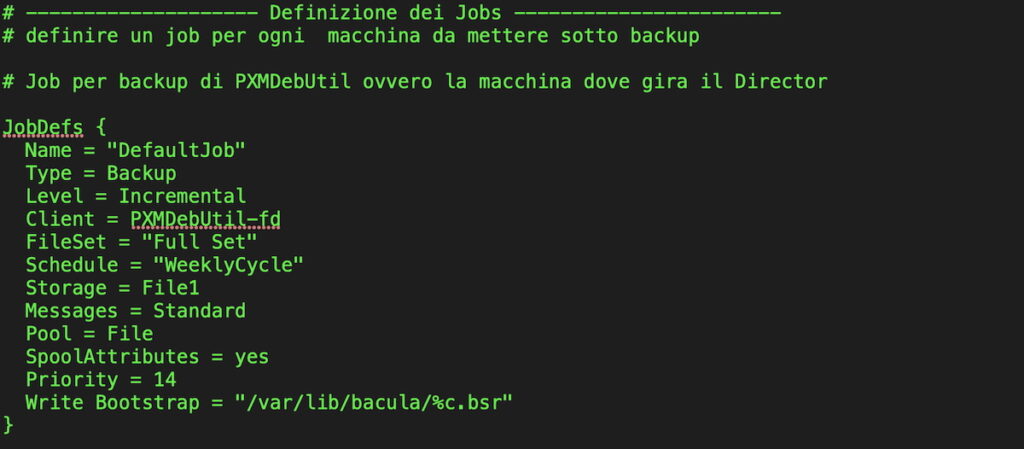
- Name: è il nome col quale verrà richiamato il job / Job name that will be used to invoke the job
- Type: azione del job ovvero Backup/Restore/Verify / job action that may be Backup/Restore/Verify
- Client: il nome del File Daemon / File daemon name
- FileSet: insieme degli elementi da trattare, più in basso sotto questo nome troveremo il dettaglio della/le directory da backuppare / Set of file/directory this job will handle (they will be detailed later in this conf file)
- Schedule: nome della pianificazione, più in basso sotto questo nome troveremo il dettaglio della pianificazione / Schedule name this job will use (will be detailed later in this conf file)
- Storage: nome del device sul quale il backup verrà salvato / Storage device name this job will use (will be detailed later in this conf file)
- Pool: nome del pool di risorse da utilizzare / Pool type, File in our case
- Priority: se abbiamo più jobs attivi questo numero permette di sequenziare i jobs / “Weight ” indicator that let you to sequence jobs execution in case you have more than one job scheduled
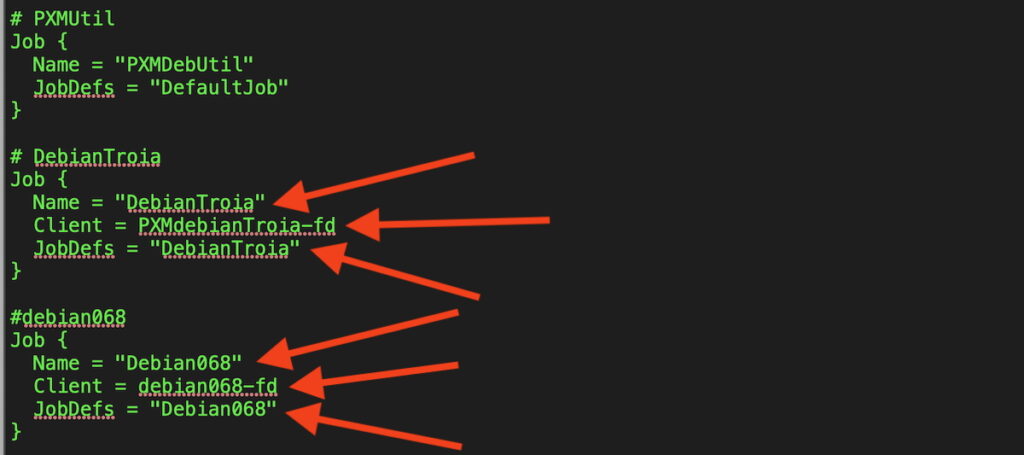
Nel caso intendiamo backuppare altri computer della rete i jobs relativi dovranno essere indicati di seguito / If you’re going to backup some additional network clients place here their jobs definition

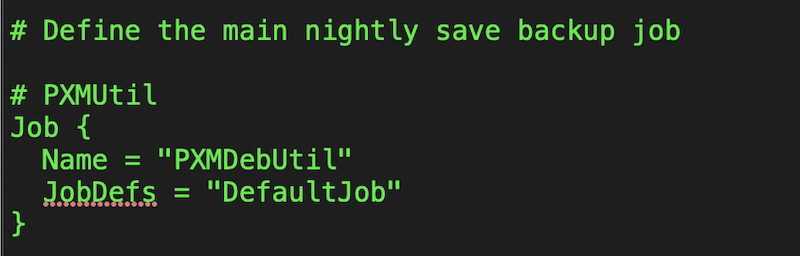
Scorrendo il file troviamo l’attribuzione del tipo di azione che vogliamo eseguire sul computer, nel mio caso il backup del computer PXMDebUtil seguirà le direttive contenute nel job chiamato DefaultJob / Scrolling down the file you’ll find something more about each job. For example here below you’ll see that the backup job named “PXMDebUtil” will follow instructions stated in “DefaultJob”
Nel caso intendiamo backuppare altri computer della rete la configurazione dei jobs relativi relativa andà aggiunta di seguito / If we have additional network clients to backup relevant job will be added here
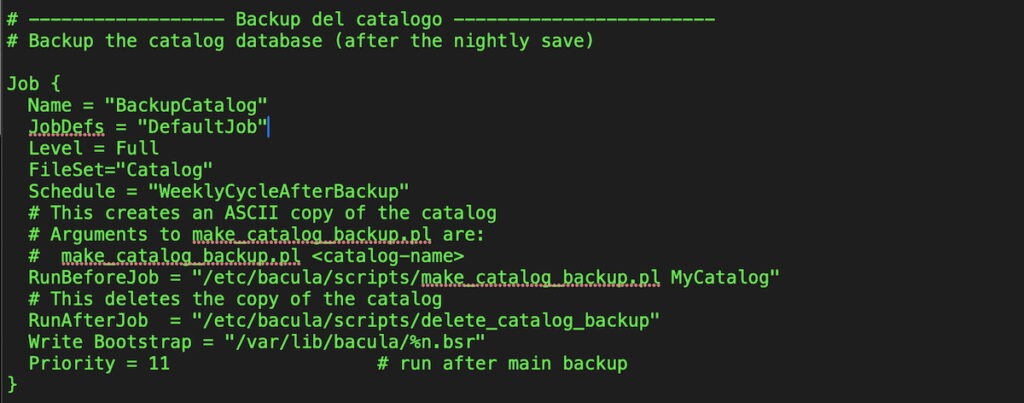
Scorrendo il file troviamo la configurazione del backup del database. Qui ho lasciato la configurazione creata automaticamente all’installazione. Notare priorità 11 che significa che il backup del DB verrà effettuato DOPO l’esecuzione del/dei jobs di backup per il quale la priorità è 14 / Scrolling forward here is the database backup definition. Please observe Priority level set to 11 that means DB backup will be executed AFTER all othe backup jobs were completed as they have Priority level = 14. I Didn’t touch this part, I left it as it was created by the installer
Scorrendo ancora il file troviamo la configurazione del job di Restore / Then we’ll meet Restore functionality definition.
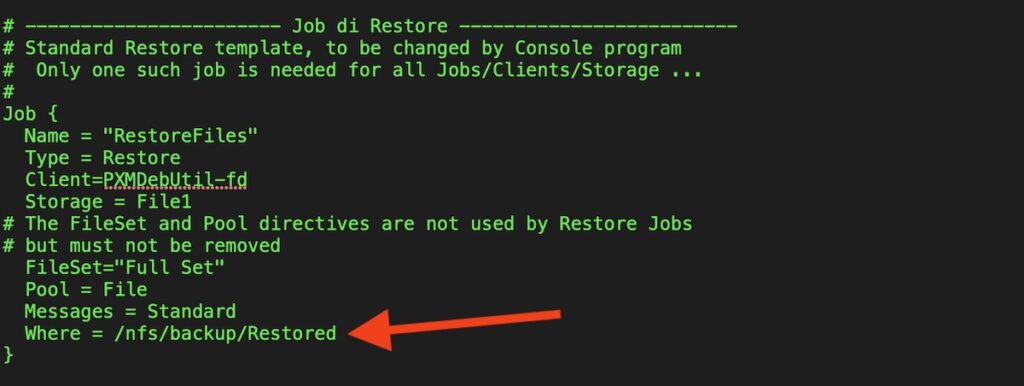
- Name: nome del job di restore (potremmo averne più di uno) / Restore Job name that will be used to invoke the job
- Type: Restore / Type of job activity so Restore
- Client: il nome del File Daemon che verrà invocato per accedere ai files che si intende recuperare / Job name that will be used to invoke the job.
- Storage: il nome del device sul quale sono stati backuppati i files da ripristinare / Storage device name
- Where: dove verranno salvati i file recuperati dal job di Restore / Path in which restored files/directories will be saved
Scorrendo ancora il file troviamo la definizione del “File set” ovvero l’elenco dei files/directories che dovranno essere backuppati / Scrolling one more time here is “File set” definition into other words what we want to backup when this job will run

- Name: il nome col quale questo File set verrà richiamato dal job / FileSet Name that will be used to invoke it
- File: la/le directory da backuppare / directories will be backed up
- Exclude: se ad esempio volessimo backuppare a partire dalla root qui andrebbero indicate le directory sotto la root da ecludere / directories that will be excluded in case we set root as backup path origin
Nel caso volessimo backuppare altri computer in rete le definizioni dei files/directories relativi dovranno essere indicate di seguito / In case we want to backup other clients in the network relevant FileSet must be defined and their FileSet will have a dedicated name.

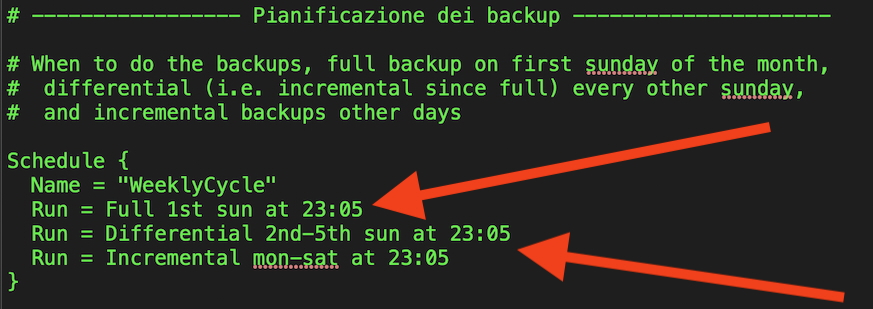
Scorrendo il file troviamo la pianificazione del backup. E’ interessante osservare che / Next file section is dedicated to backup Scheduling. Let’s have a quick glance to
- il Full backup (ovvero tutto ciò che è indicato alla direttiva “File” nella schermata precedente) viene eseguito alle 23:05 della prima domenica di ogni mese / Full backup will backup ALL is declared in the Job Filset without care if its elements have been modified or fresh created. In my case it will run each month 1st Sundayat at 23:05
- Il backup Differential (ovvero di ciò è stato modificato dall’ultimo backup Full all’interno delle directory indicate nella direttiva “File” della schermata precedente) viene eseguito ogni altra domenica del mese / Differential will save what has been modified inside the declared Job FileSET since the last Full backup. In my case it will run each month Sunday at except the first Sunday (there’s a Full backup scheduled the 1st Sunday) at 23:05
- Il backup Incremental (ovvero di ciò è stato modificato e/o creato dall’ultimo backup Full all’interno delle directory indicate nella direttiva “File” della schermata precedente) viene eseguito ogni giorno alle 23:05 / Incremental will save what has been modified or fresh created inside the declared Job FileSET since the last Full backup. In my case it will run mon-sat at 23:05
- Il backup del Catalog (ovvero il database) è sempre del tipo Full (salvato tutto indipendentemente ci siano state modifiche oppure no) viene eseguito tutti i giorni alle 23:10 / Catalog (the database) Full backup will be executed each day at 23:05 after other backup job due to Priority “weight” set above (remember priority 14 for backup jobs and priority 11 for catalog backup ?)
E’ ovviamente possibile modificare la pianificazione per adattarla alle proprie esigenze ritoccando gli orari e/o creando nuovi schemi ad esempio uno schema mensile e chiamarlo come vi pare / Of course you can modify scheduling as you like in terms of timing or if you need by creating new scheduling for example a “MonthlyCycle”

- Name: come al solito il nome col quale viene invocata questa pianificazione. Ovviamente se ne possono aggiungere altre con programmazione e nomi diversi per eseguire backup con cadenze differenti. Se ad esempio avessimo un’archivio di dati che ci basta venga salvato solo ogni domenica dovremo creare una nuova pianificazione, assegnarle un nome diverso (“EachSunday” ad esempio) e richiamarla nella definizione del job che tratta il nostro archivio modificando la direttiva Schedule in Schedule = “EachSunday” (vedi più in alto) / Schedule Name that will be used to invoke it. As told here we can add new scheduling schema with different time plan and new names. If we had (for example) a file/directory that should be enough to backup only each sunday we can create “EachSunday” plan, then above in the Job definition set the directive Schedule = “EachSunday”
- Run: definisce per ciascuna modalità possibile quando verrà eseguita / Set the time when the job that invokes this schema will be executed
Proseguendo troviamo la definizione della connessione col file damon della macchina da backuppare / Going ahead we define the reference to the file daemon will be used to run the backup
ATTENZIONE: Affinchè la connessione col “file daemon” funzioni è necessario che la password qui indicata sia IDENTICA a quella indicata nel file di configurazione del “file daemon” (bacula-fd.conf) della macchina da backuppare. Se si aggiungono clients di rete all’installazione del File daemon su ciascuno di essi l’installazione creerà una password che sarà inevitabilmente diversa da quella del nostro Director, quindi sul File daemon di ciascun computer di rete occorrerà cancellare la password e mettere quella del nostro Director
ATTENTION: to get each file daemon connected with Director its Password MUST be IDENTICAL to the one set in bacula-dir.conf relevant section ! Into other words if we added network clients to our backup system when we install onto each one the File daemon (bacula-fd) the installer will create a password that probably is different from the one we expect in bacula-dir.conf. Please check this and by touching each bacula-fd.conf and modify password in order to match the one stated in bacula-dir.conf
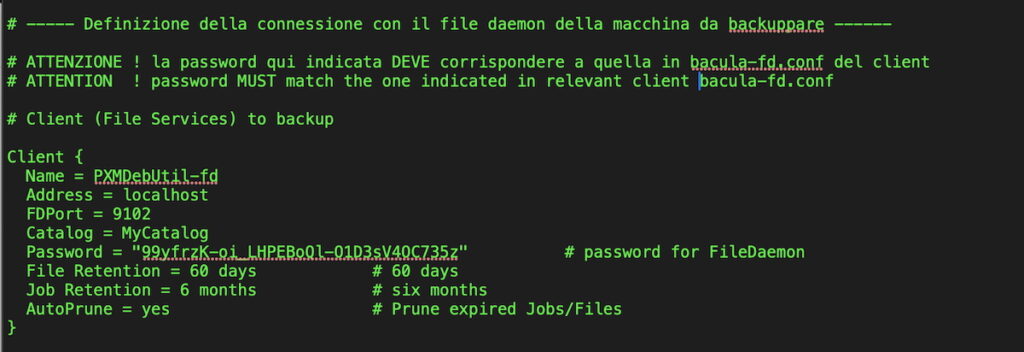
- Name: è il nome del “file daemon” da richiamare. Nella schermata siamo sul computer dove gira il Director (nel mio caso si chiama PXMDebUtil) ma deve comunque essere invocato il “file daemon” affinchè il backup funzioni / File daemon Name that will be used to invoke it (in my case PXMDebUtil-fd). Even if here with are Director onboard (so it’s all local) a File daemon name must be invoked
- Address: l’indirizzo del computer da backuppare, in questo localhost / Computer under backup address. In the screenshot we are defining a local backup so “localhost” is OK
- FDPort: la porta Tcp 9102 che verrà usata per mattere in comunicazione il Director col “file daemon” / Tcp 9102 is the port the file daemon uses to communicate with the Director
Nel caso avessimo altri computer in rete da backuppare dovranno essere aggiunti di seguito. Nella videata vengono aggiunti 2 computer di rete. Controllate le Password ! / If you had network clients you have to add relevant clients definition in this section. Pay attention to Passwords !
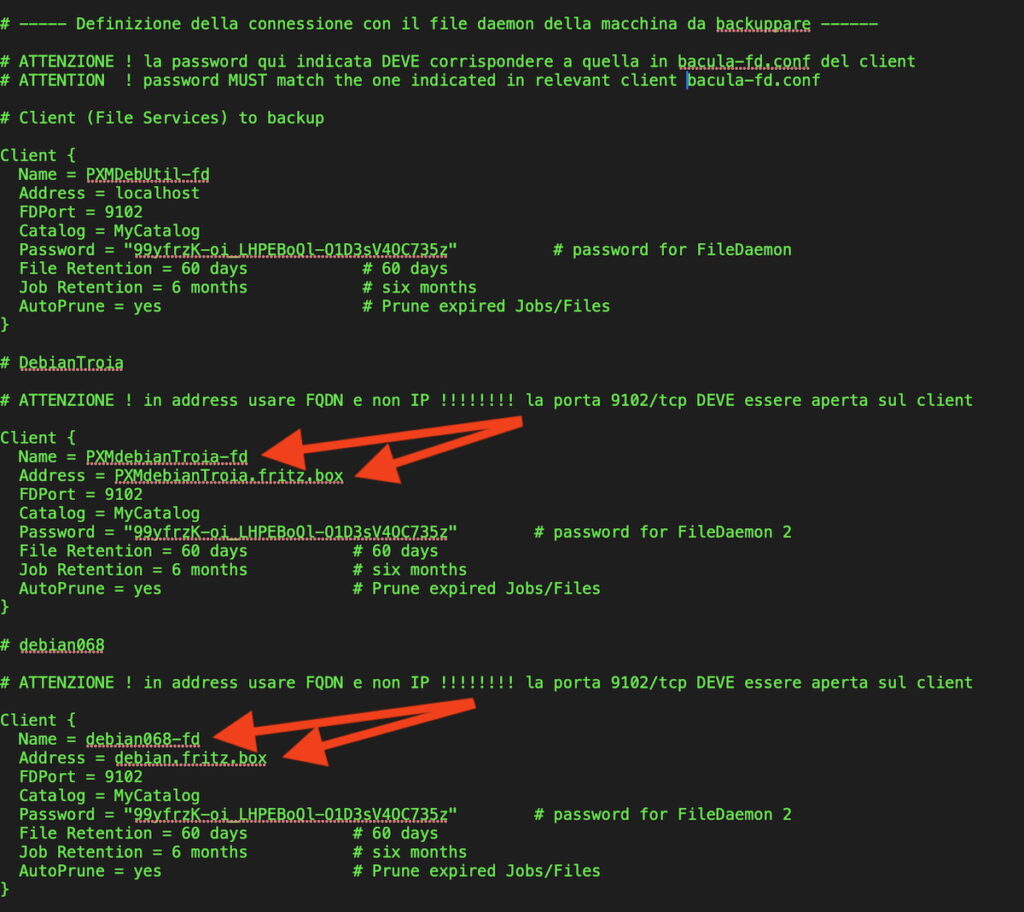
ATTENZIONE: in Name indicare il nome del computer in formato FQDN (fully qualified domain name) / ATTENTION: Name of computer must be indicated in FQDN format (Fully Qualified Domain Name)
ATTENZIONE: su ciascun computer di rete da backuppare dovrà essere aperta la porta Tcp 9102 / ATTENTION: if you have a firewall network computers defined in Bacula must have Tcp 9102 port opened
Infine troviamo la definizione dello Storage dove il Director salverà i dati del backup eseguito secondo le regole finora definite / Finally we reached the Storage definition that’s the share on which our backup data will be placed
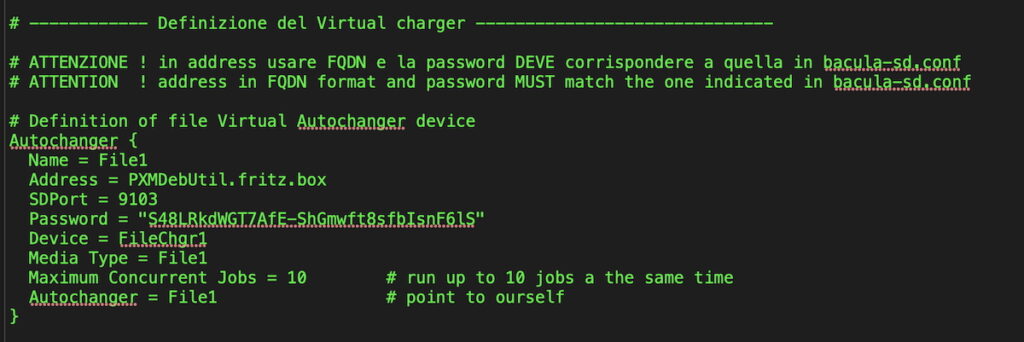
- Name: al solito il nome col quale verrà invocato / As usual the device name the Director will use to communicate with
- Address: indirizzo del computer sul quale gira lo “storage daemon” in formato FQDN / Computer where the Storage daemon is running in FQDN format
- SDPort: la porta Tcp 9103 che verrà usata per mattere in comunicazione il Director con lo “storage daemon” / Tcp 9103 is the port the storage daemon uses to communicate with the Director
- Password: deve essere IDENTICA a quella indicata nel file di configurazione dello “storage daemon” (bacula-sd.conf) / Must be IDENTICAL to the one set in bacula-sd.conf
- Device: nome col quale verrà richiamato lo storage
- Media Type: essendo un Nas il tipo è File
Per la restante parte del file bacula-dir.conf ho lasciato i valori dell’installazione / Remaining part of bacula-dir.conf has been left as it was after installation
Terminate le modifiche (e se in futuro faremo altre modifiche) è necessario verificare che non ci siano errori e per farlo digitare:
Once modifications are completed (and any time something will be modified in future) you must check for errors by running this command
- sudo /usr/sbin/bacula-dir -t -c /etc/bacula/bacula-dir.conf
e se non vengono visualizzati errori / and if no messages are reported digit:
- sudo systemctl restart bacula-director
Configuriamo il File Daemon / File daemon configuration
Spostiamoci in /etc/bacula ed editiamo il file bacula-fd.conf con il comando / Let’s move to /etc/bacula and start editing bacula-fd.conf by command
sudo nano bacula-fd.conf

- Director-Name: nome del Director che utilizzerà questo File daemon / The Director name will use this File daemon
- Director-Password: password per accedere al Director (DEVE essere identica a quella indicata in bacula-dir.conf) / Password to authenticate to Director (again: MUST be identical to to the one declared in bacula-dir.conf)
- Director-Name (monitor): nome del Director sul quale è attivo il monitor (servirà alla Console di Bacula per per ottenere informazioni di stato) / Director (monitor) name (it will be used by text console to show info about file daemon work)
- Director-Password monitor: password per accedere alla console (DEVE essere identica a quella indicata in /etc/bacula/bconsole.conf) / Password to authenticate to Director monitor (again: MUST be identical to to the one declared in bacula-dir.conf)
- FileDaemon-Name: il nome con il quale verrà richiamato questo demone (DEVE essere identico a quello indicato in bacula-dir.conf) / File daemon name the Director will use to invoke this daemon (this Name MUST be identical to the one declared in bacula-dir.conf)
- FDPort: porta Tcp 9102 che sarà usata per mettere in comunicazione il demone con il Director / Tcp 9102 is the port the file daemon uses to communicate with the Director
- FDAddress: indirizzo di rete del demone. In questo caso essendo il demone installato sul computer dove gira il Director usare 127.0.0.1 / Network address where this daemon runs, in this case it runs on the same computer hosting Director so 127.0.0.1 is OK
- Message-director: nome del Director al quale verranno inviati i messaggi / Name of the Director that collects Bacula messages
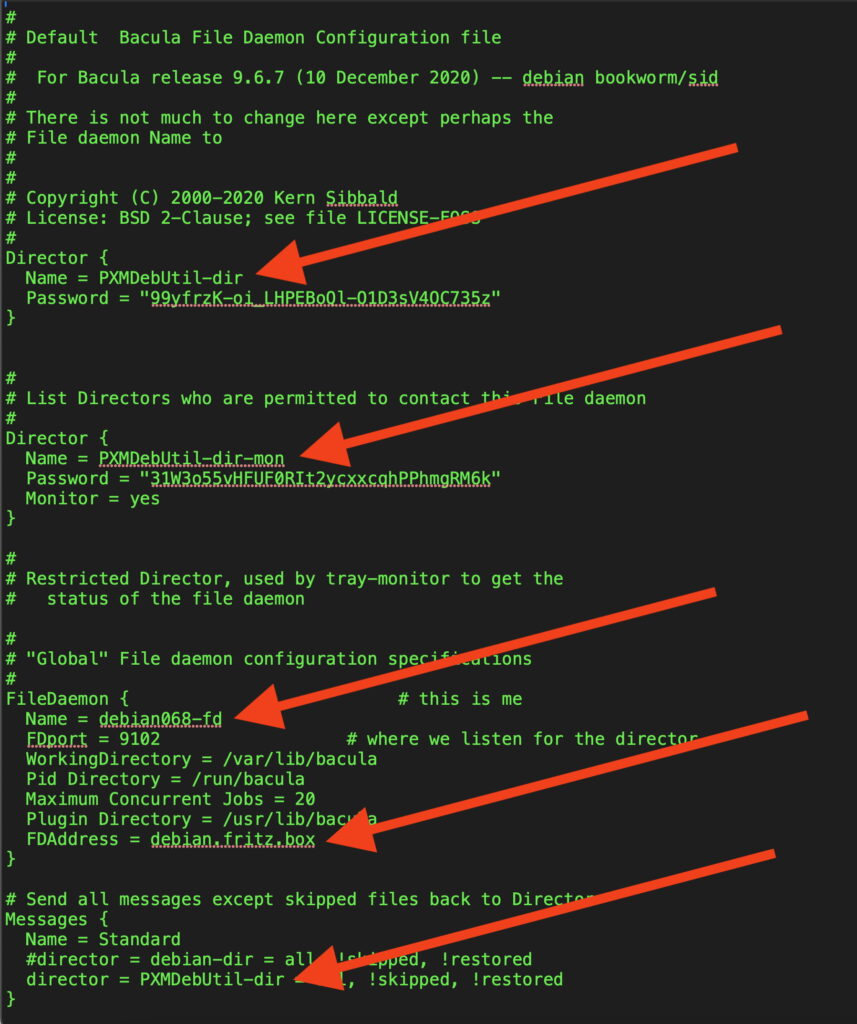
Se invece avessimo centralizzato il backup (ovvero 1 Director e xx computer in rete da backuppare) su ciascun computer dovremo installare SOLO bacula-fd ed in /etc/bacula troveremo solo il file bacula-fd.conf che sarà stato creato con riferimenti locali e dovremo quindi modificarlo adattandolo alla nostra configurazione. Nel mio caso il computer in rete si chiama debian mentre PXMDebUtil è il computer dove gira il Director di conseguenza il file bacula-fd.conf del computer debian dovrà contenere i riferimenti del Director in modo che possa essere backuppato.
If we are implementing a “centralized backup” (that means 1 Director and xx network clients) we have to install on each network client ONLY the File daemon bacula-fd and in its local /etc/bacula you’ll find a file named bacula-fd.conf created by the installer. Of course this bacula-fd.conf local file has been created without any coherent reference to our Director so we MUST edit and modify it in order to integrate this File daemon into our backup scenario. In the example here below you can see one of my network clients (debian.fritz.box) and its file daemon is named debian068-fd, the red arrows show how and where to touch the bacula-fd.conf file
Come si osserva / as you can see
- il Director al quale il file daemon del computer debian.fritz.box fa riferimento è il nostro Director centrale (per me PXMDebUtil-dir) e la password deve essere IDENTICA a quella presente in bacula-dir.conf / This network client will refer to the central Director (here PXMDebUtil-dir) and password MUST be IDENTICAL to the one set in bacula-dir.conf
- Director-Password monitor: password per accedere alla console (DEVE essere identica a quella indicata in bconsole.conf) / Access to console, password MUST be IDENTICAL to the one set in bconsole.conf
- Name: il nome col quale il Director chiamerà il file daemon di questo computer in rete (DEVE essere identico a quello indicato in bacula-dir.conf). In questo caso il computer si chiama debian ma il file daemon l’ho chiamato debian068-fd / File daemon name used by Director to invoke this daemon. In my case this network client is named debian.fritz.boz but its File daemon is named debian068-fd
- FDPort: la porta Tcp 9102 attraverso la quale avverrà la comunicazione col Director (porta che deve essere aperta sul firewall del computer debian068) / Tcp 9102 is the port the file daemon uses to communicate with the Director, in case you have a firewall running on this client this port Tcp 9102 must be opened
- FDAddress: nome del computer (nel mio caso debian.fritz.box) in formato FQDN (assolutamente non usare l’IP) / Network address where this daemon runs in FQDN format (don’t use IP here !)
- Messages: anche qui il riferimento dovrà essere al Director
Terminate le modifiche (e se in futuro faremo altre modifiche) verificare che non ci siano errori e per farlo digitare:
When modifications are completed (and any time something will be modified in future) you must check for errors by running this command
- sudo /usr/sbin/bacula-fd -t -c /etc/bacula/bacula-fd.conf
e se non vengono visualizzati errori / and if no messages are reported digit:
- sudo systemctl restart bacula-fd
Mac installazione e configurazione del file daemon / Mac File daemon installation and configuration
Ho aggiunto il mio mac Mini M4 al mio backup centralizzato basato su Bacula che gira su una macchina Linux Debian. La descrizione che segue fa quindi riferimento al mio setup su M4 e sottolineo che l’installazione di bacula-fd mediante “brew” usa path differenti a seconda che ci sia un processore ARM o un Intel. Di conseguenza chi installerà su processore Intel dovrà modificare opportunamente i path che trova nell’articolo
Just added to my Mac Mini M4 to my centralized backup system (based on Bacula hosted on a Linux Debian machine). What I’m here describing matches my setup on an M4 processor but I need to underline that bacula-fd brew installation places files in different paths depending on the processor architecture (ARM or Intel). In consequence of this who’s going to setup Bacula Mac client on an Intel based Mac must touch the paths I’m indicating here.
Ho letto che anche Bacula Director (bacula-dir) e Bacula Storage Daemon (bacula-sd) sono disponibili anche per Mac attraverso Homebrew, ma non li ho provati / I read that Bacula Director (bacula-dir) and Bacula Storage Daemon (bacula-sd) too are available for Mac via Homebrew, but I didn’t test them
Bacula File Daemon (bacula-fd) per Mac è installabile attraverso “Homebrew”. Per chi non lo avesse già installato sul Mac andare a questo link e seguire le istruzioni di installazione / Bacula File Daemon (bacula-fd) for Mac is available via Homebrew, for those who never installed Homebrew please go to this URL and follow installation instructions
Consiglio di usare la versione .pkg come indcato dalla freccia / I suggest to use .pkg version (see red arrow)

Una volta installato l’eseguibile si trova in / Once installation is completed the executable file is located here
/opt/homebrew/bin/
per avviare l’installazione digitare nel terminale / to launch installation type in the terminal
./brew
Con Homebrew installato possiamo installare il client di Bacula per Mac digitando da terminale il comando / Once Homebrew is installed we can easily install Bacula file daemon for Mac, to do this in the terminal type
brew install bacula-fd

Quando bacula-fd è installato riceveremo questo messaggio / When bacula-fd has been installed we will get this message
To start bacula-fd now and restart at startup:
sudo brew services start bacula-fd
Or, if you don’t want/need a background service you can just run:
/usr/local/opt/bacula-fd/bin/bacula-fd -f
Avviamo bacula-fd digitando dal terminale/ Let’s start bacula-fd by typing in the terminal
brew services start bacula-fd
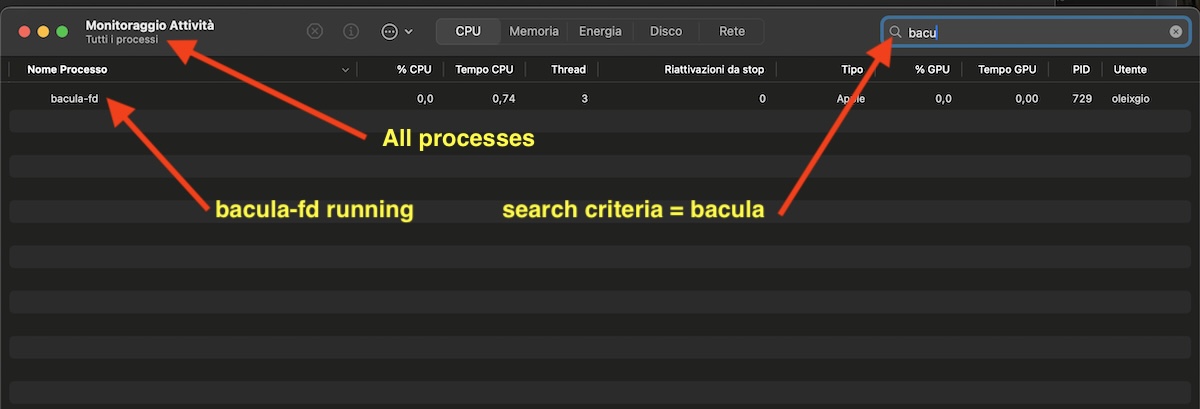
Verifichiamo che sia in esecuzione / Check if it is running
Configuriamo bacula-fd sul nostro Mac / It’s time to configure our Mac bacula-fd
Fare una copia di scorta del file bacula-fd.conf installato da brew / Make a safe copy of bacula-fd installed by Brew
spostarsi nella directory / move to directory
cd /opt/homebrew/etc
ed editare il file bacula-fd.conf per adattarlo alla vostra installazione/ edit bacula-fd.conf to match your setup
nano bacula-fd.conf


Attenzione ! Non modificate i path perchè corrispondono all’installazione fatta da Brew ! I path da me indicati sono relativi all’installazione su Mac con processore ARM, con processore Intel sono diversi
Warning ! Don’t modify the paths because they are set by Brew and match your installation ! Paths in my screenshot are valid for Mac with ARM processor, in case of Intel processor they are different

A questo punto verifichiamo che non ci siano errori di sintassi con il comando / Let’s check for possible syntax errors by the command
/opt/homebrew/opt/bacula-fd/bin/bacula-fd -t -c /opt/homebrew/etc/bacula-fd.conf
se non ci vengono mostrati errori la nostra configurazione è OK / if no errors are reported our bacula- fd.conf is OK
Dal momento che abbiamo modificato bacula-fd.conf dobbiamo riavviarlo per attualizzare le modifiche / As we modified bacula-fd.conf we need to restart it
brew services restart bacula-fd

Nota / Remark : dal momento che ho riavviato il servizio come utente e non come root c’è un warning, ma non compromette il funzionamento / as I started bacula-fd as user and not as root there’s a warning but here it doesn’t compromise functionality
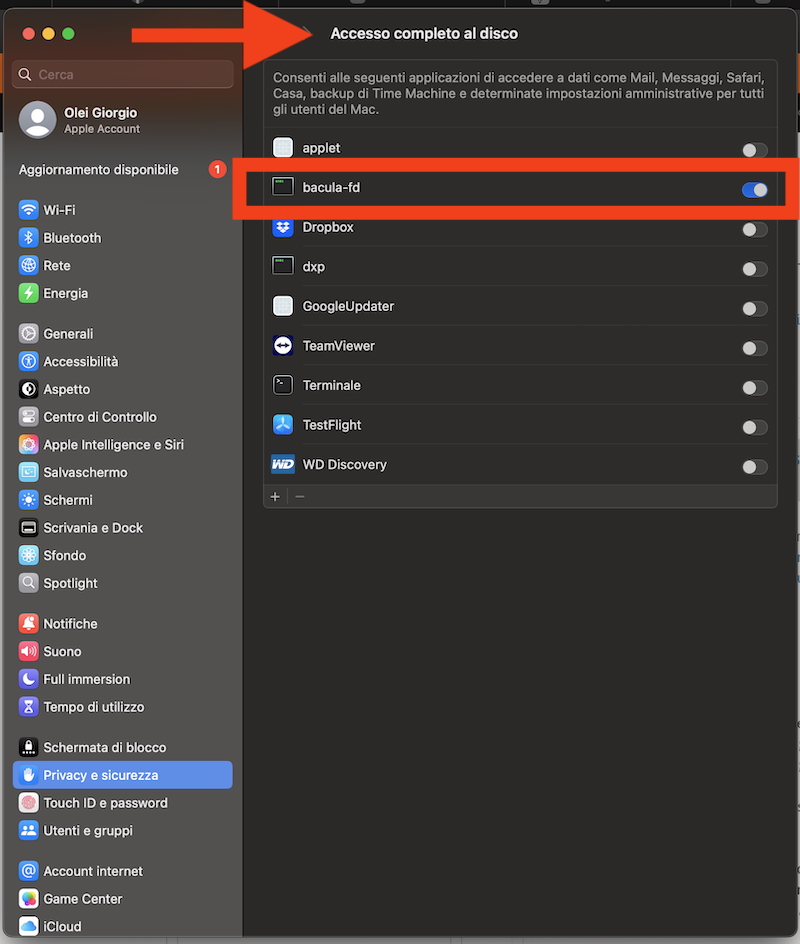
Ora consentiamo a bacula-fd di accedere al disco / Now let’s grant disk full access to bacula-fd
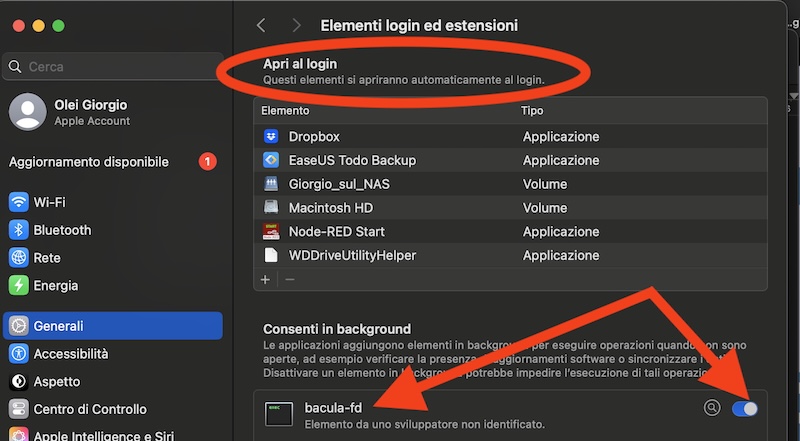
e verifichiamo che bacula-fd venga avviato in background al login / and check that bacula-fd was started in background at login
Riavviamo il Mac / let’s restart the Mac
Se tutto è ok aprendo Monitoraggio attività dobbiamo trovare il processo bacula-fd / If everythig is OK we should see listed bacula-fd process

A questo punto dobbiamo aggiungere nel Director (bacula-dir.conf) il nuovo Mac client . Per farlo seguire i passaggi descritti in questo articolo nel paragrafo
At this point we need to add this new Mac client into the Director (bacula-dir). To do this please follow steps described in this article paragraph named
Configuriamo il Director / Director configuration
Come indicato terminata la modifica del file bacula-dir.conf controlliamo che la modifica non contenga errori / Once modifications are completed let’s check there are no mistakes
sudo /usr/sbin/bacula-dir -t -c /etc/bacula/bacula-dir.conf
se non vengono mostrati errori riavviamo bacula-dir / if no errors are reported let’s restart bacula-dir
sudo systemctl restart bacula-director
Verifichiamo che il nostro client Mac sia correttamente inserito in Bacula / Now we check if our Mac client is properly running inside our Bacula system
Dal computer sul quale gira il Driector avviamo la console (sudo bconsole) e dal prompt (asterisco) digitiamo “status” poi scegliamo 5 (Network) / From the computer hosting the Director start Bacula console (sudo bconsole) and from its prompt (asterisk) digit “status” and then 5 (Network)
dovremmo vedere elencato il client Mac (nel mio caso “MacMini-fd”) / we should see our Mac client listed (in my case “MacMini-fd)
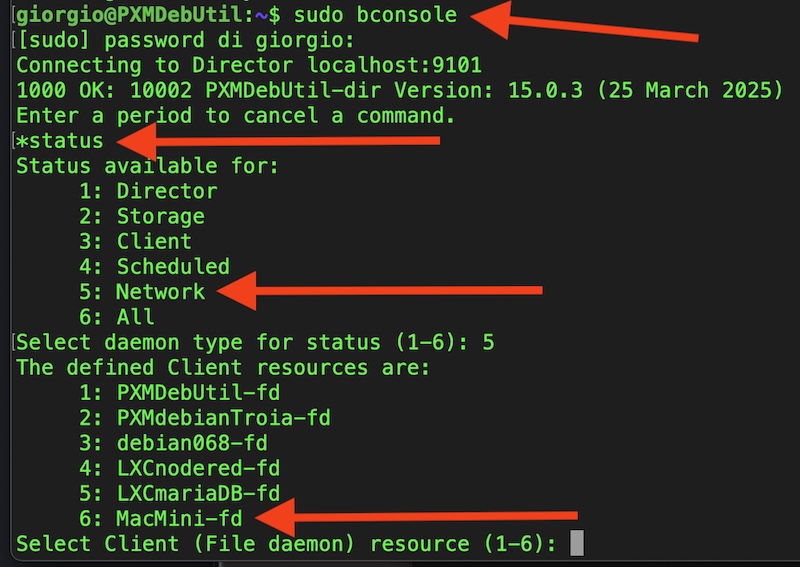
scegliamo di visualizzare lo stato del nostro client Mac digitando il numero corrispondente (nel mio caso 6) / let’s check our Mac client network status by choosing its number (in my case it’s 6)
se tutto è OK dovremmo ricevere un rapporto simile a questo / if everything’s OK we should receive a report similar to mine

Se tutto è OK al prossimo backup schedulato Bacula eseguirà il backup (che sarà Full perchè è la prima volta che il nostro Mac è inserito in Bacula) delle cartelle del nostro Mac che abbiamo messo sotto backup (indicate in bacula-dir.conf nel File Set per il Mac). Se vogliamo testare il backup dalla console digitiamo run ed il numero che corrisponde al nostro Mac
If it is all OK Bacula next scheduled backup (that will be a Full backup because it is the first time our Mac is under Bacula) will backup directories we have indicated in bacula-dir.conf in the Mac File Set. If we want to check the backup without waiting for scheduling let’s type run and then the number corresponding to our Mac

Dalla console andando su status-client-il nostro Mac troveremo l’elenco dei jobs eseguiti ed il loro stato / From Bacula console by choosing status-client-our Mac we will see jobs list and their status
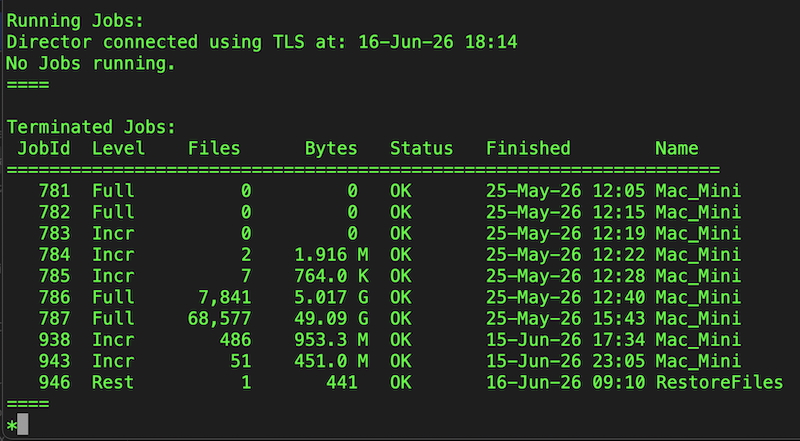
o dall’interfaccia Bacularis / or using Bacularis web page

Configuriamo lo Storage Daemon / Storage daemon configuration
Come detto io salvo le sessioni di backup sul Nas dove ho creato una condivisione NFS (nel mio caso con mountpoint sul NAS 192.168.1.33:/nfs/PXM_Backup) che ad ogni riavvio monto manualmente in /mnt/backup/ (il mio computer PXMDebUtil è acceso h24) con il comando
As stated I’m saving my backup sessions onto my NAS and for this puprose I created on it an NFS share (in my case 192.168.1.33:/nfs/PXM_Backup) and I preferred to manually mount it in /nfs/backup/ at any reboot (computer hosting Bacula is under Ups and h24 7/7 up) by executing this command:
sudo mount 192.168.1.33:/nfs/PXM_Backup /nfs/backup/
e questo è il risultato sul Nas. Come si osserva vi sono più “volumi” salvati e questo deriva dalle prove di backup che ho eseguito nel tempo / this is the situation on the Nas filesystem. You can see there are several “volumes” because they are backup some tests I made before arriving to today’s “in production” situation
La mia implementazione di Bacula lavora in modalità “append” al volume corrente (fino quando non scade il suo tempo di vita) quindi ogni sessione di backup si aggiunge al volume corrente, ad oggi il volume con etichetta “Vol-0027” / my Bacula implementation works in “append” mode that means each new backup session is “appended” to the “volume” in use (until that volume doesn’t reach its retention time end). At today the volume in use is the one labeled “Vol-0027)

Spostiamoci in /etc/bacula ed editiamo il file bacula-sd.conf con il comando sudo nano bacula-sd.conf Let’s move to /etc/bacula and start editing bacula-sd.conf by command
sudo nano bacula-sd.conf

- Storage-Name: il nome con il quale verrà richiamato questo demone (DEVE essere identico a quello indicato in bacula-dir.conf) / Storage daemon name the Director will use to invoke this daemon (this Name MUST be identical to the one declared in bacula-dir.conf)
- SDPort: porta Tcp 9103 che sarà usata per mettere in comunicazione il demone con il Director / Tcp 9103 is the port the storage daemon uses to communicate with the Director
- SDAddress: indirizzo di rete del demone (nel mio caso PXMDebUtil.fritz.box) in formato FQDN / Network address of the computer where this daemon runs (for me PXMDebUtil) in FQDN format (don’t use IP here !)
- Director-Name: nome del Director che utilizzerà questo Storage daemon / The Director name will use this Storage daemon
- Director-Password: DEVE essere identica a quella indicata in bacula-dir.conf nella definizione del Virtual Charger / MUST be IDENTICAL to the one set in bacula-dir.conf in “Virtual Charger” paragraph

- Director-Password monitor: password per accedere alla console (DEVE essere identica a quella indicata in bconsole.conf) / Access to console, password MUST be IDENTICAL to the one set in bconsole.conf
- Archive Device: directory dove i dati backuppati verranno salvati (nel mio caso condivisione NFS montata sotto /nfs vedere nota all’inizio di questo paragrafo) / Directory where to save backup sessions (see at this paragraph beginning)
Terminate le (e se in futuro faremo altre modifiche) ènecessario verificare che non ci siano errori e per farlo digitare:
When modifications are completed (and any time something will be modified in future) you must check for errors by running this command
- sudo /usr/sbin/bacula-sd -t -c /etc/bacula/bacula-sd.conf
e se non vengono visualizzati errori / and if no messages are reported digit
- sudo systemctl restart bacula-sd
Tips & Workarounds
Passaggi suggeriti per l’implementazione del vostro sistema di backup / Suggested steps to implement your backup system
- installare dei pacchetti sul computer dove risiederà il Director / Install required packages on the computer that will host the Director
- fare una copia di riserva dei files bacula-dir, bacula-fd, bacula-sd / perform a safe copy of files bacula-dir, bacula-fd, bacula-sd
- adattare bacula-dir alla vostra situazione / adapt bacula-dir to your scenario (host names, daemon names, passwords, paths to backup, scheduling etc)
- adattare bacula-fd alla vostra situazione / adapt bacula-fd to your scenario (host names, daemon names, passwords etc)
- creare la condivisione NFS sul Nas e adattare bacula-sd alla vostra situazione (aprire TCP 9103) / adapt bacula-fd to your scenario (host names, daemon names, passwords, share name etc) remember to open TCP 9103
- avviare la console di Bacula (bconsole) / Start Bacula console (bconsole)
- verificare con il comando status che il Director stia funzionando e comunichi col file daemon (bacula-fd) e lo storage daemon (bacula-sd) . Controllare eventuali messaggi digitando message / By using “status” command verify that the Director is up and running and it can dialog with file daemon (bacula-fd) and storage daemon (bacula-sd)
- lanciare il job di backup / run the backup job. Check for messages (if any) by typing message
- dare il comando “list jobs” per vedere cosa ha backuppato (nr di files, dimensioni ecc) / Type “list jobs” to see what was in the backup session we just executed (files quantity, size etc)
- Avviare Bacularis e indicare quanto richiesto (host name, DB password ecc) / Start Bacularis and input requested parameters (host name, DB password etc)
- Provate a fare un Restore (con bacularis è molto più semplice rispetto alla console) / Try to perform a Restore (via Bacularis is much more simple than restore via Bacula console)
Se tutto ha funzionato ora potete aggiungere i clients di rete (ricordarsi di aprire la porta TCP 9102 sia sul computer del Director che sui clients) / If everything was OK you can add network clients (don’t forget to open TCP 9102 in the Director hos and on each client)
Per semplificare il backup del DB senza usare un’agente specializzato per il DB (al momento mi interessa backuppare solo il DB chiamato EL_Components) ho configurato cron affinchè prima dell’avvio del backup giornaliero faccia un dump del DB in una cartella locale messa sotto backup / In order to simplify database backup without using a specialized agent I setup cron to perform (before the backup daily job starts) a DB dump into a local directory that’s defined under backup (at present I need to backup only DB named EL_Components)

Dal momento che Node-Red salva tutti i flows in un unico fila chiamato flows.json ho configurato cron affinchè prima dell’avvio del backup giornaliero faccia una copia di flows.json in una cartella locale messa sotto backup / As Node-Red keeps all flows inside one only file (named flows.json) I setup cron to perform (before the backup daily job starts) a flows.json file into a local directory that’s defined under backup


La console di Bacula / Bacula Console
A questo punto Bacula è configurato e possiamo interagire attraverso la console testuale. In realtà esisterebbe anche la “Bacula Admin Tool” che permette di interagire in modalità grafica ma presenta diversi limiti, prima di tutto non è pensata per poter accedere da un’altro computer ed è piuttosto complicata. Io ho preferito installare “Bacularis” che appoggiandosi su Apace permette di accedere da qualsiasi computer attraverso pagine web, ne parleremo più avanti
Now Bacula is configured for use and we can interact with it by using the builtin textual console. It exists indeed a GUI console (named “Bacula Admin Tool”) but it has some linitations and It’s not so friendly IMHO. I prefer to use “Bacularis” that’s a web console published by the computer hosting Bacula Director and it is very easy and friendly and you can use from any computer in the network. I’ll show it in the next paragraph
Dal computer dove gira bacula-dir ( o in una sessione SSH)apriamo la console mediante il comando / from the computer hosting the Director or in SSH session let’s execute:
- sudo bconsole

- il prompt della console è l’asterisco e digitando “help” invio avremo la lista dei comandi mentre per visualizzare le opzioni di un comando (ad esempio il comando “status”) basterà digitare “help status” invio / bconsole prompt is an asterisk and if we digit “help” we can see a list of bconsole commands. If we need to know options for a command it’s enough to digit help followed by the command (help status in the example)
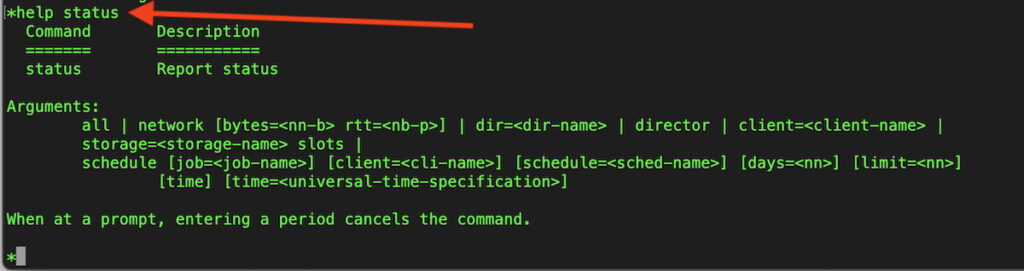
La console è uno strumento completo dal quale si possono compiere TUTTE le operazioni (ad esempio eseguire un job, eseguire un restore ecc) anche se non è proprio di uso immediato (ad esempio il restore non è proprio immediato) molto semplice da fare invece usando Bacularis. Qui descriverò le funzioni che più utilizzo, ma per conoscere in dettaglio l’uso e le potenzialità della console vi rimando alla documentazione:
The console (bconsole) it’s a complete and powerful tool and from it we can do ALL Bacula operations (for example run a job, make a restore etc). Restore operation from bconsole is not so friendly indeed, but it works fine. Doing a Restore from Bacularis instaed is very easy and friendly. In this paragraph I’ll describe bconsole operations I often do, to go more in deep about bconsole possibility please refer to its documentation
https://www.bacula.org/5.0.x-manuals/en/console/console/Bacula_Console.html
Uno dei comandi indispensabili per capire se la nostra configurazione sta girando correttamente è il comando “status” (abbreviato “s”). Quindi se dal prompt (asterisco) della console digitiamo “status” avremo un menu nel quale dovremo scegliere quale status ci interessa
One of the commands more useful to check if and how our Bacula backup works is STATUS (short command s). By digiting status we get a list of possible modules to check for status
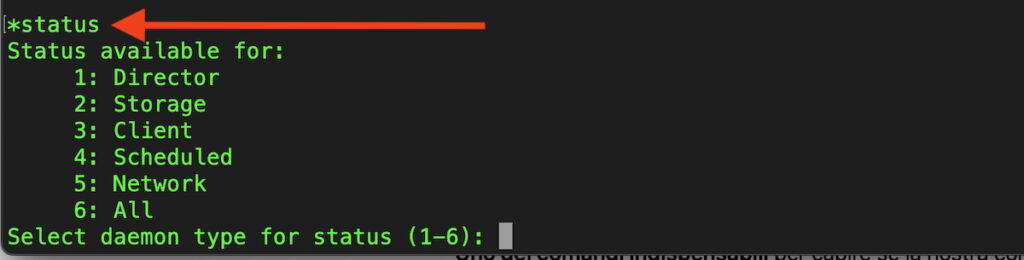
Vediamo subito che le prime scelte riguardano i “mattoni” principali di Bacula, ovvero il Director lo Storage ed il/i Client/s. Digitando “1” visualizzaremo lo stato del Director
As you can see the first 3 choices are relevant to Bacula main “bricks” (Director, Storage and Clients). Let’s digit “1” (so we’re looking for the Director status)

digitando “status” e poi 2 avremo lo stato dello Storage / if we digit “status” and then “2” we’ll get info about Storage status

osserviamo che ci mostra quale “Autocharger” usa (io ne ho solo uno) e in quale directory i dati verranno salvati (sul NAS in /nfs/Backup ovvero la condivisione NFS che abbiamo montato in /nfs/Backup). Ci viene detto che il device “is not open” in quanto verrà aperto solo quando verrà utilizzato ed visto che al momento non ci sono jobs in esecuzione non è necessario che sia aperto.
Please observe that it shows which Autocharger is in use (I have only 1 defined in bacula-dir.conf) , in which path backup sessions will be saved (in my case the NFS share previously described and mounted in /mnt/backup). As you can see it says the device “is not open” and that’s because there are no jobs running in this moment so the device doesn’t need to be opened
Digitando “status” e poi 3 avremo lo status del/i client/s. Ricordo che io ho sotto backup computer in rete quindi dovrò scegliere di quale dei 5 computer mi interessa conoscere lo stato
if we digit “status” and then “3” we’ll get info about clients status. Remember I have some network clients under Bacula backup so I have to choose which client status I want to see.

Supponendo di voler vedere lo stato del client LXCnodered digiteremo 4 ed otterremo questa videata / let’s choose client nr 4 (a Proxmox LXC hosting Node Red)

osserviamo che il job 459 del 3 Aprile alle 23:05 è fallito (infatti ha salvato zero bytes) perchè si è spento l’Ups alle 22:55 / nicely we can see that on April 3rd at 23:05 backup failed (yes I had an UPS failure at 22:55)
Dalla console è anche possibile eseguire un job in qualsiasi momento senza dover aspettare la sua esecuzione programmata. Per farlo sempre dalla console digitiamo run e dobbiamo selezione quale client vogliamo backuppare
From the console we also can execute a job at any time without waiting for the job schedule. Simply digit “run” and choose which job to run

visto che il backup di LXCnodered di ieri sera è fallito facciamo un backup adesso quindi scegliamo 4 poi digitiamo Y per confermare l’esecuzione del backup
As I had a backup job failure (was LXC Node Red) , let’s backup that client now. Digit “run” and then “4” and finally “Y”

ora digitando message avremo le informazioni circa l’esecuzione di quest’ultimo backup appena eseguito / After a short time let’s digit “message” and we get a detailed report about the job we just executed

Altro comando molto utile è “list jobs” che elenca tutti i jobs eseguiti con le informazioni relative al tipo (B=backup, R=restore, V=verify) al livello (F=full, I=incremental) a quanti files sono stati salvati e la dimensione totale ed allo stato finale (T=terminated, f=failed)
One more useful command is “list jobs” that lists all jobs with basic info about them: Jobid (job number) Name (job name I set equal to client name) Start time (time when job was started) Type (B=backup, R=restore, V=verify) Level (F=full, I=incremental) Jobfiles (how many were backupped) Jobbytes (how many bytes were written) and Jobstatus (T=terminated, f=failed


se vogliamo visualizzare solo un job anzichè “list jobs” basterà digitare “list jobid=nr del job” (nell’esempio job nr 466)
if we want to see on only job instead of “list jobs” command we will digit “list jobid=job number” (in the example job #466)

Bacularis alternativa web alla console / Bacularis web console
Come dicevo esiste uno strumento molto più comodo basato su interfaccia web per utilizzare Bacula. Si tratta di Bacularis il quale usando un web server (Apache nel mio caso) permette di interagire con Bacula da qualsiasi computer della rete.
As I told before there’s a more confortable web based tool to interact with Bacula. It’s Bacularis that using a web server (Apache in my case) makes Bacula managing easy and friendly. In addition you can interact with your Bacula backup from any browser in the network
Nel paragrafo Installazione fra i pacchetti marcati per l’installazione vi sono bacularis e bacularis-apache2. Bacularis va installato sul computer dove si trovano bacula-dir ed il database. Per la sua configurazione invito a leggere la documentazione che si trova a questo link:
In the Installation paragraph you found bacularis and bacularis-apache2 marked for installation because they must be installed on the computer hosting the Director. Setup is really easy and you can find setup guide here:
https://bacularis.app/doc/brief/installation.html#debian-12-bookworm
Per utilizzare Bacularis basterà aprire col browser la pagina web del computer dove gira Bacula alla porta 9097 (192.168.1.xx:9097) ed inserire i riferimenti richiesti. Fatto questo Bacularis sarà agganciato al nostro bacula e potremo utilizzalo da qualsiasi computer della rete. Per accedere ci verrà richiesto nome utente (bacula) e la nostra password in uso sul computer dove gira Bacula. Una volta autenticati ci troveremo in questa pagina
Once installed to use Bacularis simply open your browser at Computer_hosting_Director_IP on port 9097 (for example 192.168.1.xx:9097) and insert required references (among them you need database password you memorized during Bacula installation). If everything is correct your Bacularis is connected to your Bacula. Refreshing Bacularis web page you’re asked for a username (bacula) and a password (your user password for computer hosting Bacula) and if all is OK you’ll be in this page

e da qui navigando fra le molte possibilità offerte dal menu di sinistra potremo visualizzare tutti i nostri backup. Non solo ma da qui in maniera estremamente agevole potremo fare Restore di ciò che ci serve ed alla data che desideriamo.
In the left side there’s a menu with many choices available and in the central panel what you asked will be shown. From this menu we can execute a Restore in simple and guided way
Facciamo un esempio: ripristinare il file “flows.json” (file che contiene i flows sviluppati in Node Red). Dal menu di Bacularis andrò su Restore e mi verrà chiesto di scegliere il client dove si trovano i files di Node Red (inteso come nome che abbiamo assegnato al file daemon di quel computer nel mio caso LXCnodered-fd)
Let’s see how to Restore a file, for example a file named “flows.json” (that contains all flows developed in Node Red). From Bacularis Menu go to Restore and we will be asked to select which client (or better which file daemon) is in charge for “flows.json” backup. In my case the computer hosting Node Red is a Proxmox LXC machine and its file daemon is named LXCnodered-fd

selezioniamo LXCnodered-fd e premiamo Next. Nella casella “File by filename” scriviamo flows.json e clicchiamo sulla lente
we select LXCnodered-fd and click Next. Now we write flows.json inside the textbox “File by filename” and click on the lens to perform the search

ci verranno mostrati tutti i salvataggi del file flows.json con indicata del giorno e dell’ora in cui sono stati backuppati (ovviamente i salvataggi presenti nel periodo di tenuta dei dati (Retention) che abbiamo configurato in bacula-dir). Marcando la casella Select (a destra) selezioniamo quale salvataggio vogliamo ripristinare. Osserviamo che vengono elencate solo le sessioni di backup che hanno salvato quel file questo perchè la nostra pianificazione prevede backup differenziale/incrementale tutti i giorni e full backup una volta al mese, quindi se quel file non ha subito modifiche nella sessione giornaliera non è stato salvato (in altre parole se un file non è stato modificato dall’ultimo full lo troviamo nella sessione full backup più recente)
all backup session containing a saving (and its backup sessions date and time) of the file flows.json will be listed. Of course only sessions inside to the Retention time we set in Bacula configuration will be considered. Please observe that the listing contains only sessions in which our file has been saved. That’s because Full backup saved everything but the Incremental backup saved our file only if it has been modified otherwise it skips our file saving. Now let’s find the file saved session we want to Restore and mark the correspondant Select checkbox

premiamo Next e navighiamo fra le directories nel pannello di sinistra fino a trovare il file che vogliamo ripristinare. Una volta trovato clicchiamo su “Add” ed il nostro file apparirà nella sezione in basso a destra con la data e l’ora nella quale è stato backuppato. Se avessimo sbagliato basta premere sul cestino per rimuoverlo dalla nostra sessione di Restore. Premiamo Next e Bacularis ci chiederà dove vogliamo salvare il file ripristinato (nella posizione originale o in un’altra directory, se vogliamo sovrascrivere un eventuale file esistente)
by pressing Next we go to this screen in which in the left panel we have to have to navigate the directory tree until we find the file we asked to Restore. Once found press Add aside the file name and it will appear in the right bottom panel. If we wanto to remove press the trash icon. Of course here we can add more than 1 file to restore or a whole directory

premiamo Next ed ora ci sono opzioni da scegliere ovvero se ripristinare il file nella posizione originale o in un’altra diretory e se sovrascrivere eventuali file con lo stesso nome oppure no / by pressing Next we have some option to select such as Restore to original position or a given path and if overwrite an existing file with the same name

premiamo Next e ci sarà presentato il riepilogo dell’operazione (o più correttamente del job) che stiamo per eseguire. Se tutto è corretto premiamo “Run Restore” ed in brevissimo tempo il file desiderato sarà disponibile come era alla data/ora che abbiamo richiesto e nella directory indicata. Questo job di Restore verrà riportato nell’elenco del job corredato delle informazioni relative e dell’esito.
let’s press Next and we’ll get an operation summary and if everything matches our need we can press “Run restore”. Very soon we will find the restored file in the path we have choosen. What we did generated a Job and this job will have a job ID and we will see in the job list , it will be defined as Restore job and completed by date/time it has been executed and the relevant status

Voglio ricordare che la mia pianificazione (che ovviamente potete personalizzare a piacere) prevede un backup Full ogni prima domenica del mese (mentre il backup del Catalogue ovvero il database è sempre Full e viene eseguito quando l’ultimo job di backup è terminato
I want to underline that my scheduling schema (obviously you can adapt it to your needs as you like) does a Full backup on monthly first Sunday ) and Catalog backup (the database) is a Full backup every day after the latest backup job has finished
di conseguenza il backup di Domenica 5 Aprile 2026 è stato del tipo Full
so Sunday April 5th (first April Sunday) listing shows this list of jobs

o se preferiamo vederlo attraverso Bacularis / or if we prefer Bacularis listing

Un trucco che ho usato per backuppare mariaDB e Node Red / a workaround I used to backup mariaDB database and Node Red flows
mariaDB: con cron tutti i giorni eseguo un dump del database alle 22:45 in una cartella del computer. Il backup va a prendere quel dump che ho chiamato mariadb-dump (l’alternativa sarebbe stata installare un pacchetto che si occupa di mettere sotto backup il database)
mariaDB: under cron I execute a database dump each day at 22:45 and I save it with name “mariadb-dump” into a computer directory and backup daemon saves this dump. This to avoid a mariaDB backup dedicated backup agent
Node Red: con cron tutti i giorni eseguo una copia del file flows.json alle 22:45 in una cartella del computer. Il backup va a prendere quel file che ho chiamato nodered-dump
Node Red: under cron I execute a copy of file “flows.json” each day at 22:45 and I save it with name “nodered-dump” into a computer directory and backup daemon saves this copy
Considerazioni dopo alcuni mesi di esercizio / My considerations after running Bacula “in production” for a significant amount of time
Essendo trascorso un significativo periodo di essercizio, posso affermare che / As Backup system described in this article is now up and running here since some months, I can assert that:
– è affidabile e stabile / is reliable and stable
– è veloce / is fast
– se un client di rete è irragiungibile va in timeout il job di quel client fallisce ma gli altri client vengono backuppati / if one client was unreachable its job goes in timeout and fails but the system keep on executing other scheduled jobs
– la ricerca di un file per il suo ripristino è velocissima e vengono mostrati tutti i salvataggi disponibili agevolando la scelta di quale versione/i ripristinare / File search for a restore is extremely fast and all file versions saved are promptly shown and this helps very much to decide which version (or versions) you want restore and where (original location or in any other path)


A questo punto mi dedicherò ad affinare la funzionalità del sistema di backup sulla base delle mie esigenze. Aggiusterò il tempo di conservazione delle sessioni per ciascun client, il tempo di conservazione dei volumi di backup, ritoccherò la programmazione dei jobs, probabilmente aggiungerò un secondo storage (Nas) sul quale indirizzare il backup di alcuni clients (sarebbe possibile anche definire uno storage ubicato in qualsiasi locazione e raggiungerlo attraverso la connessione geografica) e così via/ Now is time for me to to refine my backup system in order to get it matching my needs. I’ll touch clients sessions and volumes retention time, I’ll touch jobs scheduling, probably I’ll define an additional storage to use with some clients (you should even define a remote storage located somewhere else and reach it via Wan) and so on.
Bacula è un sistema molto flessibile e personalizzabile. Una volta capito come è organizzato è piuttosto semplice ottimizzarlo per i nostri scopi. L’unico file sul quale si deve intervenire è la configurazione del Director (bacula-dir.conf) dal quale è possibile modificare il comportamento del sistema. Ad esempio io ho gà modificato la programmazione del Mac-Mini. Per farlo ho creato una nuova programmazione alla quale ho assegnato un nome e l’ho richiamata nella definizione del job / Bacula is a very flexible and wearable system. Once you understood how it works it becomes simple to optimize it for your needs. The only file to touch is always the Director configuration (bacula-dir.conf). For example I just modified my Mac-Mini scheduling. To do it in bacula-dir.conf I created a new scheduling schema and I assigned it a new name, then I recall the new scheduling schema by its name into the Mac-Mini job definition


I hope you’ll enjoy !!!
Sì lo so Bacula non è un sistema che si installa con un doppio click e quattro cose da configurare, è necessario un minimo sforzo di analisi e ingegnerizzazione…è una fatica ma una volta fatto ci si dimentica e i nostri dati sono salvaguardati nel tempo / Yes I know Bacula system is not a “double-click-setup application” a bit of analysis and engineering is required…it’s an effort but then you can forget it and your data are safe in the time
….. that’s all folks ! Have fun
73 de IK1BXN
mailto: ik1bxn@ik1bxn.it