RumLog (but maybe also other loggers) a solution to push interesting cluster spots onto Telegram
July 1st 2026 – Added reference to “My shack integration” article
May 5th 2026 – “Telegram setup” paragraph: added clarification about running Node Red on a network computer different from the Mac hosting RumLog
May 2nd 2026 – First issue
RumLog (come la gran parte dei logger) permette di definire filtri in modo che sulla finestra del cluster vengano mostrati gli spot che abbiamo scelto di ricevere ad esempio perchè ci manca la conferma di quel country. Naturalmente solo il nostro logger può farlo perchè conosce il nostro log e per ciascuno spot in arrivo applica i filtri che abbiamo impostato e popola di conseguenza la nostra finestra del cluster evidenziando se per quel country o banda o modo abbiamo già la conferma.
Like many other loggers RumLog cluster feature offers the possibility to set several filters in order to show for example calls from a country we need. Of course only our logger can do this because it knows our log so at any incoming spot he queries the log and check if that spot matches a filter we set and acts accordingly and inform us if that country/band/mode we already have the confirmation.
Ovviamente è necessario essere davanti al monitor per vedere la finestra del cluster. Il mio desiderio era invece essere avvisato di uno spot interessante anche quando sono lontano dallo shack. Ho quindi cercato un modo per ricevere su Telegram un messaggio quando viene spottata una stazione di mio interesse (perchè non ho la conferma del country o della banda o del modo).
Obviously we must to be in front of the screen to see the cluster window. My goal was to be alerted even when I’d be far from the shack. For this reason I tried to find a way to get a Telegram message as soon as a spot coming from a country I need appears on the cluster
In questo articolo farò riferimento esclusivamente a RumLog, ma il principio di funzionamento credo sia adattabile (con le opportune modifiche) anche ad altri logger dal momento che RumLog (come fanno anche altri logger) propaga le informazioni del cluster in formato N1MM sulla LAN attraverso il protocollo UDP.
In this article I’ll strictly refer to RumLog, but I think the concept can be adapted (with appropriate modifications) also to other loggers because RumLog sends cluster info in N1MM format over Udp protocol (like several other loggers do)
Questo progetto è parte della mia integrazione di stazione. A questo indirizzo troverete la descrizione dettagliata / This project is part of my shack integration. At this URL you’ll find its concept and the detailed description
https://www.ik1bxn.it/wp/2023/04/24/la-mia-integrazione-di-stazione-my-shack-integration/
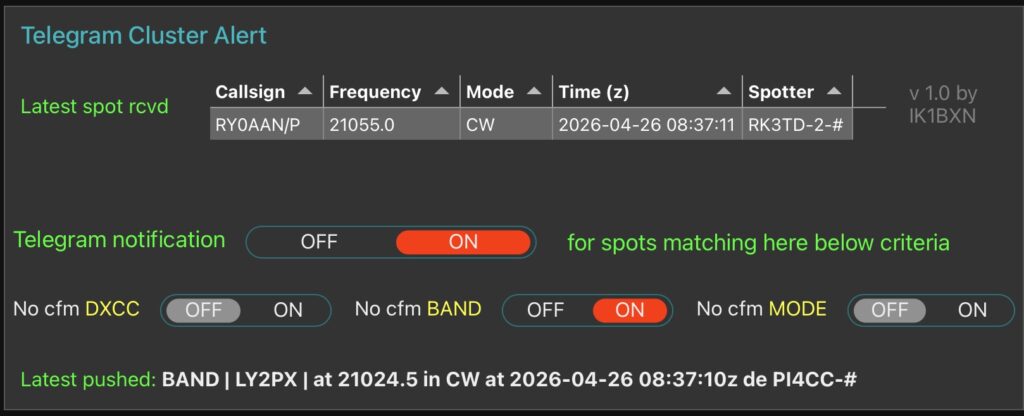
La Dashboard / The Dashboard
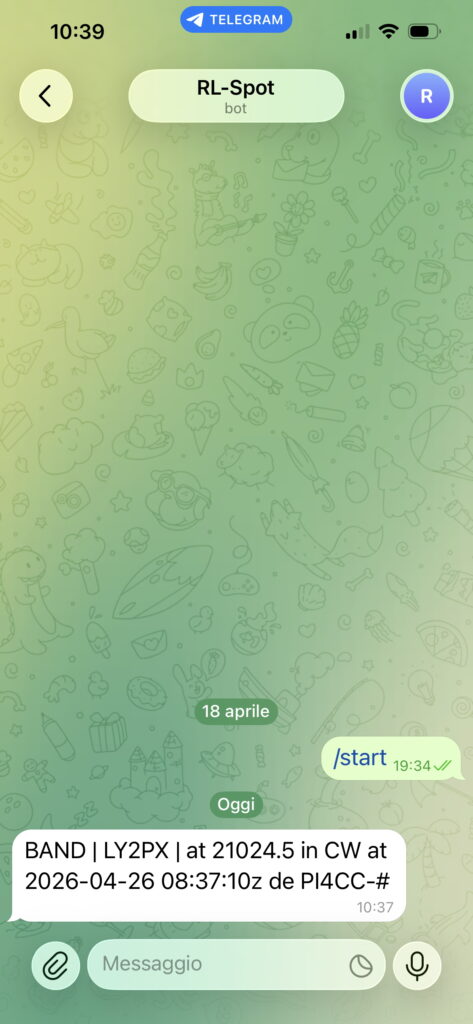
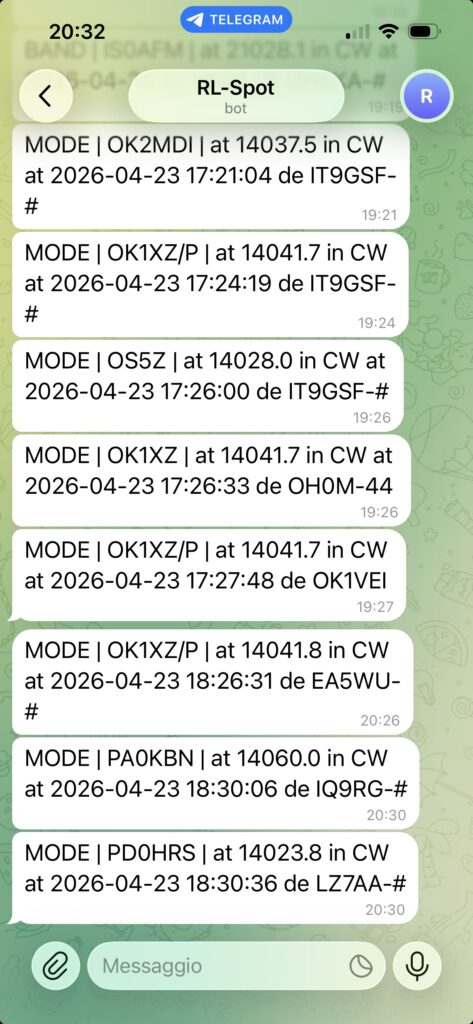
Messaggio ricevuto su Telegram / Telegram incoming message
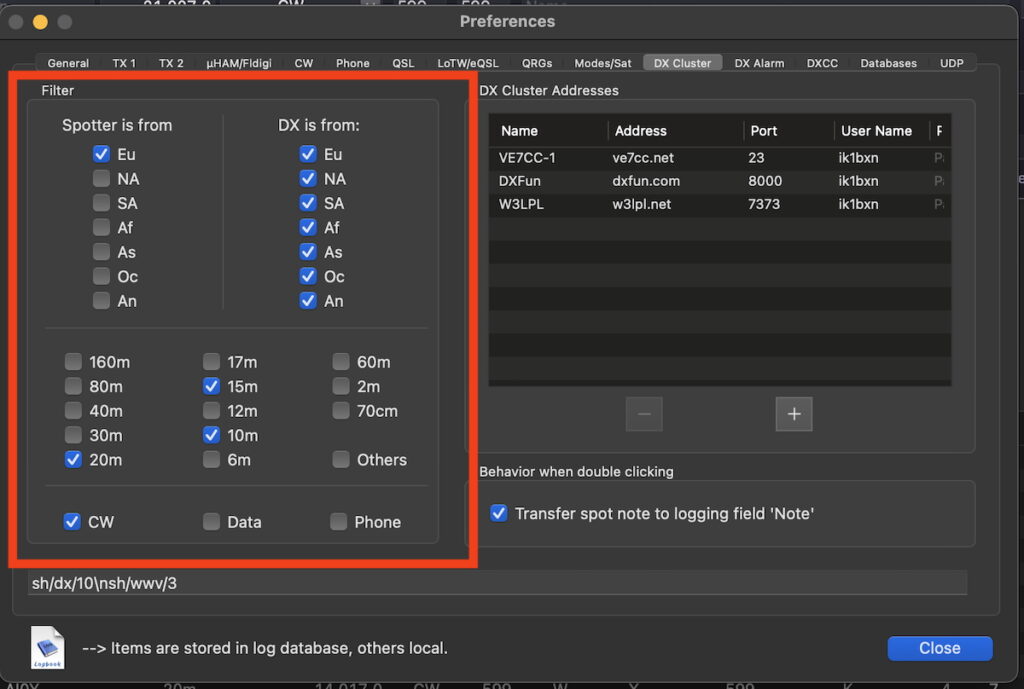
Il cluster di RumLog / RumLog cluster
RumLog ha una finestra di configurazione del Cluster nella quale possiamo selezionare quali spot ci interessa visualizzare nella finestra del cluster. I filtri qui selezionati verranno utilizzati per costruire il pacchetto UDP che RumLog invierà sulla nostra LAN.
In RumLog there’s a Cluster configuration panel where we can set spots we’re interested in. Filter here set will define the spot set RumLog will send over Udp, into other words spots not matching these filter will not be sent over the LAN
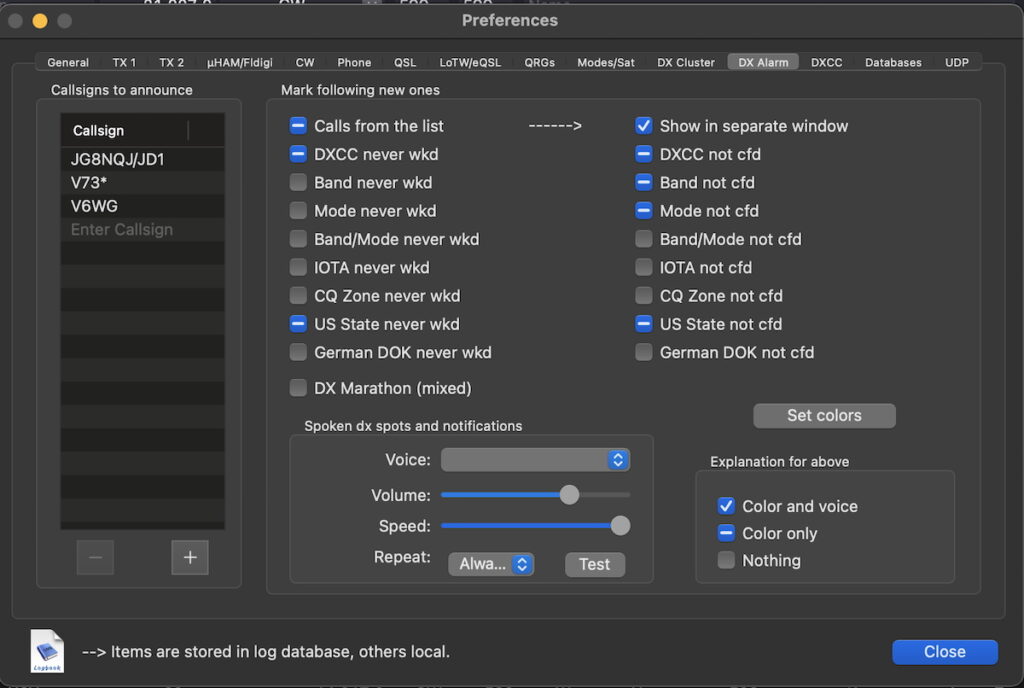
RumLog inoltre offre ulteriori possibilità di configurazione degli allarmi che però impattano solo sulla finestra locale del cluster
Furthermore RumLog let you to set additional filtering criteria but they only affect the local RumLog cluster window
Una volta impostati i filtri è necessario attivare l’invio su UDP degli spot
Once the filter are set you’ve to activate Udp DX spot sending
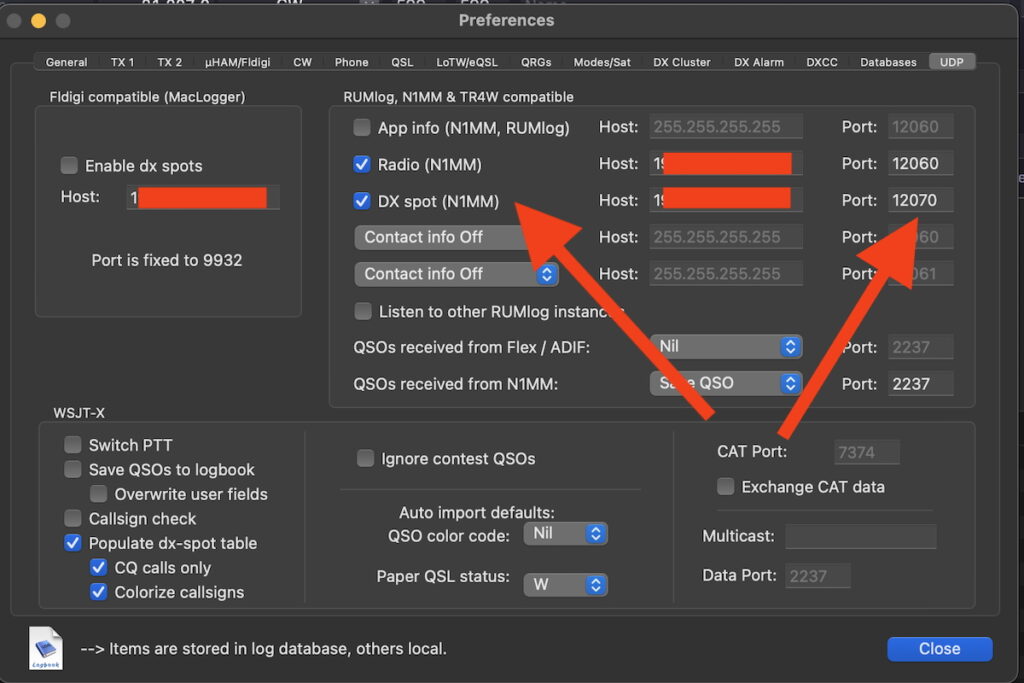
NOTA: ho preferito assegnare alla comunicazione degli spot in formato N1MM una porta diversa (12070) da quella delle informazioni CAT (12060) perchè la uso già (https://www.ik1bxn.it/wp/2025/02/13/acom-600s-lan-web-console-v-2-3-cat-synch-to-flrig-macloggerdx-rumlog-n1mm-flow-cleanup/) . Inoltre preferisco indicare l’IP del computer che le riceverà anzichè usare l’indirizzo di broadcast.
Remark: I prefer to assign to DX spot Udp port 12070 instead of the default 12060 that I currently use for radio info (you can see the 12060 in use here (https://www.ik1bxn.it/wp/2025/02/13/acom-600s-lan-web-console-v-2-3-cat-synch-to-flrig-macloggerdx-rumlog-n1mm-flow-cleanup/). In addition typically I prefer to set destination IP instead of spreading Udp broadcast over the LAN.
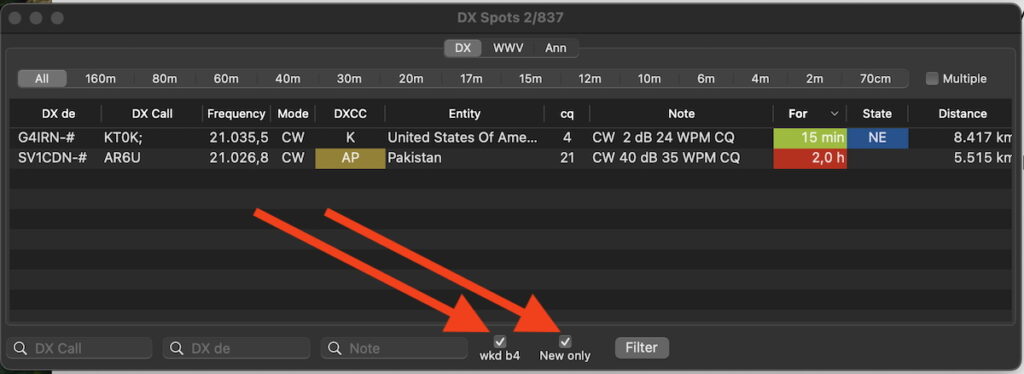
Oltre ai filtri sopra mostrati nella finestra del cluster di RumLog è possibile agire sui filtri, ad esempio nell’immagine qui sotto voglio visualizzare solo spot relativi a countries che mi mancano (“New only” marcata) ed escludo dalla visualizzazione i callsign che ho già a log (“wkd b4” ovvero “worked before” marcata). Tutto questo però riguarda le finestre di RumLog a video in quanto i dati inviati via UDP continueranno a mantenere la loro struttura indipendentemente da queste scelte.
Just to give a complete sight, in RumLog cluster window you can when “in session” decide to restrict spots list (in addition to filters set in Cluster configuration above discussed) to “New only” and/or “Worked before. Here below my daily setting. As above stated even these selections will not affect the “DX spot” sending via Udp
Il formato degli spot inviati da RumLog via UDP / Structure of RumLog Udp spots sending via Udp
A questo punto sulla porta Udp 12070 (nel mio caso) RumLog invierà le informazioni degli spot che superano i filtri impostati ed il pacchetto inviato è di questo tipo:
Now we have RumLog sending spots over Udp (port 12070 in my case) and for each spot matching filter condition we receive this kind of message
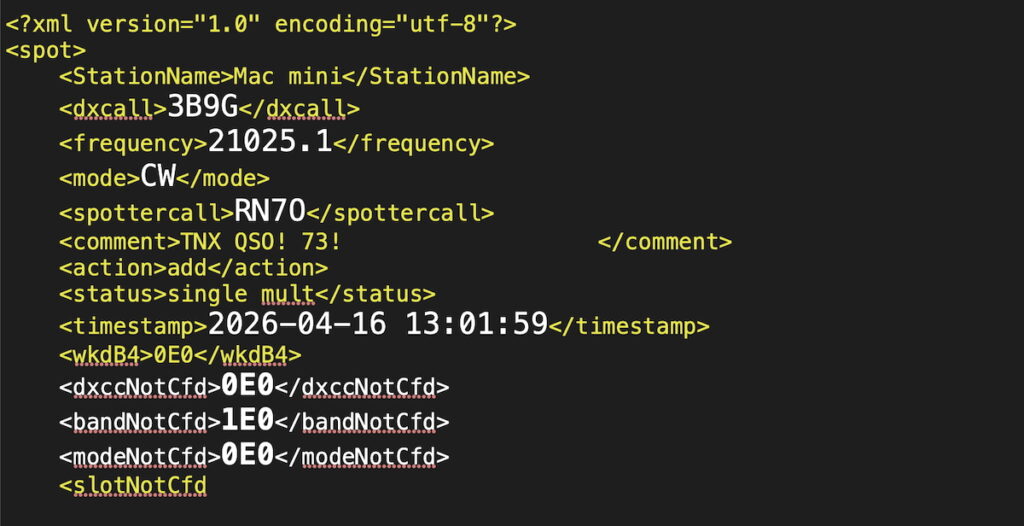
In questo messaggio troviamo Call,Qrg,Modo,Spotter,Data ed Ora. In aggiunta RumLog ha controllato il log per il country relativo al call 3B9G e ci dice anche (vedi campi dxccNotCfd-bandNotCfd-modeNotCfd) che per questo country in questo modo abbiamo già ricevuto la conferma ma ci manca la conferma di banda (infatti io 3B9G ce l’ho a log in 20m Cw)
In the above message we find Call, Qrg, Mode, Spotter, Timestamp. RumLog for this incoming spot checked my log for (in the example) 3B9G country (Rodriguez Island) and discovered that I have country confirmed only in 20m CW (I filtered spots only in CW and only for some bands) but I miss confirmation in 15m (current spot Qrg is for 15m). So in the message we can see that dxccNotCfd is False (0E0), bandNotCfd is True (1E0), modeNotCfd is False (0E0)

queste informazioni sono quelle che ci servono per alimentare gli switches dei criteri della Dashboard
these info are just what we need to feed Dashbord criteria switches
Elaborazione degli spot inviati da RumLog / RumLog Udp spot processing
Per prima cosa dobbiamo ascoltare la porta Udp sulla quale gli spot vengono inviati e con un minimo di elaborazione trasformarli in un messaggio che sarà inviato sul nostro Telegram.
First of all we need to listen to the Udp port RumLog uses to send spots, then with a simple process we will transform each of them in a message that will be sent via Telegram
Per questa attività ho utilizzato Node Red, un’ambiente di sviluppo molto intuitivo con un’approccio grafico. Node Red è multipiattaforma (Windows, Mac e Linux) e pubblica l’applicazione che abbiamo sviluppato su una Dashboard che si raggiunge col browser. Questo garantisce una grande fruibilità e portabilità, ad esempio se il nostro Node Red gira su un pc con Linux noi potremo interagire con un browser da un pc windows o un telefonino.
To do this job I’ve choosen “Node Red” that’s a development enviroment very intuitive with a graphic approach. Node Red is multi-platform (Windows-Linux-Mac) and consist of two main “bricks” based on web pages one is the workspace and the second one is the “dashboard” that’s the graphic user interface. This kind of this architecture grants flexibilty and portability, in fact we can have the Node Red “server” running on a Linux machine and we can interact with it from a Windows computer or a mobile device….only a browser is required
Node Red è molto diffuso ed in rete si trova molta documentazione. In Node Red le applicazioni che sviluppiamo vengono chiamate “Flow” e la programmazione consiste nel collegare tra loro graficamente “mattoni” che svolgono funzioni e sono chiamati “Nodi”. Naturalmente esistono nodi nei quali si può programmare uno di questi è il nodo chiamato “function” (nel mio flow ne troverete qualcuno.
Node Red is very widespread and very much documentation can be found in the Internet. In Node Red what we design is named “flow” and coding consists in to place the functional blocks (called “nodes”) we need and connect them with some “wires”. Of course there are some nodes for example a node named “funcion” in which you can code as usual (here in my flow you’ll find some)
Per installare Node Red fare riferimento a questo sito https://nodered.org/docs/getting-started/local ed in particolare in funzione del proprio sistema operativo alle indicazioni riportate in alto
To install Node Red please refer to instructions you’ll find here https://nodered.org/docs/getting-started/local and depending on which operating system you’re running open the link indicated by red arrows

ad esempio per l’installazione su Windows ci si troverà in questa pagina https://nodered.org/docs/getting-started/windows . ATTENZIONE non dimenticare di fare in modo che Node Red si avvii automaticamente al boot e per fare ciò seguire le indicazioni del paragrafo “Run Node-RED on Startup” situato in fondo alla pagina https://nodered.org/docs/getting-started/windows
If you’re going to install under Windows you’ll be directed to this page https://nodered.org/docs/getting-started/windows . ATTENTION don’t forget to make Node Red automatically restarting after a reboot and to do this follow “Run Node Red on startup” paragraph at the bottom of this page https://nodered.org/docs/getting-started/windows
Il Flow di Node Red / My Node Red flow
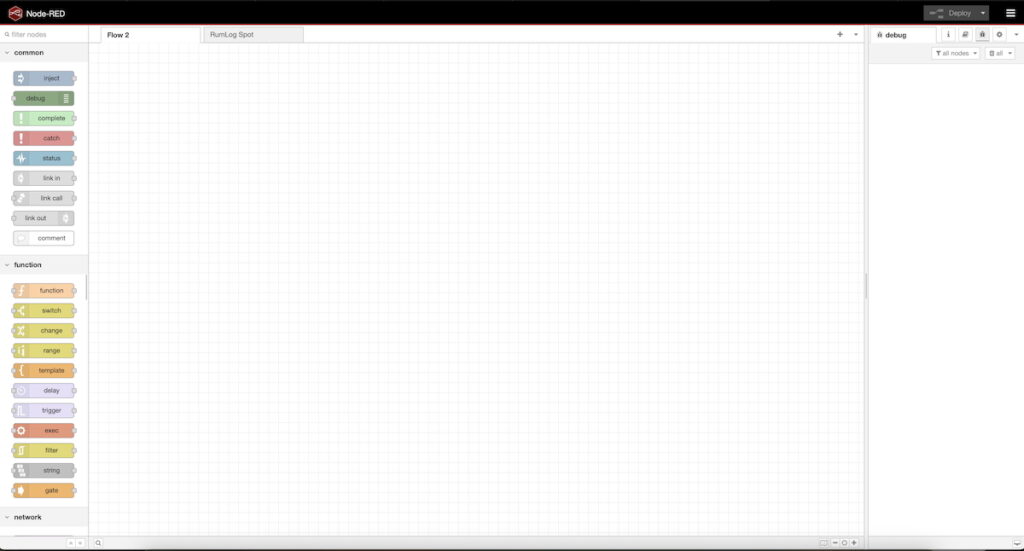
Con Node Red installato e in esecuzione col nostro browser aprendo l’indirizzo: http://127.0.0.1:1880 ci troveremo nella pagina di Node Red, ovviamente vuota
Once Node Red installed and running by opening your browser at this address (assuming your Node Red is running on the computer hosting RumLog) http://127.0.0.1:1880 you will meet the Node Red workspace (empty of course)
Download e importazione del mio flow / My flow Download and Import
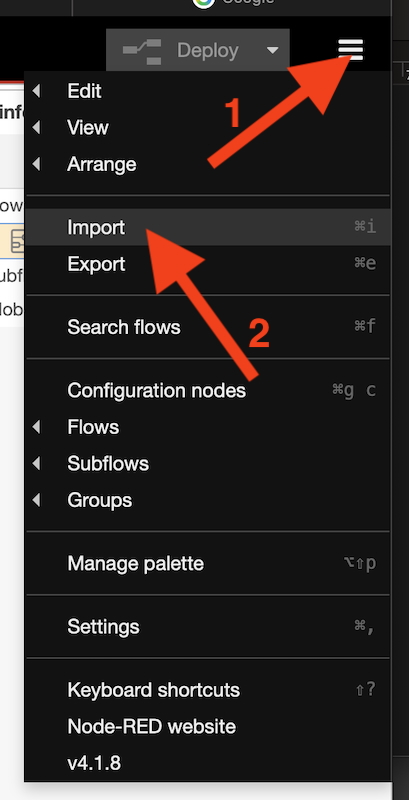
Dalla pagina di Node Red cliccare come da freccia 1 poi 2 / From Node Red workspace in the top right corner click as indicated by red arrow #1 and then click Import as per red arrow #2
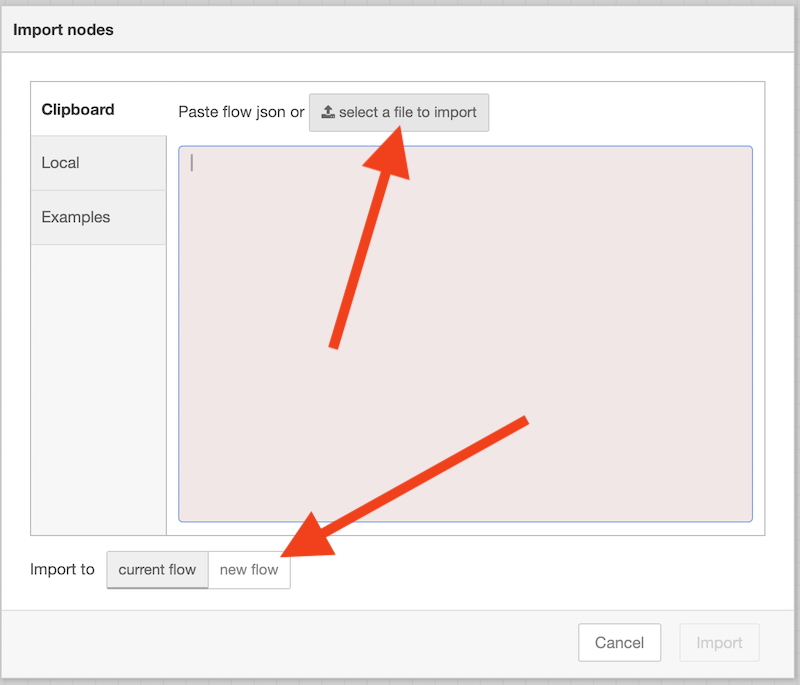
nella finestra selezionare “new flow” e cliccare “Select a file to import” / a window will appear, select “new flow” and “select a file to import”
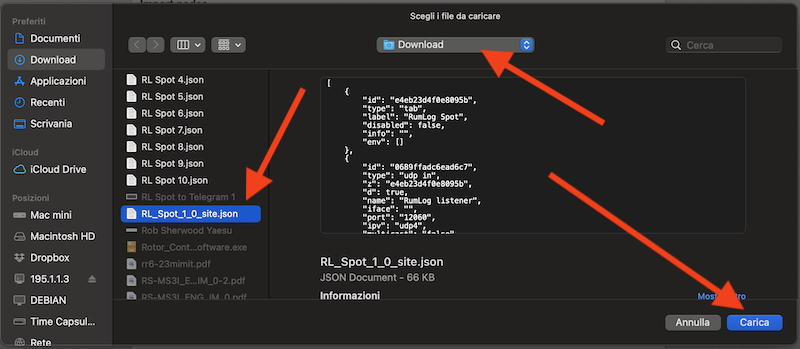
ora navigate nella cartella dove avete scompattato il mio flow, selezionatelo e premete “Carica” / navigate now to the folder in which you unzipped the file you downloaded and select that file then press “Load”
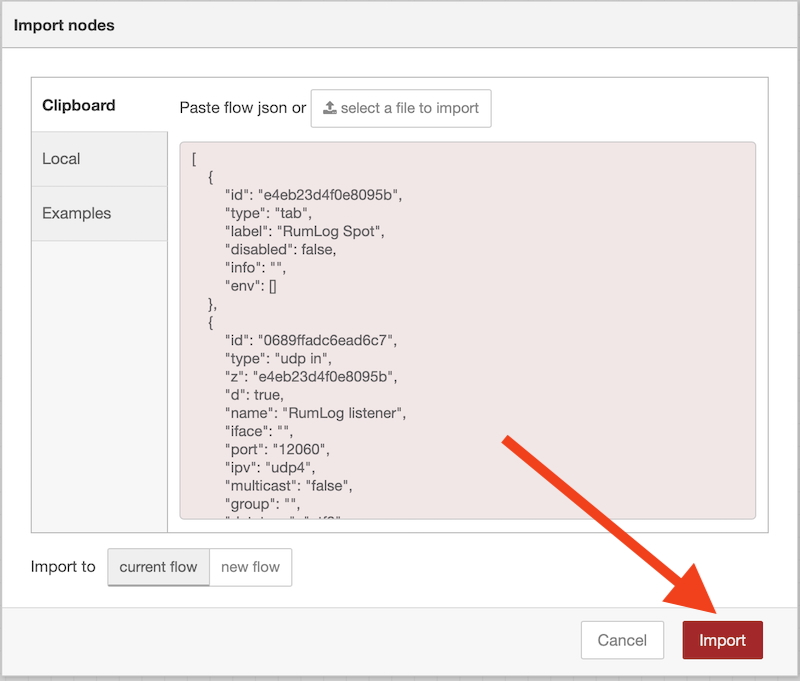
nella finestra che si apre premete “Import” / in the window press Import
verrà visualizzato questo messaggio / you’ll get this message
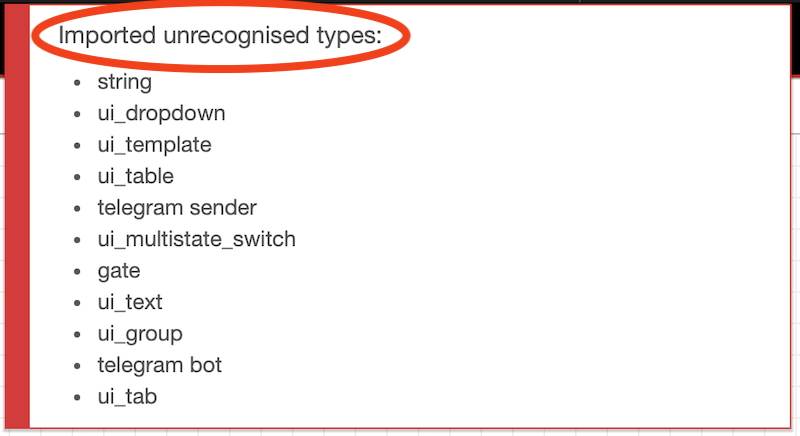
che significa che nel mio flow sono usati “nodi” non installati su Node Red, questo perchè l’installazione di Node Red installa un set di nodi basilari / this means that in my flow there are nodes that your workspace doeasn’t recognize. This is normal because Node Red installation install a basic node set
Aggiunta dei nodi mancanti / How to add missing nodes
Step 1
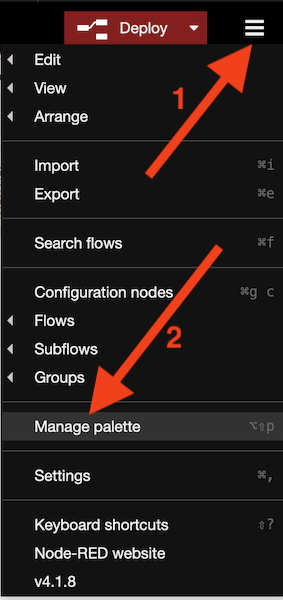
verrà aperta questa pagina, clicchiamo su Install / in this window choose Install
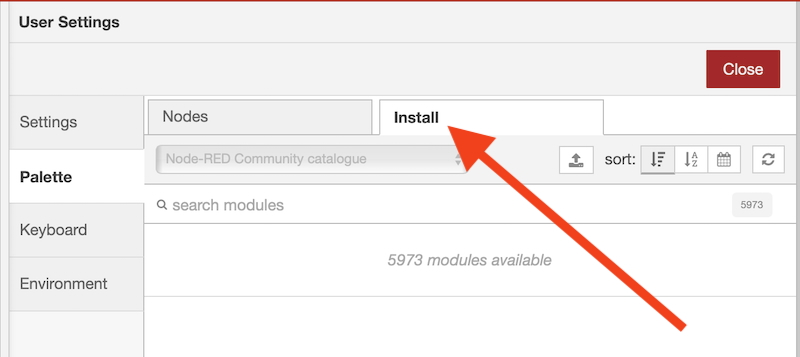
Step 2
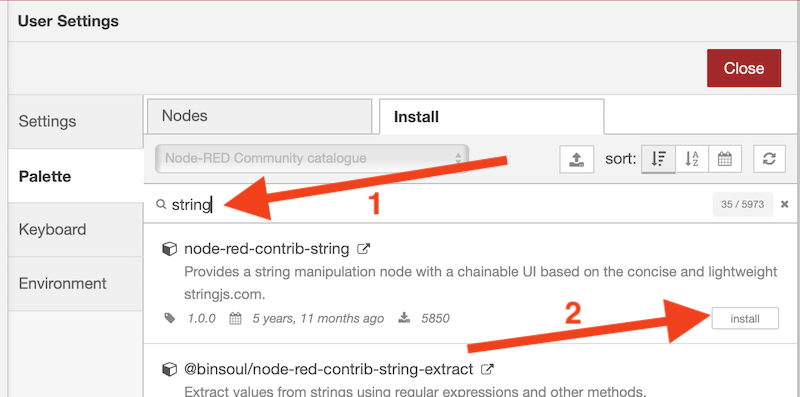
e nel campo di ricerca digitiamo il nome di uno dei nodi mancanti (nell’esempio il nodo “string”) e premiamo invio. Apparirà una lista di “nodi” che contengono il nome “string” ma quello che interessa a noi è il primo quindi premiamo “Install”.
in the search field (lens) type the name of one of the missing nodes above shown (in the example the node named “string”) and press Enter. A list of available nodes containing “string” in their name will appear. The one we need is the first listed (node-red-contrib-string) so let’s press Install
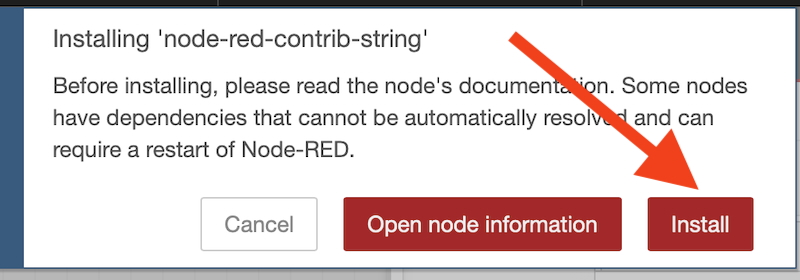
a questo punto un messaggio ci chiederà di confermare l’installazione quindi premiamo “Install” / A message will ask us for confirmation, so press Install
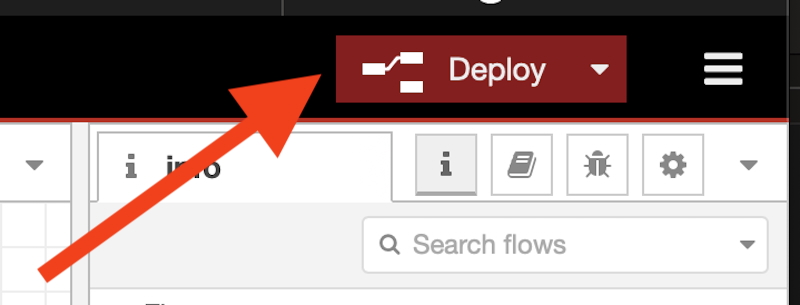
ora facciamo il “Deploy” e osserviamo che il nodo “string” non figura più nell’elenco dei nodi mancanti / now let’s apply modification by pressing Deploy button. If we correctly add the “string” node it will disappear from the missing nodes list
Nota: Deploy corrisponde a salvare la modifica, quindi TUTTE le volte che qualcosa nel flow verrà cambiato occorre fare il Deploy
Remark: Deploy means “apply modifications” and it MUST be performed any time you touch something in a flow
Step 3
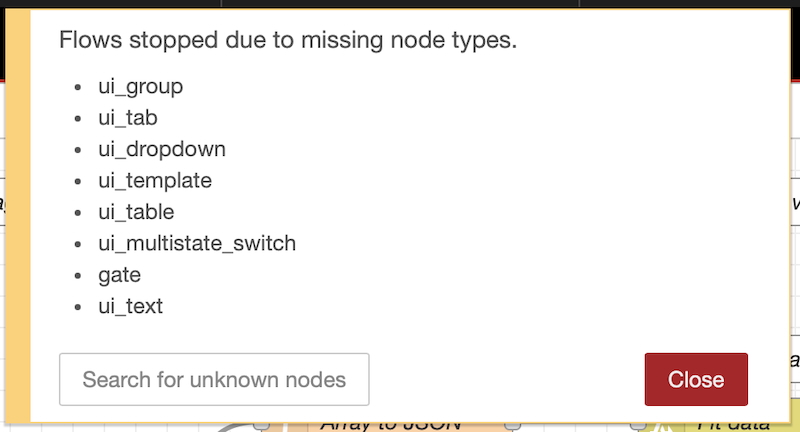
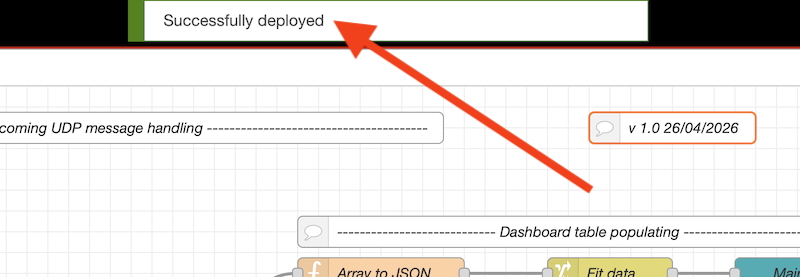
ma mancano altri altri nodi ! Ripetiamo i passaggi da Step 1 a Step 3 per tutti i nodi mancanti. Quando li avremo aggiunti tutti eseguendo il Deploy riceveremo il messaggio “di OK “Succesfully deployed”
as expected “string” node is no longer listed, but some other nodes are still missing. Repeat from Step 1 to Step 3 for all missing nodes. When we will have all missing nodes installed doing Deploy we’ll get message “Succesfully deployed”
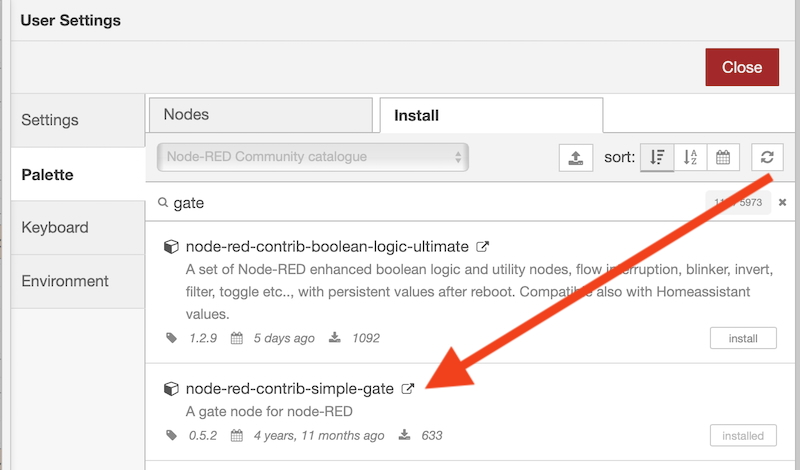
Nota: per il nodo “gate” va installato questo
Remark: about the “gate” node you must choose this one
Tip: se il pulsante Deploy non fosse attivo basta spostare un nodo qualsiasi (ad esempio quello dove sono indicate versione e data) e così facendo Node Red si accorgerà di una modifica ed attiverà il pulsante Deploy che diventerà rosso
Tip: if Deploy button was grayed drag (just a bit) a node (for example the one that indicates version and date) by doing this Node Red will notice a modification and it will activate again the Deploy button
Come funziona / How it works
Questo è il “Flow” di Node Red per questa applicazione che si occuperà di ascoltare i dati in arrivo da RumLog sulla porta UDP, ne tratterà il contenuto, creerà la Dashboard del programma, confezionerà il messaggio da inviare a Telegram e lo invierà (per una visualizzazione più comoda tasto destro del mouse sull’immagine -> apri in un nuovo pannello)
This is my flow for this application and at this point you shoud see it in your workspace. This flow cares of listening Udp port 12070 (for me), will handle its content, will create the Dashboard, will build the Telegram message and will send it via Telegram. For a more confortable view right click on the image and open it in a separate panel
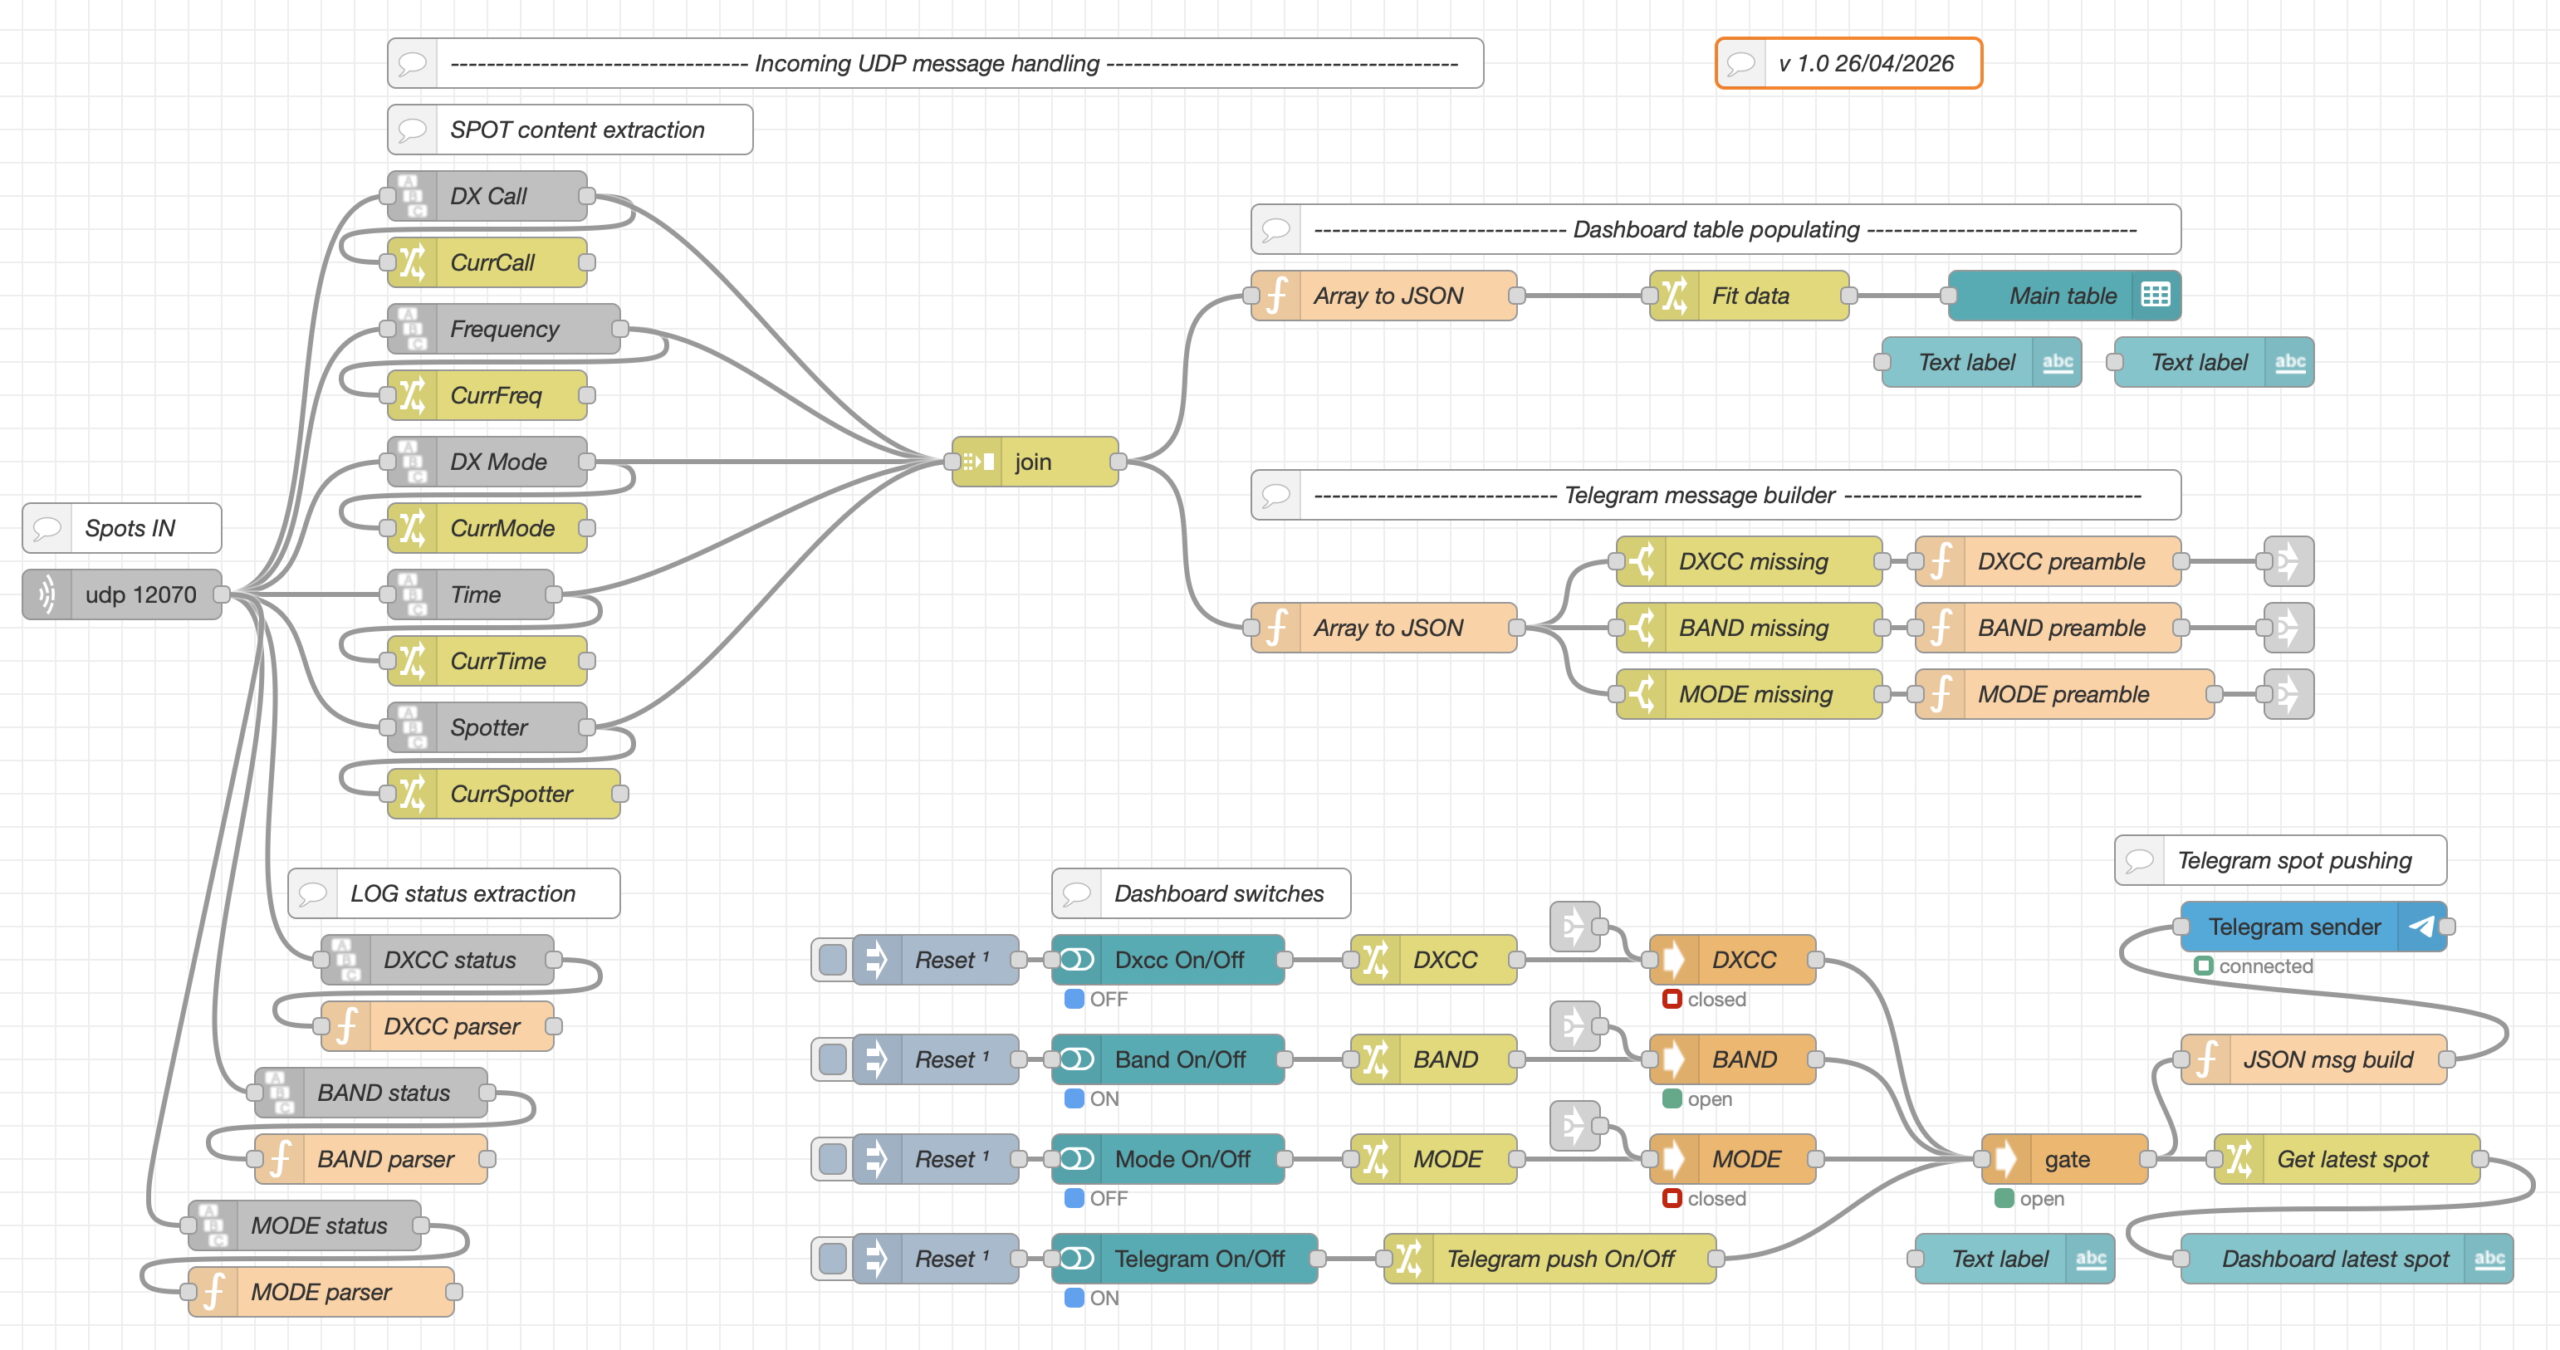
Nella parte sinistra abbiamo il nodo Udp In che ascolta i dati UDP sulla porta 12070 (nel mio caso) e li passa ad una serie di nodi che si occupano di estrarre da ciascuno spot in arrivo le stringhe nelle quali sono contenuti i dati che ci servono (Call, Frequenza ecc) e li salvano in una serie di variabili. I dati estratti vengono poi assemblati in un array e da qui passati ai due bracci in alto a destra:
Left side you can see the node “Udp In” that listen Udp port 12070 (for me) and its output goes to a group of “string” nodes that extract from each spot the info we are looking for (Call, Qrg and so on) and load correspondant flow variables. All info so extracted are passed to a “join” node that assembles the data into an array and its output feeds 2 paths:
- quello più in alto si occupa di visualizzare tutti gli spot che arrivano da RumLog (ovvero quelli che hanno superato i filtri che abbiamo impostato) / the highest path treats all incoming spots from RumLog (thath means the spots that satisfied the filter we set in RumLog) and show the in the dashboard
- quello più in basso si occupa di preparare i messaggi verso Telegram e selezionerà gli spot in base alle scelte di invio a Telegram che avremo impostato nella dashboard (ad esempio DXCC non confermato). Per ciascuna scelta impostata viene confezionato il messaggio per Telegram e viene aggiunto un preambolo (DXCC-BAND-MODE) in modo che da Telegram sapremo se lo spot ricevuto riguarda un country mancante ad esempio / the lowest path cares of preparing Telegram messages according to the dashboard criteria switches (for example DXCC not confirmed) For each Telegram message a preamble (DXCC-BAND-MODE) is added so reading the Telegram message we can understand which missing confirmatio that message is relevant to
I 3 nodi in basso a sinistra estraggono lo stato delle conferme (Dxcc-Banda-Modo) per il country spottato e lo caricano in variabili che verranno poi usate per selezionare quali spot vogliamo ricevere su Telegram
The 3 string nodes located in bottom left extract the confirmation status (Dxcc-Band-Mode) for the country just spotted and load 3 correspondant flow variables that will be used to select which spot will be pushed via Telegram
Nella parte in basso troviamo gli switches che dalla dashboard ci permettono di selezionare il criterio di invio a Telegram. Gli spot così trattati prendono quindi la strada per l’invio su Telegram ed a questo punto se da dashboard abbiamo attivato l’invio verso Telegram il messaggio del nostro spot verrà passato al nodo di invio Telegram ed in parallelo verrà visualizzato sulla dashboard
In the bottom region of the flow we find the dashboard criteria switches and Telegram message pushing On/Off switch. A copy of latest message pushed by Telegram will be published on the dashboard
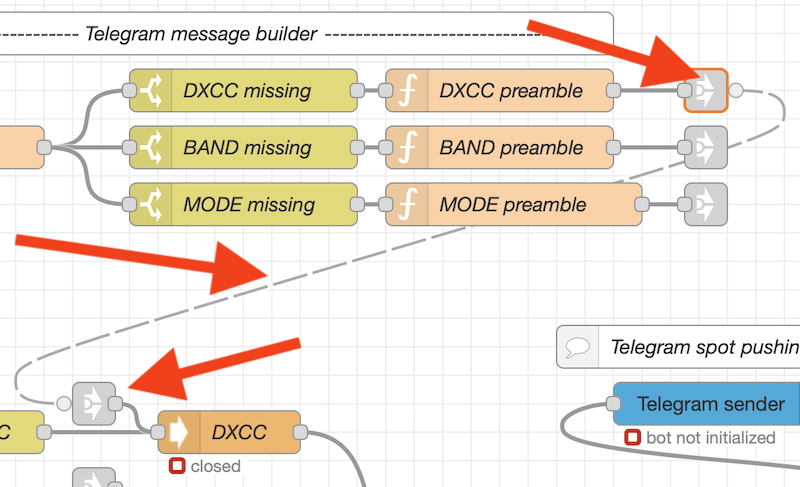
Nota: i nodi “Link In” e “Link Out” sono collegamenti “nascosti” ed apparentemente non sembrano collegati a nulla. Cliccando su di loro però viene visualizzato il collegamento tratteggiato perchè sono collegamenti reali e funzionanti ma nascosti per rendere più leggibile il flow
Remark: there are “strange” nodes (called Link In and Link Out) that seem to go nowhere. If you single click them a dashed connection will appear because they are connected and running but they are hidden in order to get the flow better readable
Messa a punto del flow / Flow setup
Naturalmente il flow che potrete scaricare da questo articolo fa riferimento alla mia installazione, quindi dovrete modificare alcuni “nodi” affinchè siano coerenti con la vostra installazione come di seguito indicato
Obviously the flow you downloaded refers to my installation so you must touch it in order to get it working for you. Here the list of what needs be modified
- nodo “udp 12070” (a sinistra nel flow) / udp 12070 node (flow left side)
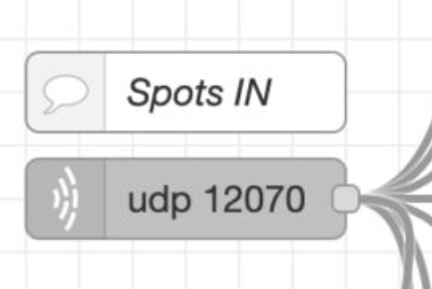
facendo doppio click sul nodo si aprirà la finestra delle proprietà / double click the node and you get the properties window
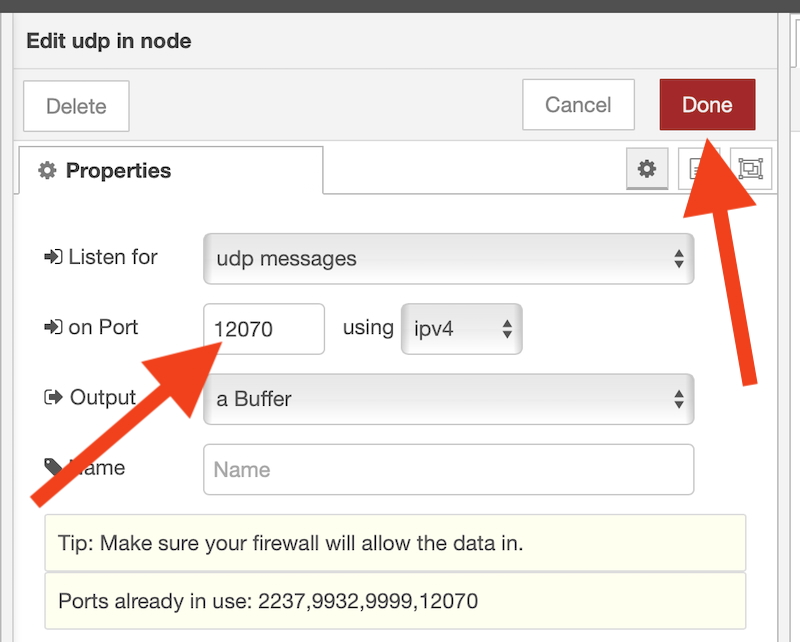
nella casella “on Port” dovrà essere indicato lo stesso numero di porta Udp definito in RumLog / in the “on Port” field you must enter the same port you assign in RumLog configuration

Premere Done per salvare la modifica / press “Done” button to save modification
- nodo “JSON msg build” (in basso a destra) / “JSON msg build” node (flow bottom right)
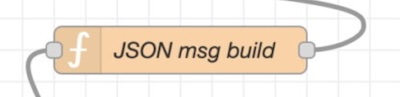
facendo doppio click sul nodo si aprirà la finestra delle proprietà / double click the node and you get the properties window
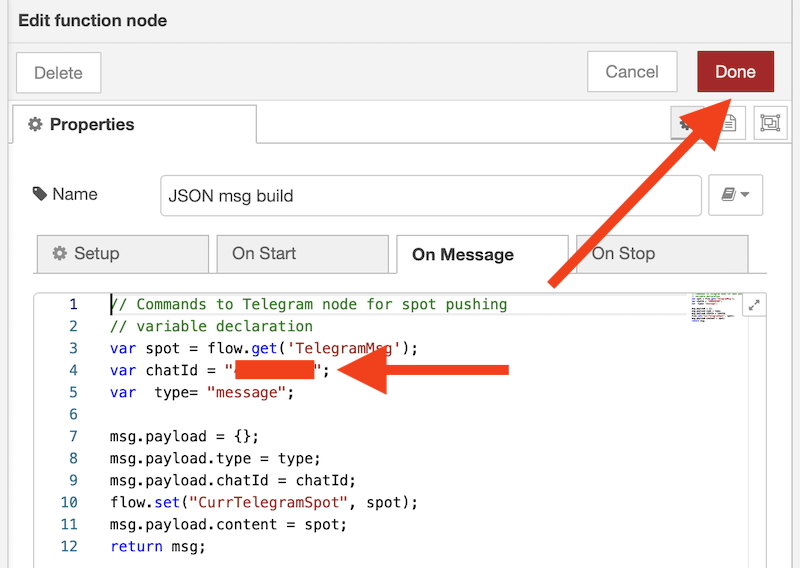
nella riga “var chatId” inserire il numero di ChatId che vi ha fornito Telegram durante la configurazione (vedi oltre in questo articolo) / in “var chatId” enter the chatId number you got from Telegram when you created the Telegram BOT (further down in this article)
Premere Done per salvare la modifica / press “Done” button to save modification
- nodo “Telegram sender” (in basso a destra) / “Telegram sender” node (flow bottom right)
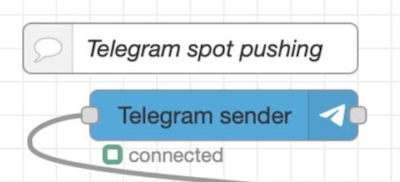
facendo doppio click sul nodo si aprirà la finestra delle proprietà / double click the node and you get the properties window
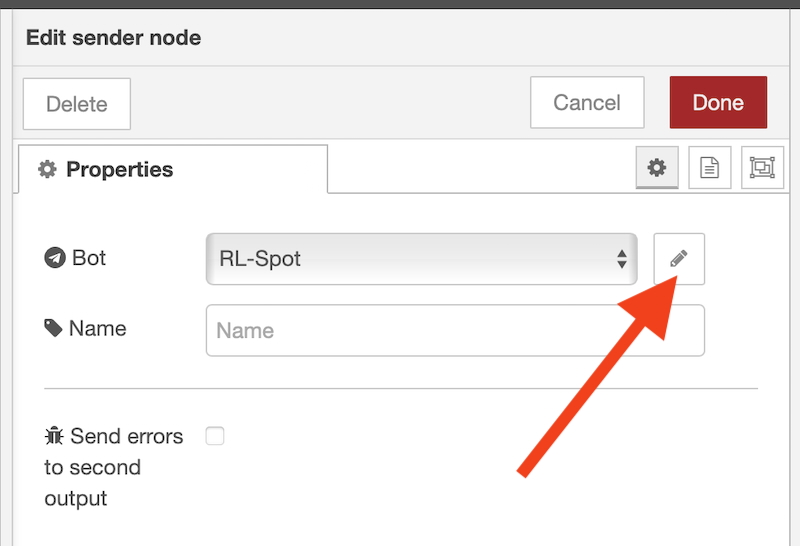
premiamo sul pulsante di modifica indicato dalla freccia e si aprirà questa finestra / press modify button (red arrow) and you’ll get this window
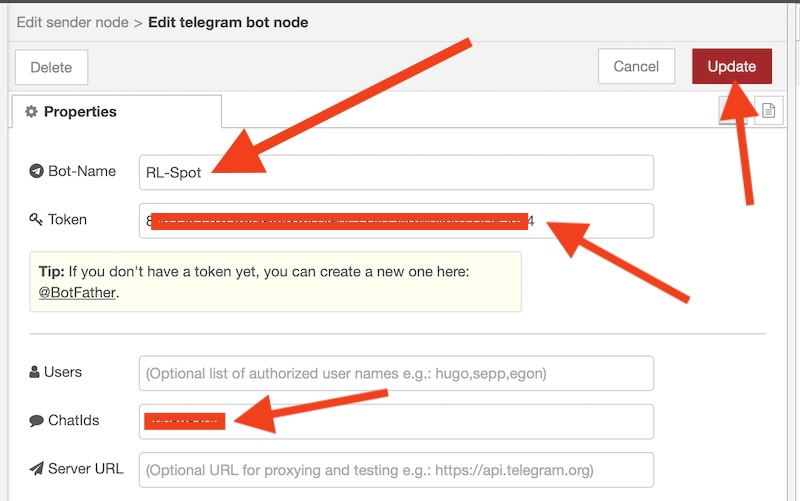
- nella casella “Token” inserire la “HTTP API” che vi ha fornito Telegram durante la configurazione BOT (vedi oltre in questo articolo) / in the “Token” field enter the “HTTP API” you got from Telegram when you created the Telegram BOT (further down in this article)
- nella casella “ChatIds” inserire il numero di ChatId che vi ha fornito Telegram durante la configurazione del BOT(vedi oltre in questo articolo) / in the “ChatIds” field enter the chatId number you got from Telegram
- Nella casella “Bot-Name” indicare il nome che avete dato al vostro BOT (vedi oltre in questo articolo) / in the “Bot-name” field enter the BOT name you assigned when you created the Telegram BOT (further down in this article)
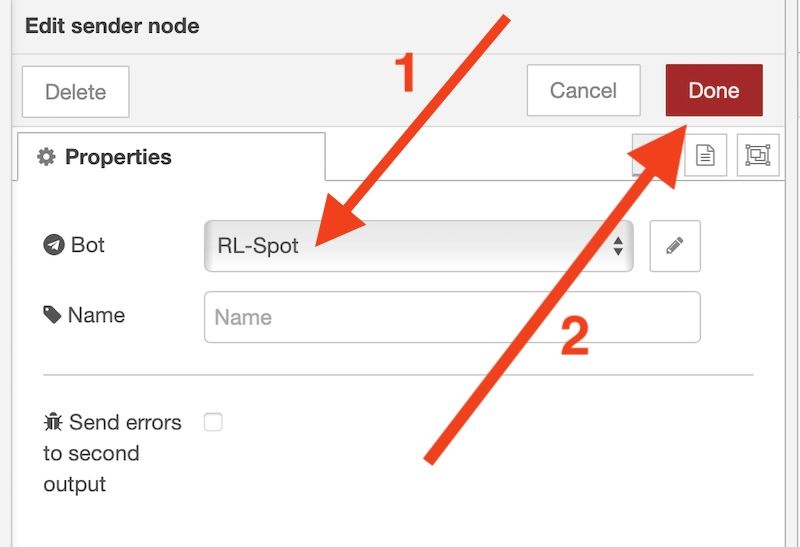
Premere Update per salvare la modifica, si aprirà questa finestra nella quale occorre scegliere il nome del vostro BOT (freccia 1) e successivamente premere Done per salvare la configurazione del nodo
Press “Update” button to save modification and you’ll get this window in which you have to select your BOT name from the list (red arrow 1) then press “Done” to save modification
A questo punto le modifiche sono completate, premere “Deploy” (in alto a destra nella finestra di Node Red) / Now the flow is ready to work for you, press “Deploy” (flow top right)
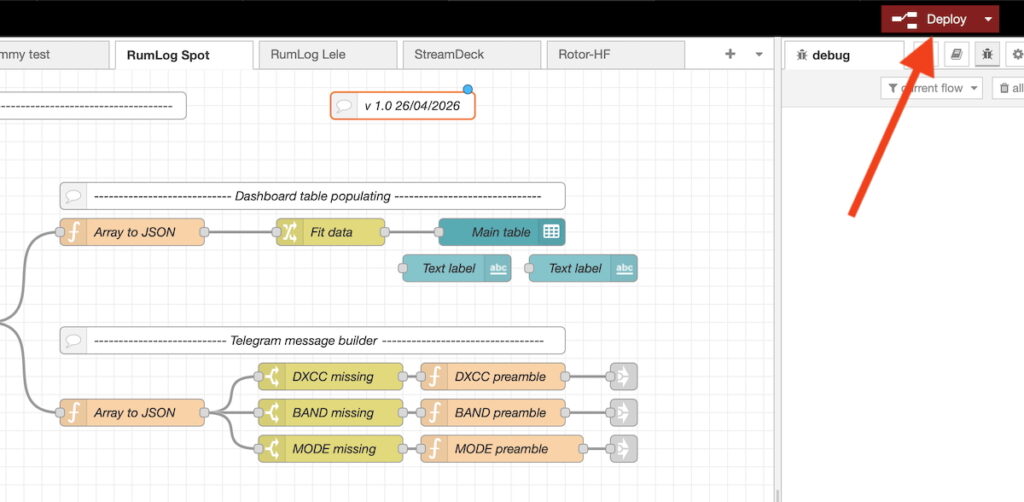
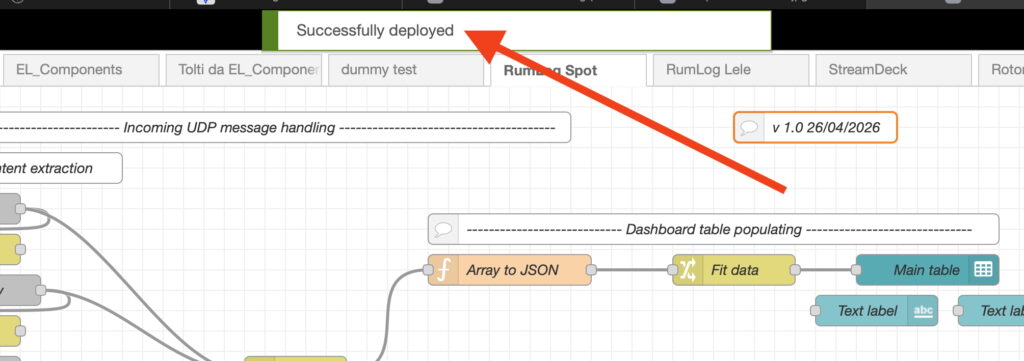
successivamente premere “Confirm deploy” e se non ci sono stati errori troveremo il messaggio “Succesfully deployed” / you’ll be asked now to confirm deployment so press “Confirm deploy” and if everything is OK you’ll get “Successfully deployed” message
La dashboard / The dashboard
La dashboard è l’interfaccia di gestione di questa applicazione. Si tratta di una pagina web che si raggiunge all’indirizzo http://127.0.0.1:1880/ui/ (ovviamente se Node Red è sullo stesso computer dove si trova RumLog)
Dashboard is the management interface for this application. It’s a web page you can open with your browser at this URL http://127.0.0.1:1880/ui/ (of course if Node Red is running on the local computer that hosts also RumLog)
Nota: ad ogni riavvio del computer o ad ogni Deploy del flow o ad ogni riavvio di Node Red la dashboard si avvia con tutti i pulsanti su OFF quindi occorre aprire la dashboard ed attivare le funzionalità desiderate. Durante il funzionamento dell’applicazione NON è necessario tenere aperta la pagina web della dashboard, si potrà aprire in qualsiasi momento se si vuole cambiare qualche funzionalità
Remark: at any computer reboot or any flow deployment or any Node Red “server” restart the dashboard restarts and all its buttons are set to OFF. During activity is not necessary to keep dashboard web page opened, you can open it any time you need to change some switches position
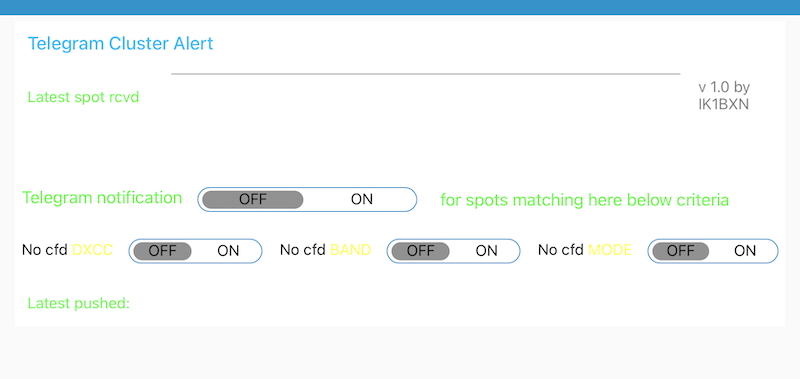
Nota: Ho usato il tema Dark per la dashboard quindi probabilmente la vostra la vostra apparirà in questo modo
Remark: I used Dark theme for dashboard design (that’s not Node Red default) so probably first time you’ll open the dashboard you’ll see it in this awful appearance
per sistemarla seguite i seguenti passaggi / to fix it please follow these steps
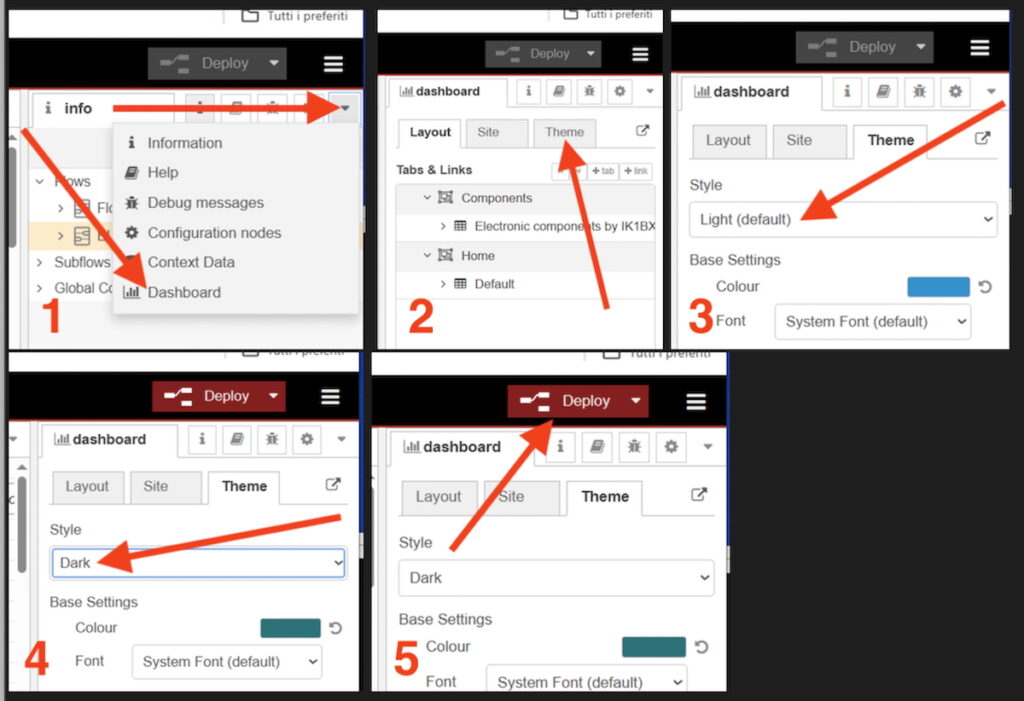
e finalmente OK / and finally it will be OK
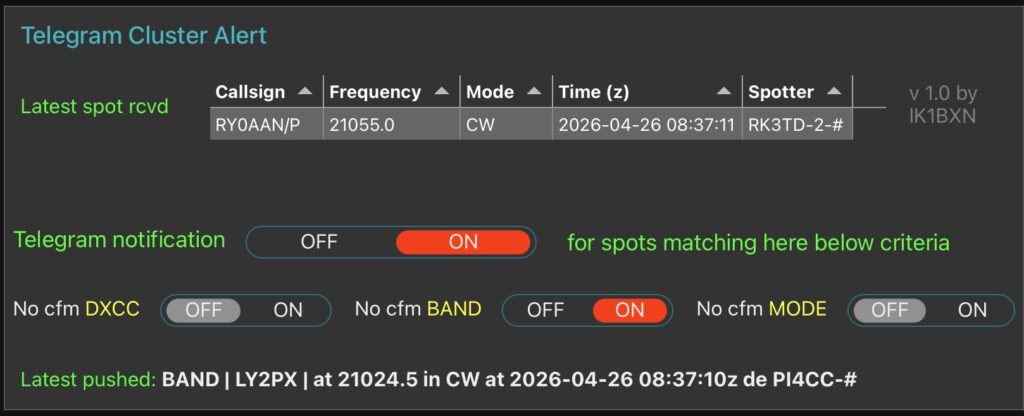
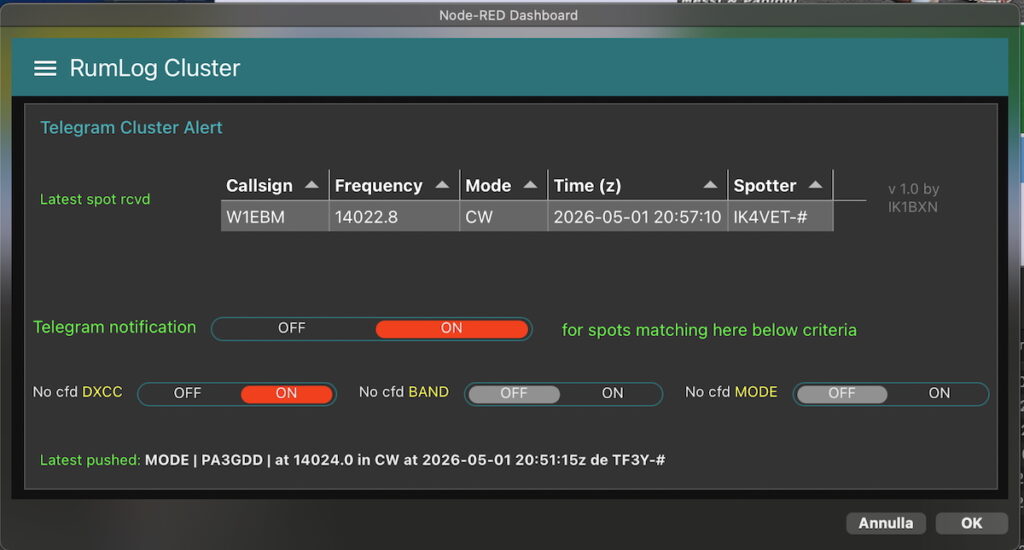
Dalla dashboard possiamo scegliere se attivare oppure no l’invio degli spot a Telegram e scegliere quali spot inviare impostando gli switches, ovvero quelli per i quali ci manca la conferma DXCC oppure Banda oppure Modo. Possiamo attivare anche più scelte, vorrà dire che se ad esempio uno spot ci manca sia come modo che come banda il messaggio che riceveremo su Telegram conterrà come preambolo sia MODE che BAND
Using the dashboard we can activate Telegram sending and choose which spots we want to be notified (by touching the 3 dedicated switches “Not cfd DXCC” – “Not cfd BAND” – “Not cfd MODE”). We can activate more than one switch simultaneously For example if we activate BAND and MODE the telegram message will show 2 preambles (BAND and MODE)

Nella riga in alto “Latest spot rcvd” verrà mostrato l’ultimo spot ricevuto da RumLog (ovvero spot che ha soddifatto i filtri da noi impostati nelle proprietà del cluster di RumLog). La riga in basso “Latest pushed” mostra l’ultimo messaggio inviato a Telegram
Dashboard top line (Latest spot rcvd) shows the latest spot received from RumLog (as told the spot that satisfied RumLog cluster filtering). The bottom line (Latest pushed) shows the latest spot sent via Telegram
- Lo switch “Telegram notification” Attiva / Disattiva l’invio di notifiche a Telegram / “Telegram notification” switch activate/deactivate Telegram notification sending
- Lo switch “No cfd DXCC” con “Telegram notification” su ON invierà lo spot a Telegram se non abbiamo la conferma per il country Dxcc / “No cfd DXCC” switch when Telegram switch is ON activates sending via Telegram for spot relevant to not confirmed DXCC for that country
- Lo switch “No cfd BAND” con Telegram notification” su ON invierà lo spot a Telegram se non abbiamo la conferma di Banda per quel country / “No cfd BAND” switch when Telegram switch is ON activates sending via Telegram for spot relevant to not confirmed BAND for that country
- Lo switch “No cfd MODE” con Telegram notification” su ON invierà lo spot a Telegram se non abbiamo la conferma di Modo per quel country / “No cfd MODE” switch when Telegram switch is ON activates sending via Telegram for spot relevant to not confirmed MODE for that country
Su Telegram riceveremo un messaggio per ciascuno spot che ha soddisfatto i filtri impostati su RumLog ed i criteri che abbiamo impostato sulla dashboard
Our Telegram client will receive one message for each spot that satisfied RumLog cluster filter settings and criteria (the 3 switches) we set in the dashboard
La configurazione di Telegram / Telegram setup
Affinchè tutto funzioni è consigliabile che Telegram sia installato sul computer dove è installato Node Red. Se Node Red è installato su un computer di rete (nel mio caso gira su una macchina LXC sotto Proxmox) occorre aprire la porta 8123 Tcp
It’s suggestable/advisable to have Telegram installed on the computer hosting and running Node Red in order to get this application running. If Node Red is installed and running on a network computer (this is my case as my Node Red is hosted by a Proxmox LXC machine) Tcp 8123 port must be open
Per poter inviare gli spot a Telegram occorre creare un BOT i cui riferimenti andranno inseriti nel flow come detto più in alto (paragrafo Messa a punto del flow). In rete si trovano molte pagine dove viene spiegato come fare. Io ho usato questa
To be able to send spots via Telegram we have to create a BOT and its configuration parameters must be entered in the positions above discussed (Flow setup paragraph). In the Internet there are lot of guides on how cretare a Telegram BOT. I used this one
https://flowfuse.com/node-red/notification/telegram
seguendo SOLO i paragrafi “Creating a Bot in Telegram” e “Obtaining your Telegram Chat ID” . Per i passaggi successivi indicati nel sito fate riferimento a quanto ho indicato più in alto nel paragrafo “Messa a punto del flow”
in the above web page please follow ONLY paragraphs “Creating a Bot in Telegram” and “Obtaining your Telegram Chat ID”. For subsequent steps follow what is written here in “Flow setup” paragraph
SEGNATEVI i dati durante la creazione del Bot (Bot name, Bot username, HTTP API, ChatId number)
TAKE NOTE of parameters you set/get during BOT creation (Bot name, Bot username, HTTP API, ChatId number)
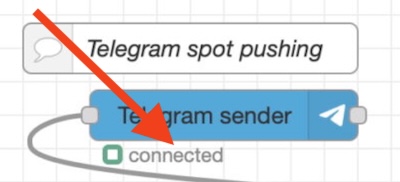
A questo punto inserite i riferimenti del vostro BOT nei nodi “JSON msg build” e “Telegram sender” come indicato nel paragrafo “Messa a punto del flow”, fate Deploy e se tutto sarà OK sotto al nodo “Telegram sender” apparirà la scritta “Connected”
At this point enter BOT parameters in the nodes “JSON msg build” and “Telegram sender” as written above in “Flow setup” paragraph then press Deploy and if everything will be OK under “Telegram sender” node you’ll see “Connected”
A questo punto attivando dalla dashboard l’invio delle notifiche su Telegram ed a seconda dei criteri selezionati dovreste ricevere su Telegram gli spot relativi
Now by activating from the dashboard the Telegram sending you should receive spot messages according to the criteria switches you set
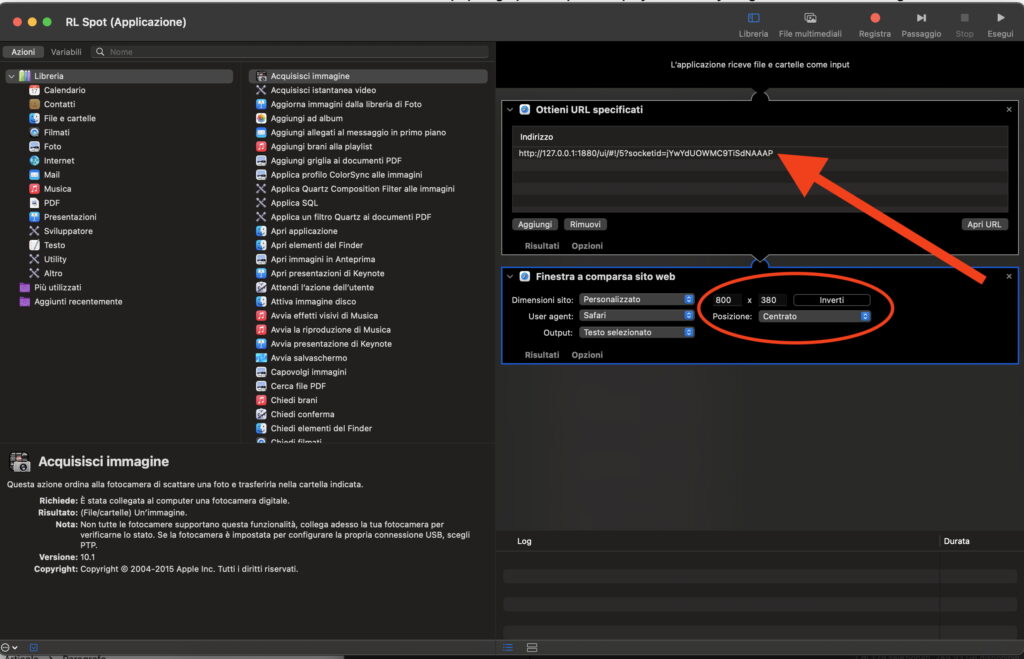
Suggerimento: di solito creo un’applicazione di Automator che mi apre in una nuova pagina del browser direttamente il link all URL della dashboard ed imposto la dimensione della finestra. In questo modo in qualsiasi momento apro e chiudo agevolmente la dashboard
Tip: Typically I create an Automator application that opens in a new browser page the dashboard URL and in it I customize window size. In this way I can easily open/close the dashboard.
questa è la mia configurazione in Automator / here is my Automator configuration
e questo è il risultato / here is the result
….. that’s all folks ! Have fun
TU 73 de Giorgio IK1BXN
mail to: ik1bxn@ik1bxn.it