Quale appassionato autocostruttore ho in casa parecchi componenti elettronici ed ogni volta che mi serviva un transistor dovevo cercarlo nel contenitore e se mancante ordinarlo. Ho così pensato ad un sistema di gestione dei componenti che mi dicesse cosa ho disponibile ed in quale quantità. Con l’occasione ho aggiunto una sommaria descrizione del componente, il pulsante per aprire direttamente il datasheet ed un campo Note nel quale indicare ad esempio se è un compnente di recupero. Già che c’ero ho aggiunto un paio di funzionalità che ritenevo utili: elencare i componenti con quantità <= 1 e la possibilità di esportare in formato .csv famiglie di componenti (il nome del file viene costruito così: “famiglia di componenti”+ exported on +”DD-MM-YYYY)
Enjoying homebrewing I have lot of electronic components at home, but any time I’d need a transistor (for example) I’ve to spend time to check if it’s present in my storage. To avoid this waste of time I designed this application that can quickly tells me if I have a component, how many of them, a brief description, a note field and a button to open its datasheet. By the occasion I added a function to export in .csv format (file name built with this pattern: “component type”+ exported on +”DD-MM-YYYY) the component list by type. A button let you to list components with quantity <= 1
Questa applicazione è stata pensata per le mie esigenze, ma può servire come base per familiarizzare con Node Red & SQL al fine di sviluppare le più svariate applicazioni (il limite è la fantasia HI). Node Red è un’ambiente molto potente e stabile e grazie al concetto di “nodo” ha il vantaggio di ridurre al minimo la programmazione (intesa come scrittura di codice) che è comunque disponibile usando il “nodo” Function. La “dashboard” è la pagina grafica (HTTP) attraverso la quale si interagisce con la nostra applicazione Node Red.
This application meets my needs of course, but IMO it may be a good and simple way to approach Node Red & SQL database so it may open the way to design further applications. Node Red is powerful and stable and thanks to its “Node” concept grants the advantage to reduce coding (if needed the node called “Function” is available for coding). To interact with a Node Red application there’s the “dashboard” (an HTTP page)
questo è il file esportato (stampato in .pdf per comodità di pubblicazione) / here’s a .csv exported file example
Descrizione / Description
Il funzionamento dell’applicazione è piuttosto semplice. Usando i controlli (pulsanti, listbox ecc) previsti nella pagina grafica di interfaccia (dashboard) si scelgono le azioni (ricerca, visualizzazione elenco per famiglie di componenti, modifica, elimina ecc) ed il flow si fa carico di inviare la query opportunamente costruita al database il quale esegue l’azione richiesta ed aggiorna la visualizzazione nella dashboard.
This application is pretty simple. By using dashboard controls (buttons, listbox etc) you choose the action you need (search, list by type, modify and so on) and the flow sends the appropriate built query to the database that does the job and refreshes dashboard with the result
Per la realizzazione di questa “applicazione” ho usato Node Red e MariaDB come database (database SQL parente di MySQL). Sia Node Red che MariaDB sono multipiattaforma (Windows, Linux, macOS) e questo aggiunge flessibilità. In questo articolo per semplicità di implementazione sia il server Node Red che il database si trovano entrambi sullo stesso computer, ma nel mio QTH il Node Red è su un computer mentre il database è su un’altro computer con Linux (Debian) che uso come server per altri servizi attivi h24. L’applicazione mostrata nel video è sostanzialmente una pagina web, quindi la si può aprire anche dal browser di uno smartphone (a condizione che siano stati adeguatamente settati i permessi di accesso al DB e sul computer che ospita Node Red)
To develop this application I used Node Red and MariaDB for database. Both of them are multi-platform (Windows, Linux, macOS) and this adds flexibility. To simplify the job in this article both Node Red and MariaDB are hosted on the local computer even if here at my home the database is hosted on a Linux (Debian) machine running h24 and Node Red is running on my Mac. The application you saw in the video above is actually a web page so you could use this application even from other devices such as iPad or smartphone browsers (of course permissions and securities must be properly set)
Per l’implementazione di questa “applicazione” sono richieste una basilare conoscenza dei database SQL ed un minimo di familiarità con Node Red. Inserisco comunque di seguito le indicazioni per installare/configurare MariaDB e Node Red al fine di agevolare l’installazione di Node Red e MariaDB.
To implement this application a basic knowledge in SQL database and a basic skill in Node Red are required. Anyway in this article I’m giving step by step instruction to let Node Red and MariaDB installation / setup easier as much as I can
NOTA importante: i nomi del database, della tabella e delle sue colonne sono richiamati dai nodi che li utilizzano per cui se si desidera modificarli occorre modificare di conseguenza anche il flow
Important REMARK: database, table and columns names are built also into the flow nodes using them, so if you’d like to change any name you’ll have to touch the flow accordingly
Installazione di MariaDB /
MariaDB installation
MariaDB è gratuito e scaricabile dal sito https://mariadb.com/downloads/ (ovviamente selezionare la versione idonea per il proprio sistema operativo). Durante l’installazione verrà chiesto di inserire una password (io ho scelto 123456) e la porta TCP attraverso la quale sarà possibile raggiungere il database (lasciare 3306 come da default). Lasciare attivata la funzionalità “Install as service” in modo che MariaDB si avvii al boot.
MariaDB is free and downloadable here https://mariadb.com/downloads/ (choose version for your operating system of course). During installation you’ll be asked to set a password (123456 in my installation) and TCP port the database will use over networking (leave default 3306). By leaving checked “Install as service” MariaDB will start automatically after a reboot

Installazione di Node Red /
Node Red installation
Per installare Node Red fare riferimento a questo sito https://nodered.org/docs/getting-started/local ed in particolare in funzione del proprio sistema operativo alle indicazioni riportate in alto
To install Node Red follow instructions you’ll find here https://nodered.org/docs/getting-started/local and depending on which operating system you’re running open the link indicated by red arrows

ad esempio per l’installazione su Windows ci si troverà in questa pagina https://nodered.org/docs/getting-started/windows . ATTENZIONE non dimenticare di fare in modo che Node Red si avvii automaticamente al boot e per fare ciò seguire le indicazioni del paragrafo “Run Node-RED on Startup” situato in fondo alla pagina https://nodered.org/docs/getting-started/windows
If you’re going to install under Windows you’ll be directed to this page https://nodered.org/docs/getting-started/windows . ATTENTION don’t forget to make Node Red automatically restarting after a reboot and to do this follow “Run Node Red on startup” paragraph at the bottom of this page https://nodered.org/docs/getting-started/windows
Download dei files / Files download
Questo è il flow da scaricare e da importare in Node Red / This the flow to be imported onto your Node Red
Al fine di testare l’applicazione partendo con un database popolato questo è il “dump” del mio database. Terminata la fase di test ognuno potrà cancellare i miei componenti (manualmente o se pratico di SQL con un semplice comando) ed inserire i propri
With the purpose to test the application started with a populated database here you’ll find a “dump” of my database. After test finished you’ll have to manually delete (button Delete) each one of my components (if you are skilled with SQL you can of course empty the DB in one shoot)
Setup del database MariaDB /
MariaDB database setup
operazione da fare all’installazione, non sarà più necessaria successivamente / this operation is required once only at first installation
Avviare la console MariaDB console usando / start MariaDB console

inserire la password per MariaDB indicata durante l’installazione (nel mio caso 123456) / digit password you set during MariaDB installation (123456 in my case)

a questo punto si aprirà la console di MariaDB / here is MariaDB console
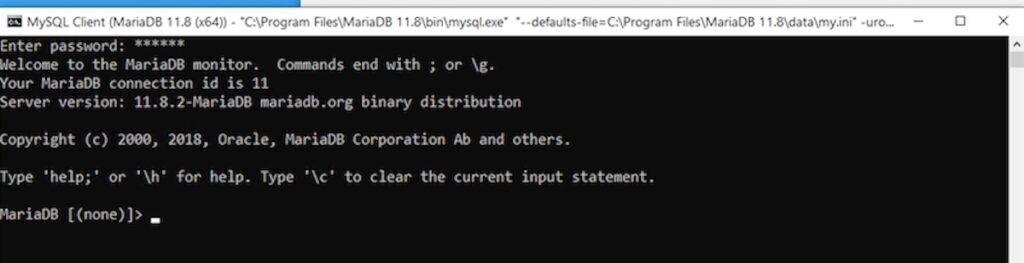
scaricare dal mio sito e salvare sul computer il file: HAM_ik1bxn-components.sql
download and save somewhere in your filesystem the file: HAM_ik1bxn-components.sql
dal prompt di MariaDB digitare il comando / from MariaDB prompt digit the command
CREATE DATABASE IF NOT EXISTS EL_Components;

a questo punto abbiamo creato il database EL_Components che però è vuoto. Importiamo quindi il dump del mio database
now we have created the database (empty) and it’s time to import my dump file
Chiudere la console di MariaDB digitando il comando / close MariaDB console with command
quit
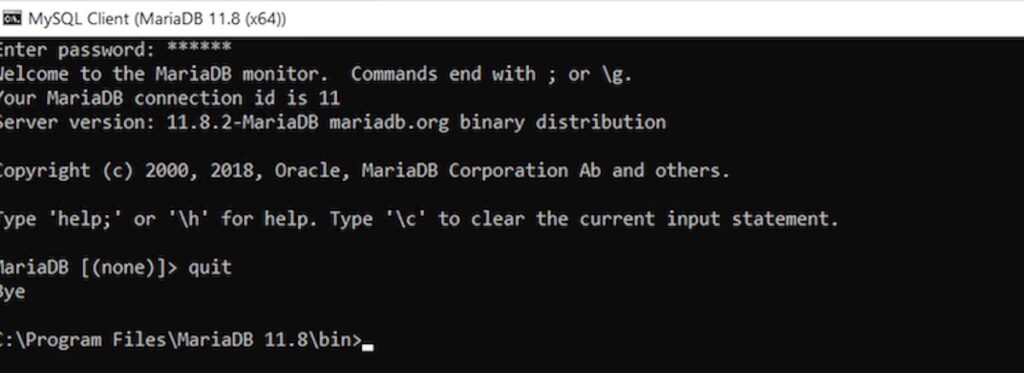
dalla riga di comando digitare il comando (PRIMA modificando il path per raggiungere il file scaricato HAM_ik1bxn-components.sql)
from the prompt digit the command (BEFORE sending command adapt path to your downloaded HAM_ik1bxn-components.sql)
mariadb -u root -p EL_Components < \Users\ik1bx\Desktop\MariaDB\HAM_ik1bxn-components.sql
inserire la password per MariaDB indicata durante l’installazione (nel mio caso 123456) e se non vengono segnalati errori tornerà il prompt
digit the password you set during MariaDB installation (123456 for me) and if everything will be OK the console will return to the prompt

verifichiamo che l’importazione del dump sia andata a buon fine. Avviamo nuovamente la console con il comando mariadb -u root -p e digitiamo la password (123456 nel mio caso)
let’s check now if dump importing is really OK. Start MariaDB console (we closed it before) by sending the command mariadb -u root -p and digit the password (123456 for me)

spostiamoci sul nostro database con il comando: USE EL_Components;
make EL_Components database active with the command: USE EL_Components;

nel database EL_Components c’è solo la tabella Components, possiamo verificarlo con il comando SHOW TABLES;
EL_Components database contains 1 only Table, we can check it sending the command SHOW TABLES;
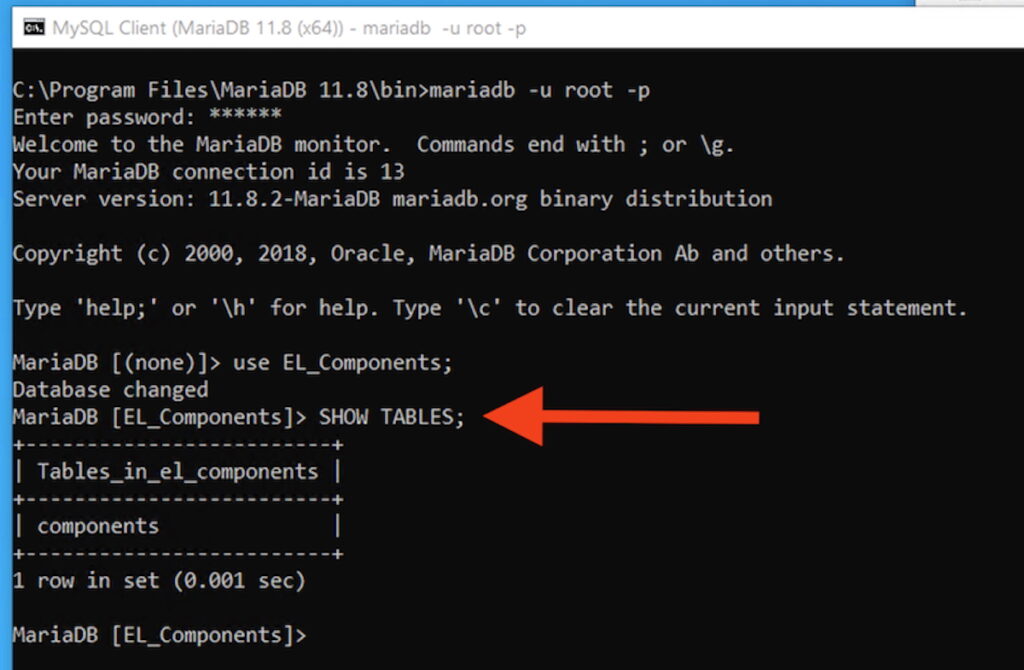
possiamo vedere la struttura della tabella components con questo comando: SHOW COLUMNS from Components;
let’s now have a look on how table Components is structured with this command: SHOW COLUMNS from Components;

per verificare che il database sia popolato digitiamo il comando: SELECT * from Components;
let’s check now if the database is populated by sneding command: SELECT * from Components;
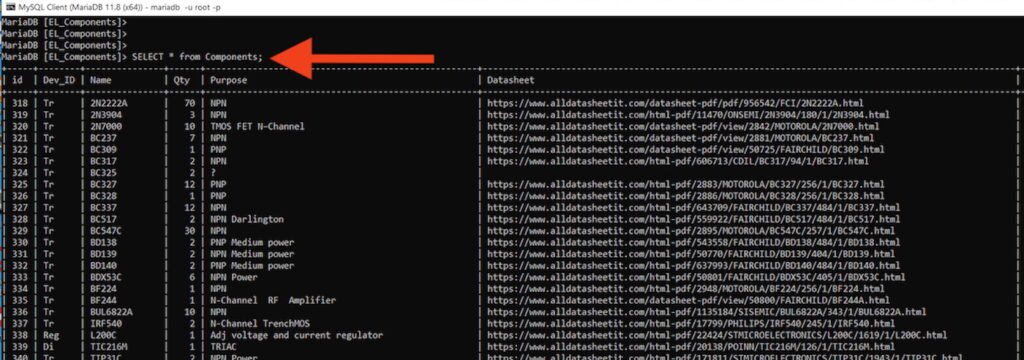
ora occorre sistemare l’accesso al database. Per farlo creiamo utente HAM_User con password password per accedere al database da Node-Red digitando il comando: CREATE USER HAM_User@localhost IDENTIFIED BY ‘password’;
now we need to setup a user to access the database. It will be username HAM_User with password password. To create this user we’ll send the command: CREATE USER HAM_User@localhost IDENTIFIED BY ‘password’;

verifichiamo che l’utente HAM_User sia OK con il comando: show grants for HAM_User@localhost;
check the user just created is OK using the command: show grants for HAM_User@localhost;

diamo i privilegi di accesso all’utente HAM_User con il comando: GRANT ALL PRIVILEGES ON *.* to ‘HAM_User’@’localhost’ WITH GRANT OPTION;
now we need to set permissions for HAM_User and the command to send is: GRANT ALL PRIVILEGES ON *.* to ‘HAM_User’@’localhost’ WITH GRANT OPTION;

A questo punto il database è pronto per essere utilizzato dall’applicazione Node Red
Finally the database is ready to be used by Node Red application
NOTA / REMARK: l’utente HAM_User e relativa password è scritto nel nodo database / user HAM_User and its password are indicated in the database node

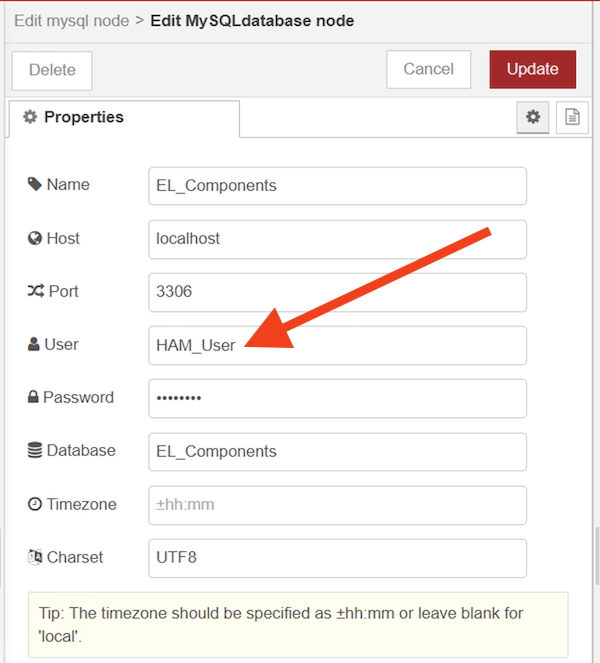
Importazione del mio flow in Node-Red /
Import my flow into Node Red
Apriamo l’interfaccia di Node Red con il browser / with browser open Node Red interface
http://localhost:1880/
seguiamo i seguenti passaggi / follow here below steps

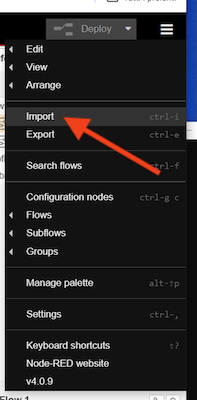
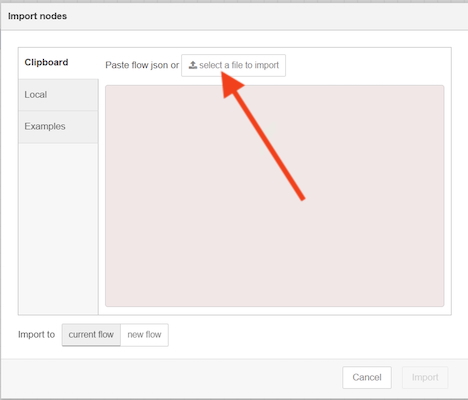
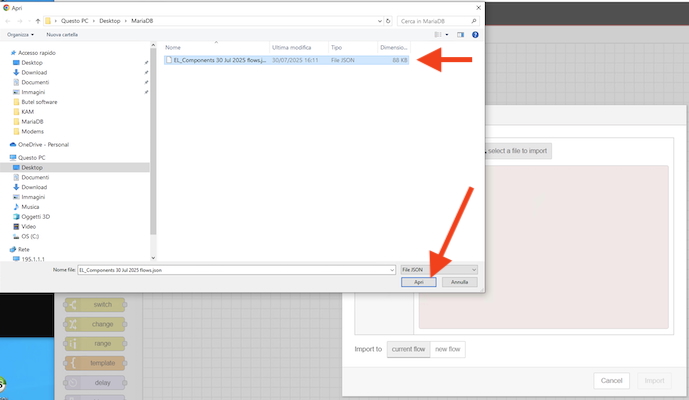
selezionariamo il file EL_Components 4 August 2025 flows.json scaricato premere Apri
select the file EL_Components 4 August 2025 flows.json you downloaded and press Open
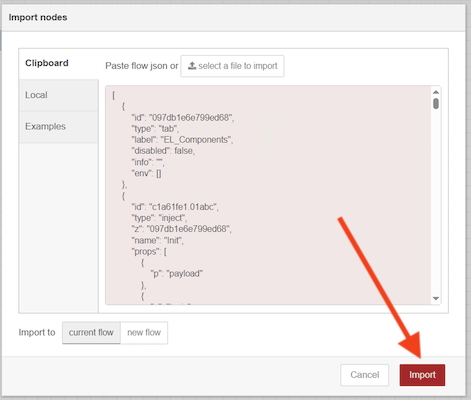
a questo punto nell’interfaccia di Node Red abbiamo un TAB nuovo
at this point into our Node Red workspace there’s a new TAB
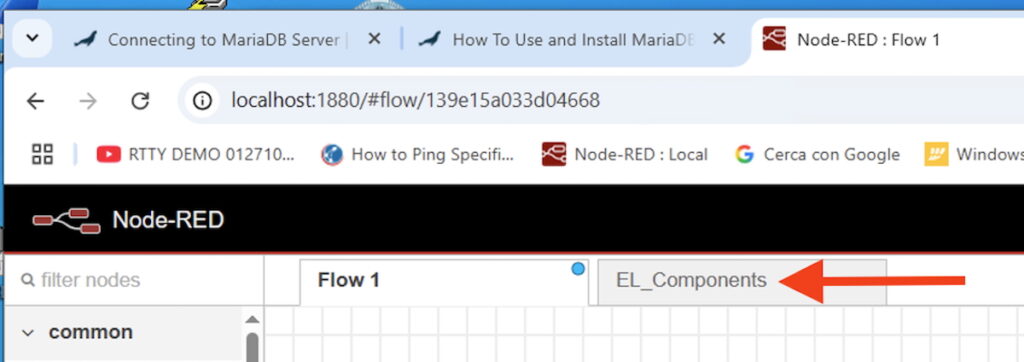
andando su EL_Components premendo il pulsante Deploy (ovvero la messa in linea del nostro flow)
click on EL_Compnents TAB and press Deploy

riceveremo un elenco di “nodi” sconosciuti alla nostra installazione di Node-Red (all’installazione Node Red installa un set di nodi basilare)
we’ll get a list of “unrecognized types” and Deploy fails (Node Red during installation has a basic node set)

dovremo quindi aggiungerli / let’s add missing nodes
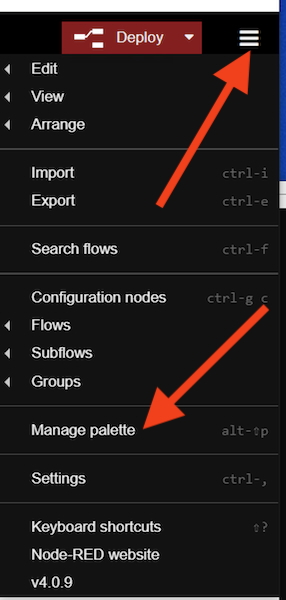
questo è l’elenco dei “nodi” che devono essere installati affinchè il Deploy non dia errori
here is the list of nodes required by this application (the “node-red” is already installed of course)
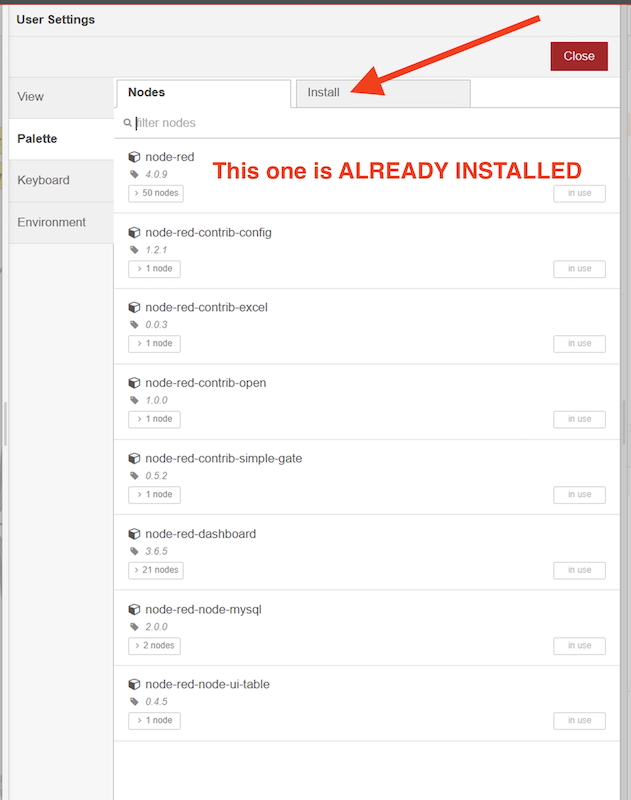
per aggiungerli premere il Tab Install e digitare il nome di ciascun nodo (nell’esempio il nodo excel)
press Install TAB and write the name of a missing node (one at a time) in the example I’m adding “excel” node
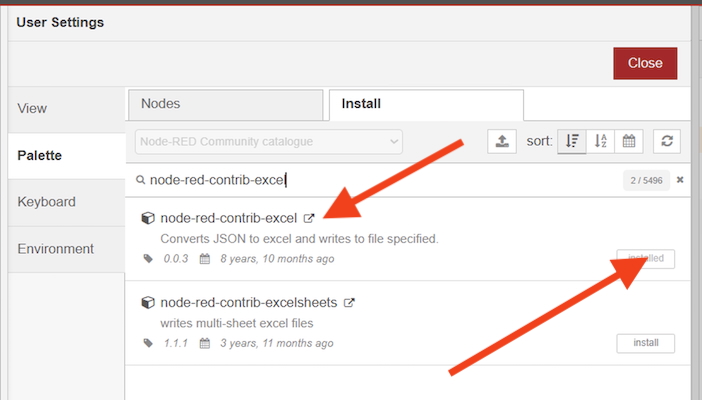
premere il pulsante Install per installare il nodo node-red-contrib-excel
press “Install” to install node-red-contrib-excel onto your Node Red
Ripetere l’operazione per tutti i nodi mancanti.
Repeat step for each missing node
Terminata l’installazione di tutti i nodi mancanti premendo il pulsante Deploy non darà più errori
When you’ve completed missing nodes installation press Deploy button and no more errors will come

a questo punto possiamo aprire col browser la dashboard all’indirizzo indicato (attenzione a /ui/ finale) che probabilmente apparirà con i colori sballati (perchè io ho settato lo stile “Dark”)
at this point we can open using the browser the dashboard at the address here below (pay attention to the /ui/ at the end) and probably will have dashboard in a color mess (because I use “dark”Dark” style)
localhost:1880/ui/

per sistemarla seguire i seguenti passaggi / to fix it follow below steps

ecco la dashboard della nostra applicazione / here is our application dashboard
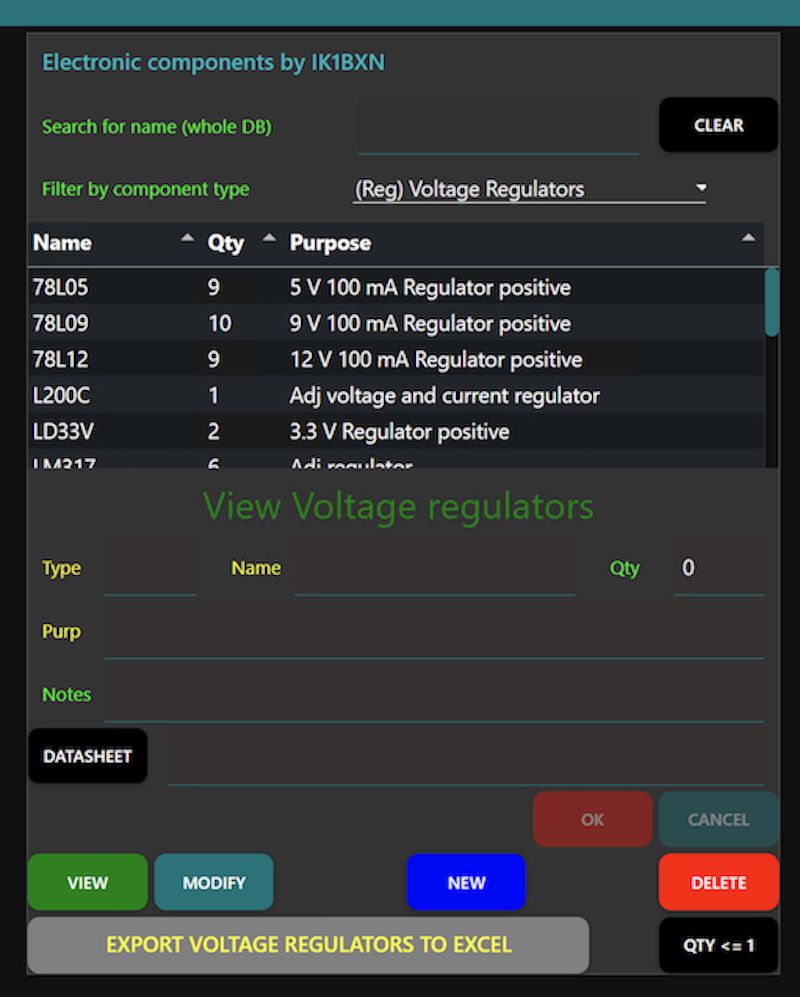
c’è ancora qualcosa da sistemare / one more thing must be touched
Relativamente al pulsante “Export…” occorre adeguare il path dove il file .csv esportato verrà salvato ! Importando il mio flow troverete il mio path (del Mac) che non sarà certamente valido sul vostro computer. Per adeguarlo alla vostra situazione occorre aprire mediante doppio click il nodo “build filename”
With reference to “Export…” button you need to touch the .csv exported file saving path ! This because in the downloaded flow you’ll find my path in use here on my Mac and it will be wrong for your filesystem. To adapt the path to your situation you have to touch “build filename” node properties (by double clicking the node)
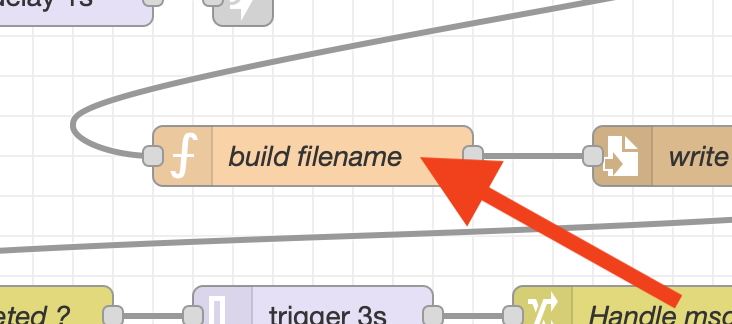
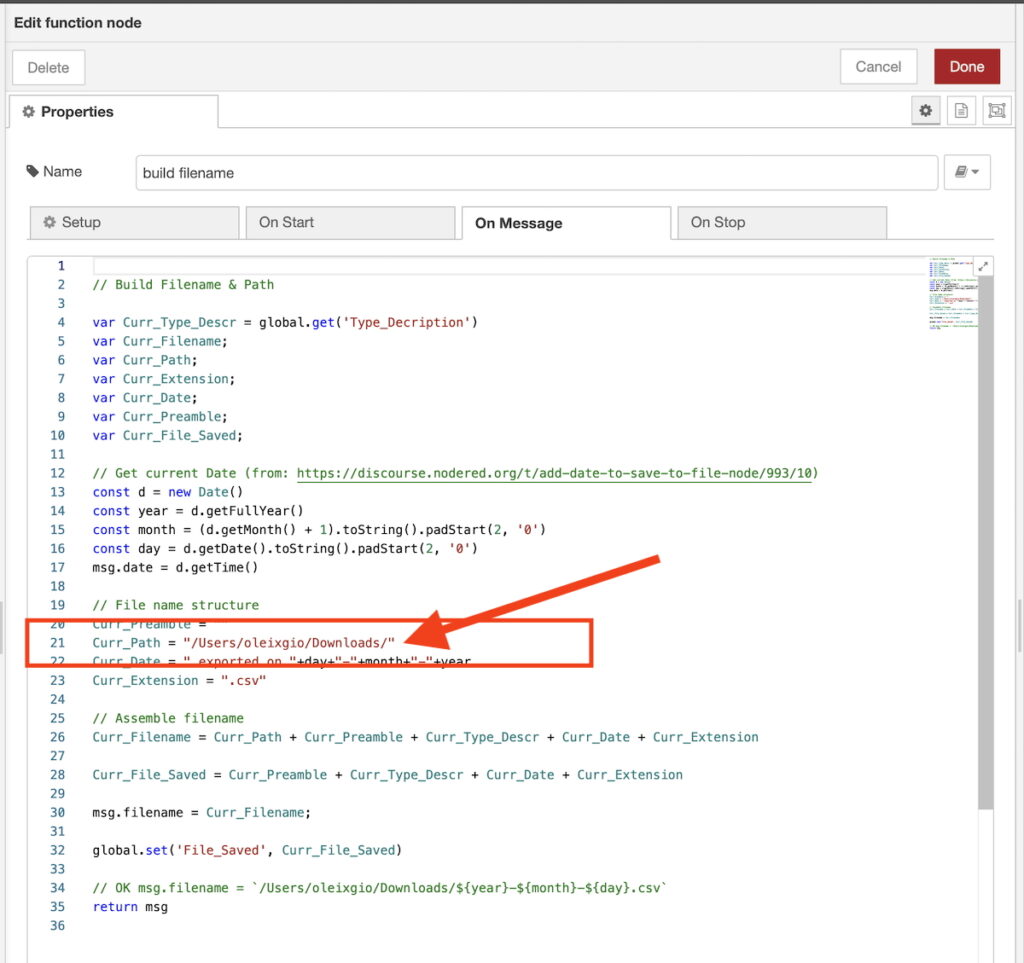
ed adeguare il path coerentemente al vostro computer. Completata la modifica eseguire il Deploy
and adapt the path by modifying Curr_Path variable content as highlighted by the red arrow. After modification press Deploy button (top right screen corner) to actualize changes
….. that’s all folks ! Have fun
TU 73 de Giorgio IK1BXN
mail to : ik1bxn@ik1bxn.it
